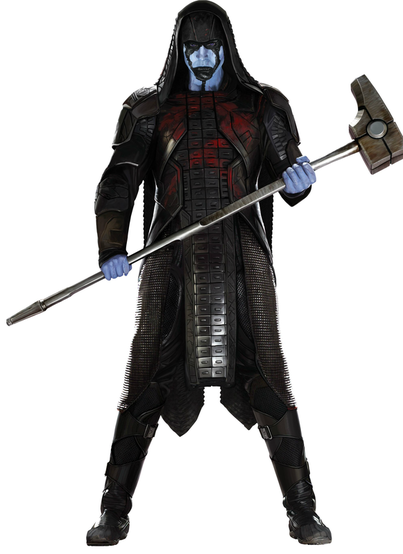
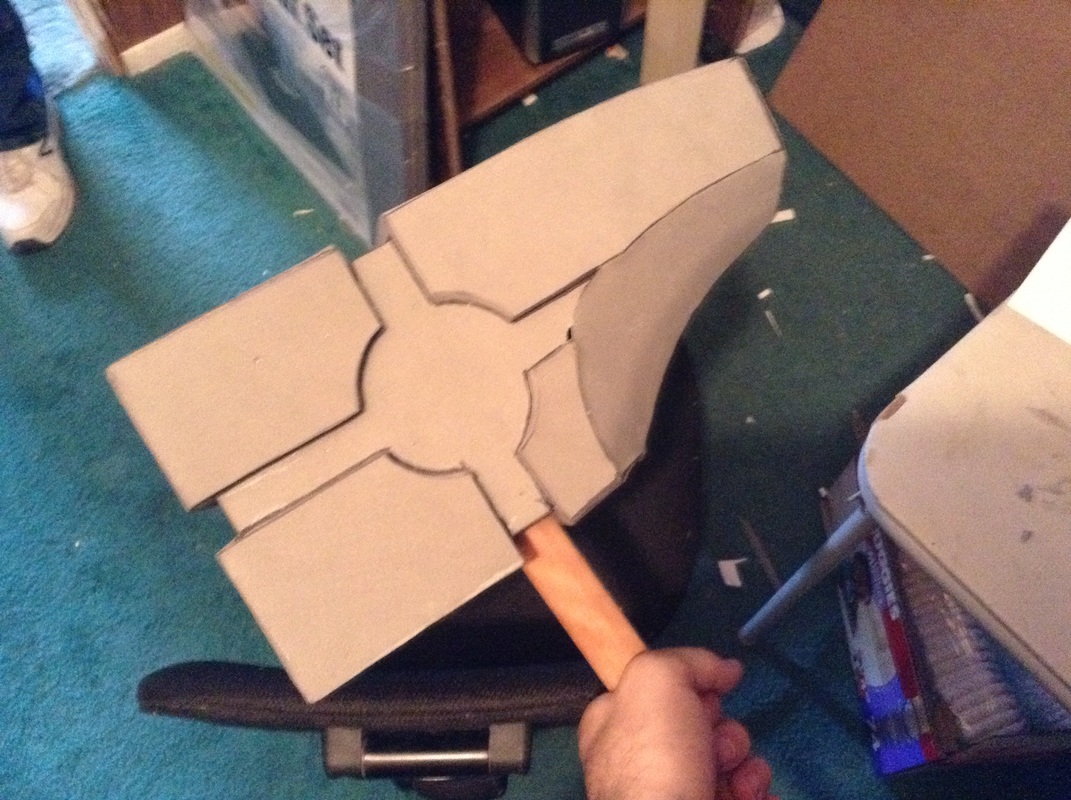
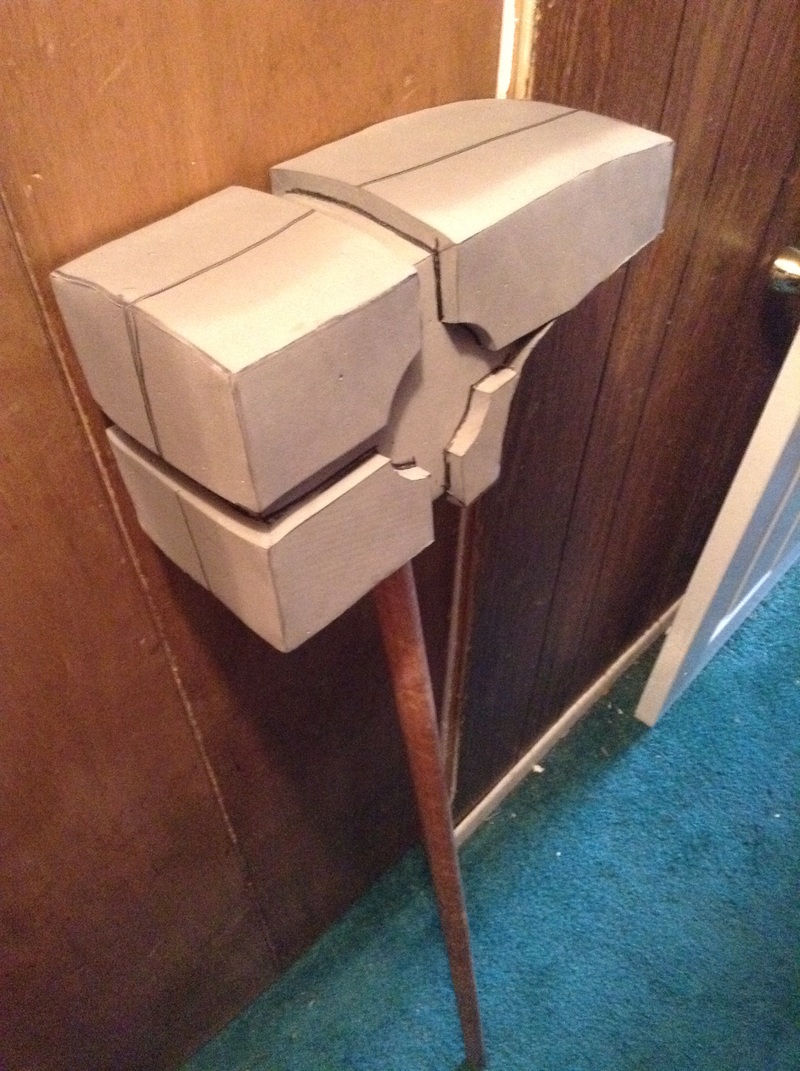
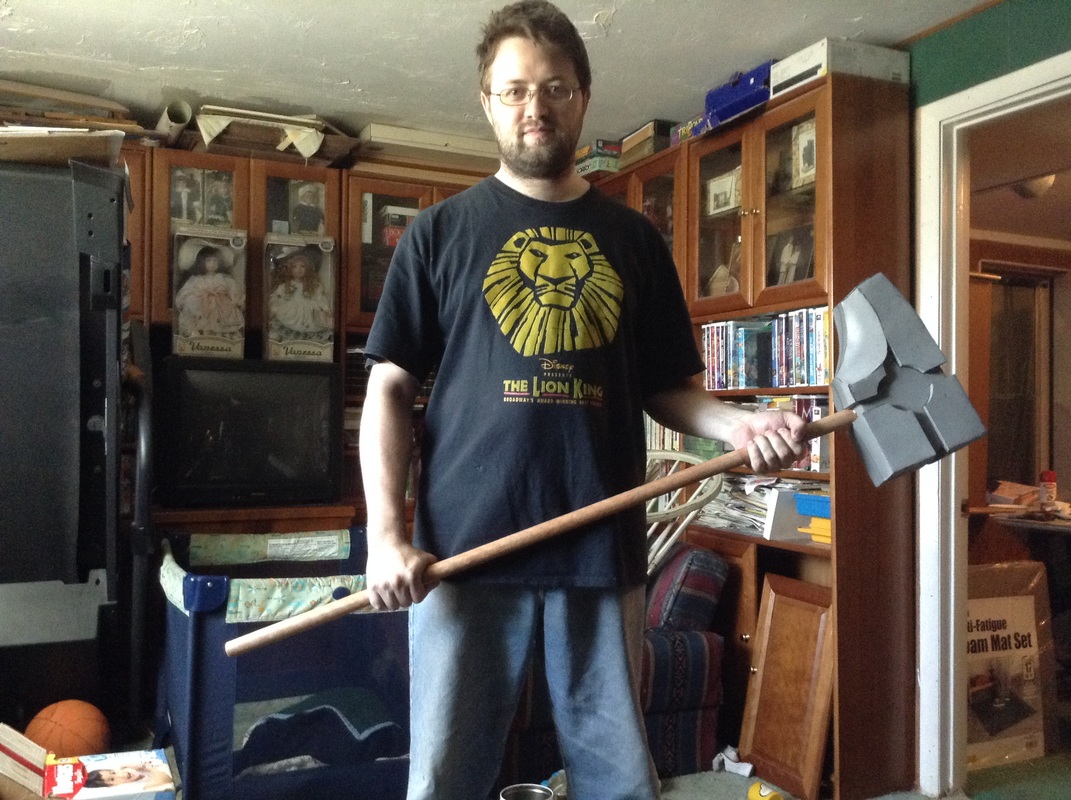
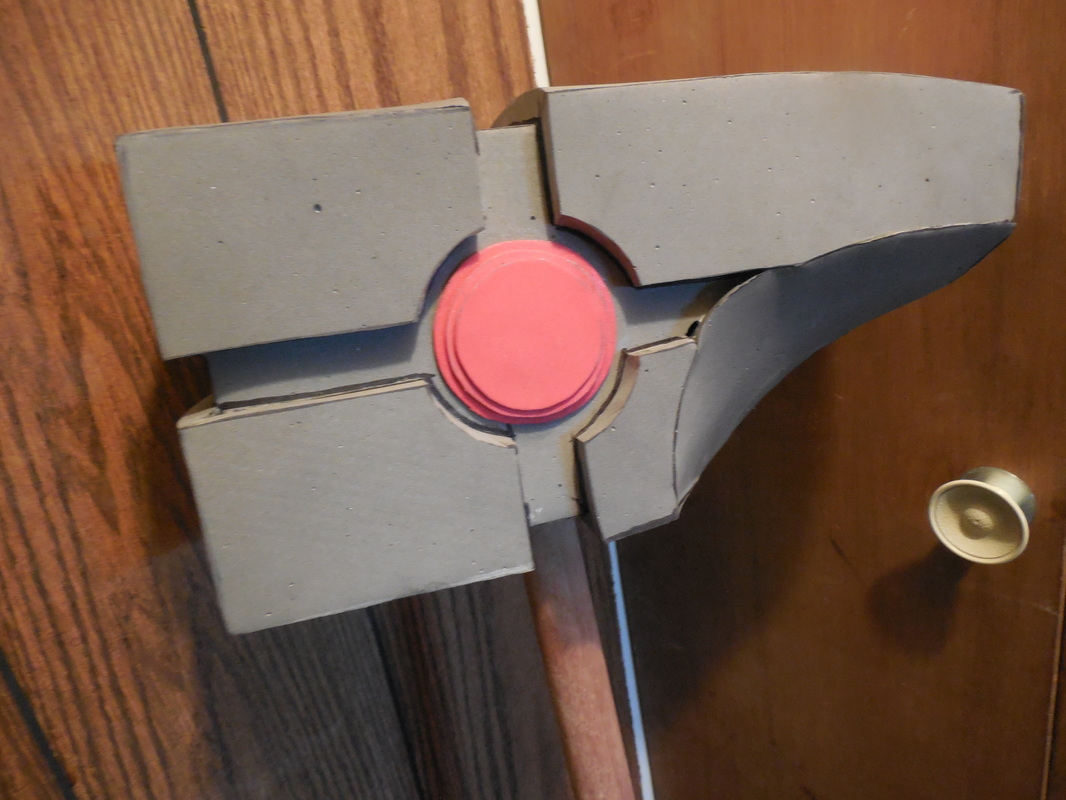
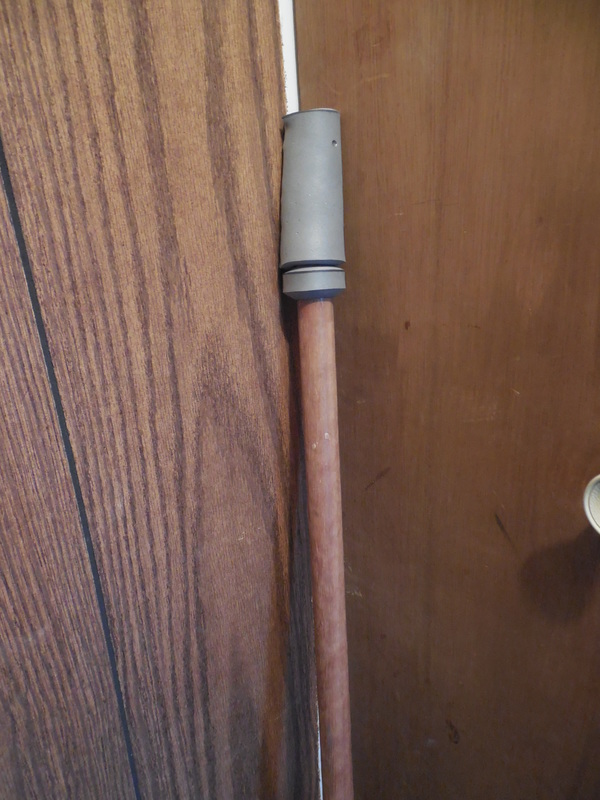
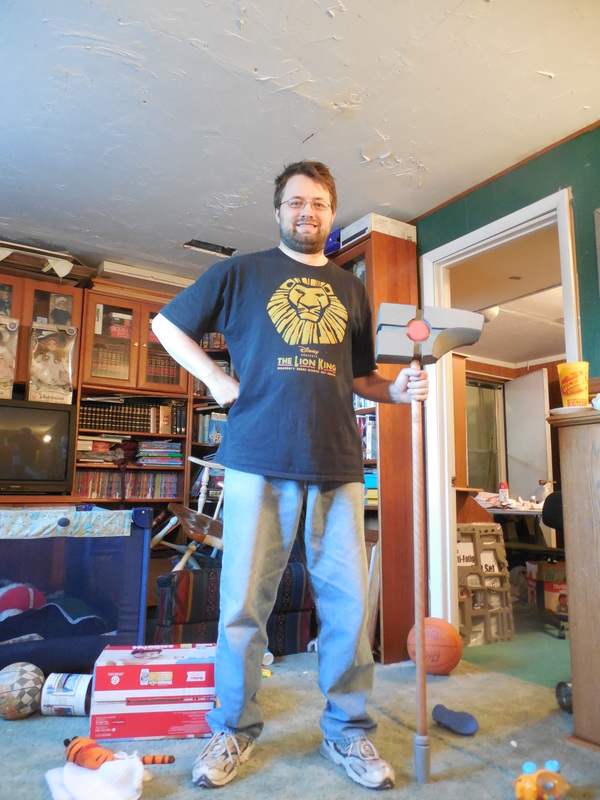
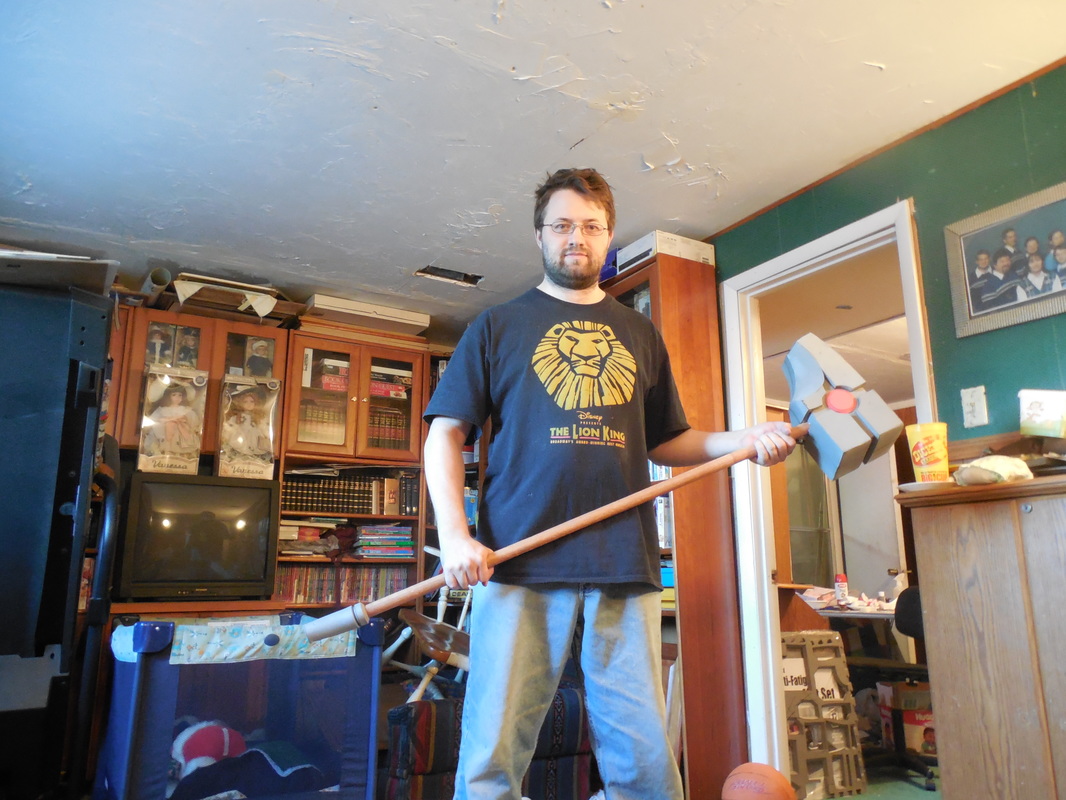
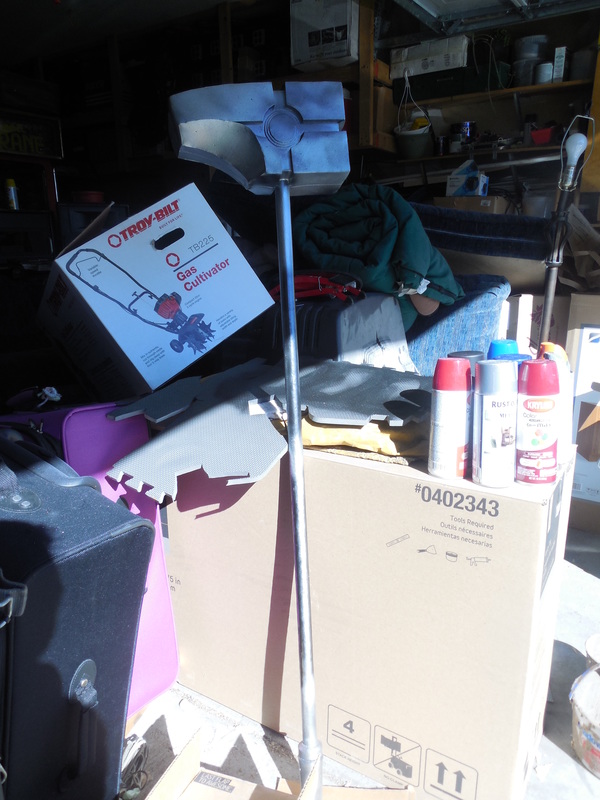
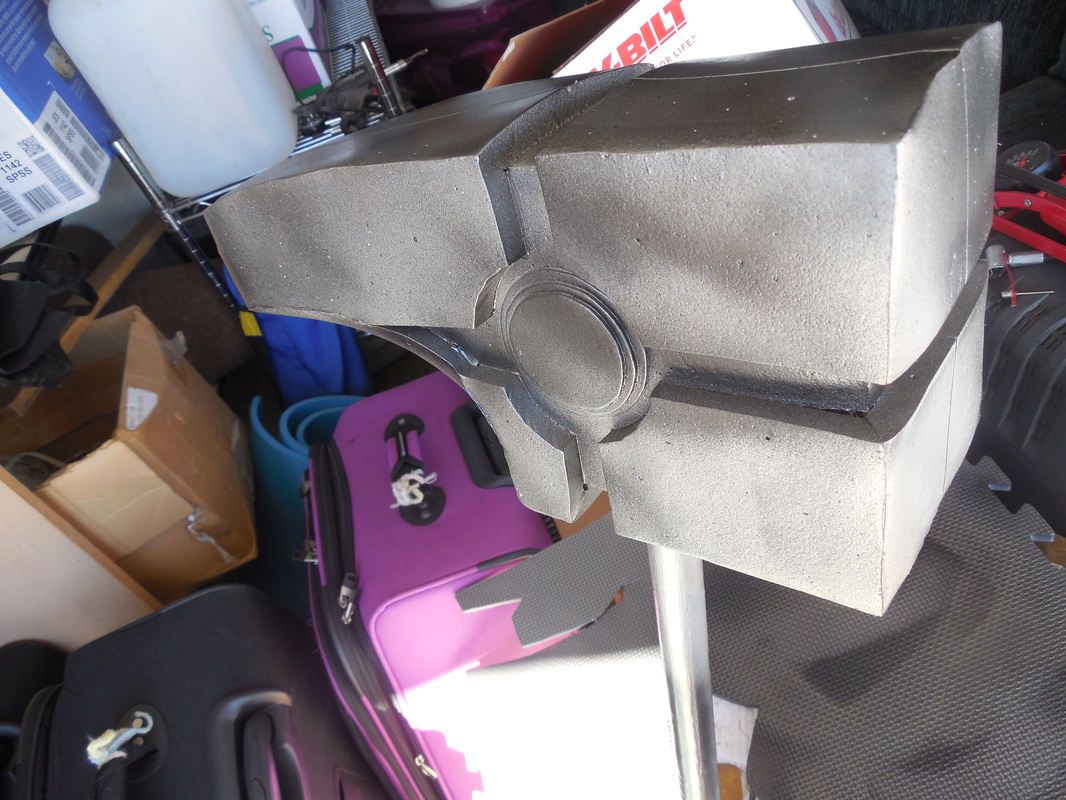
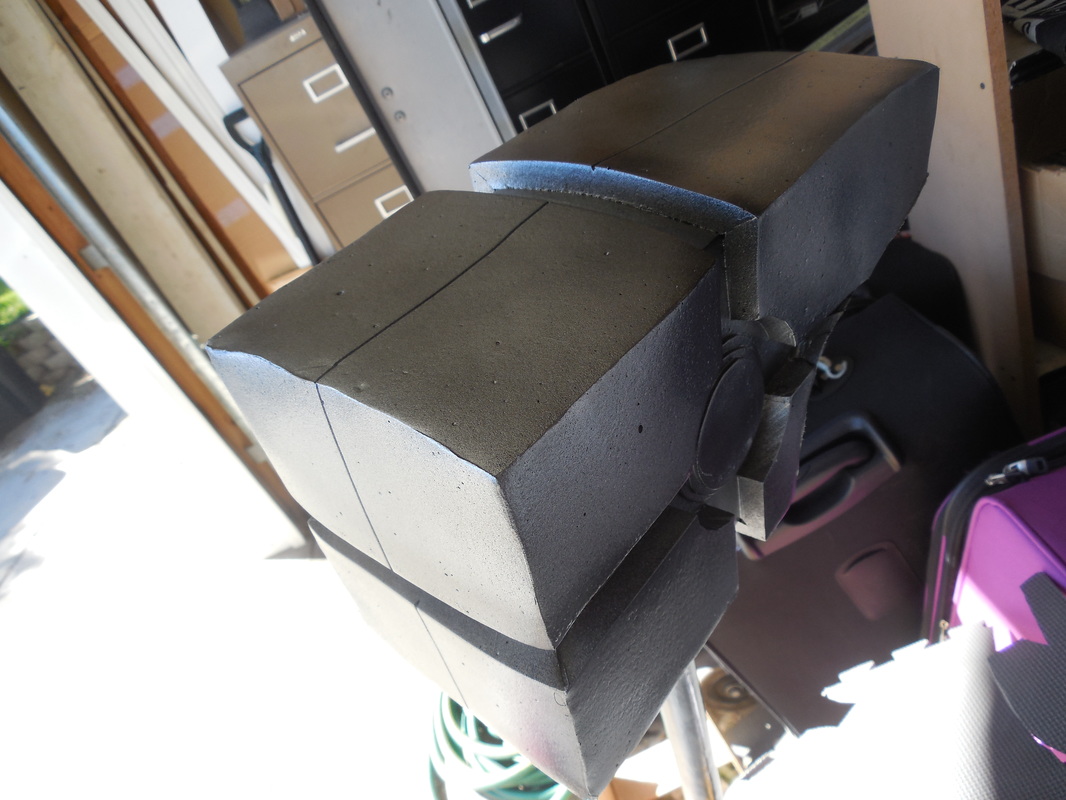
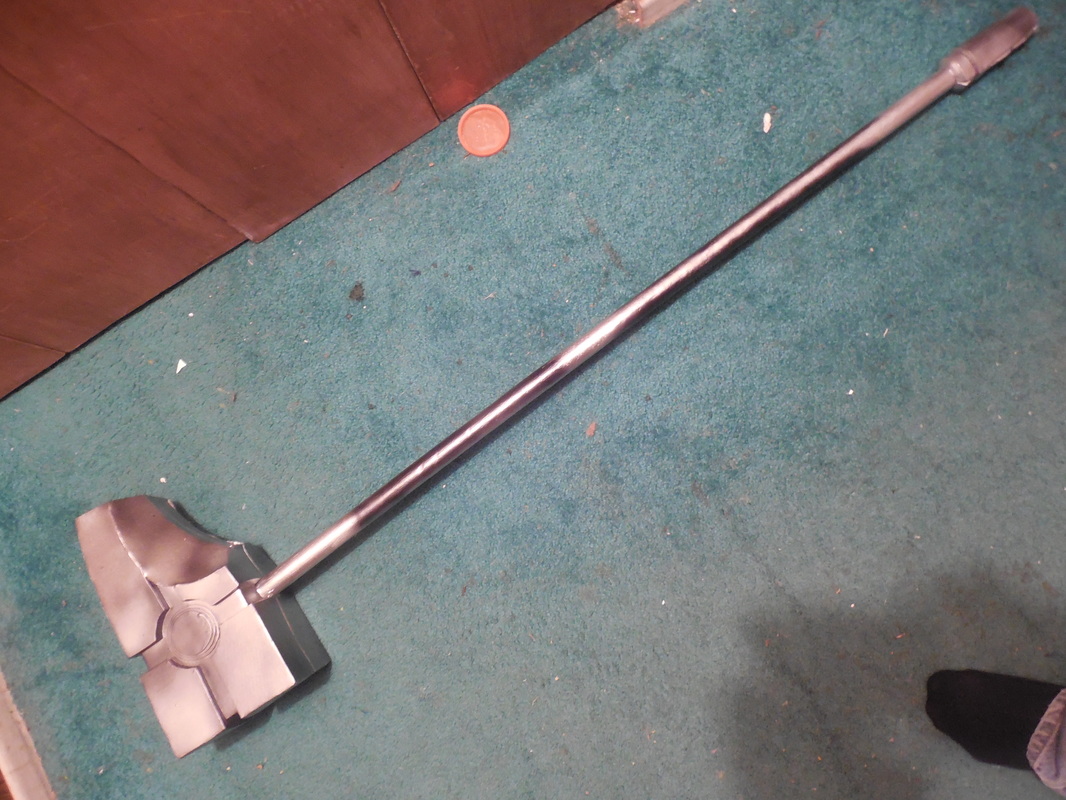
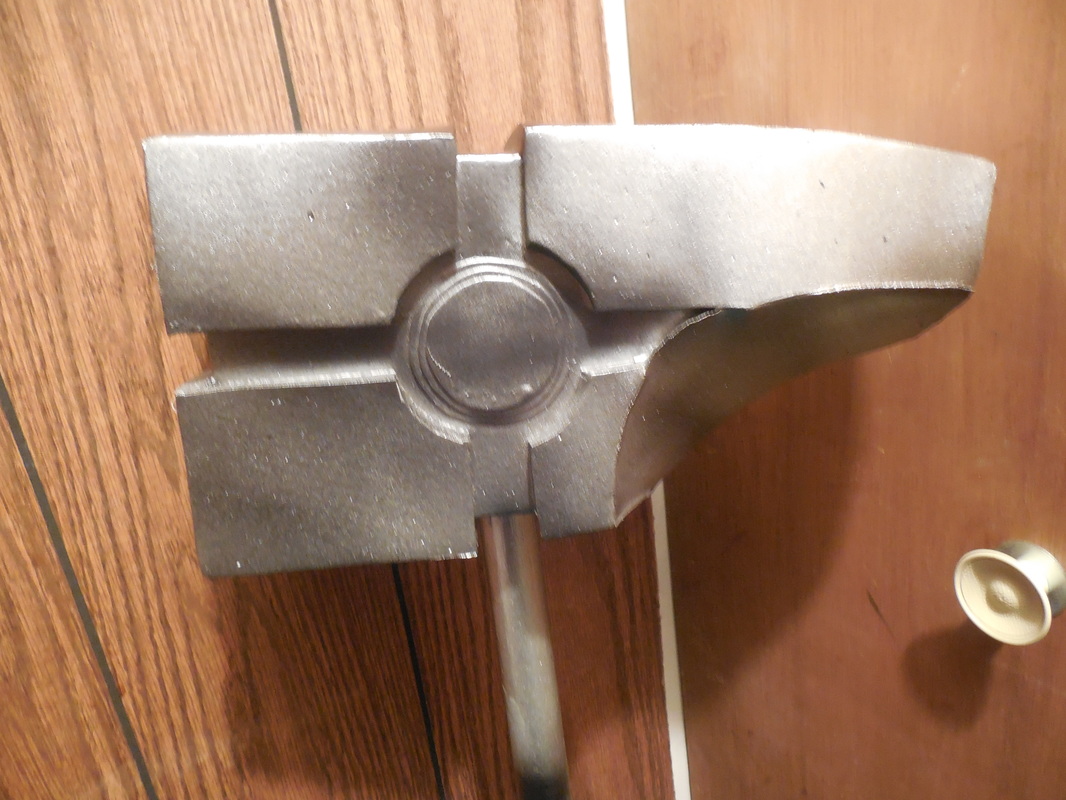
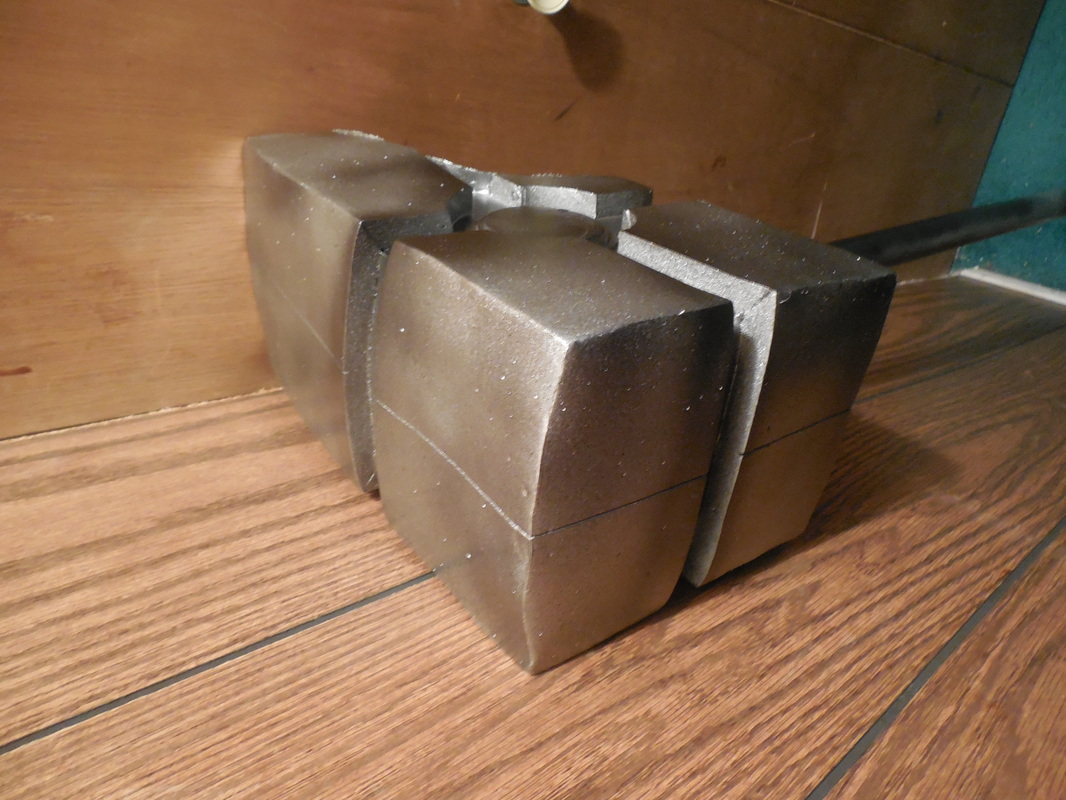
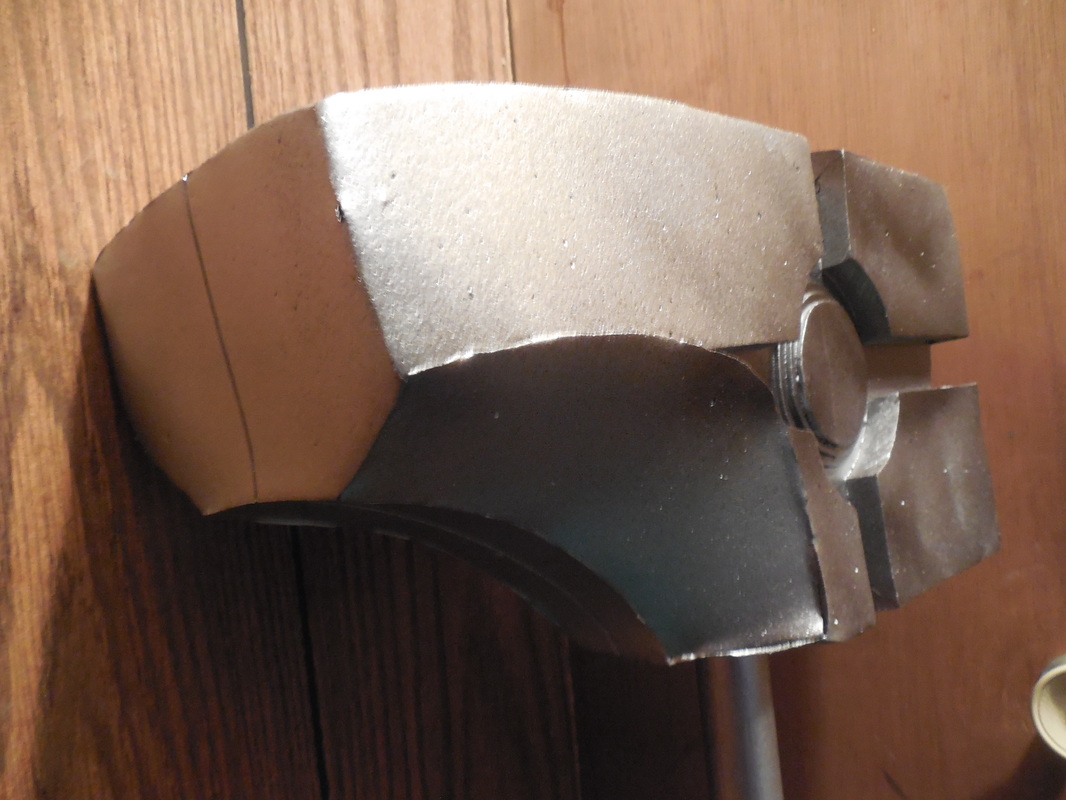
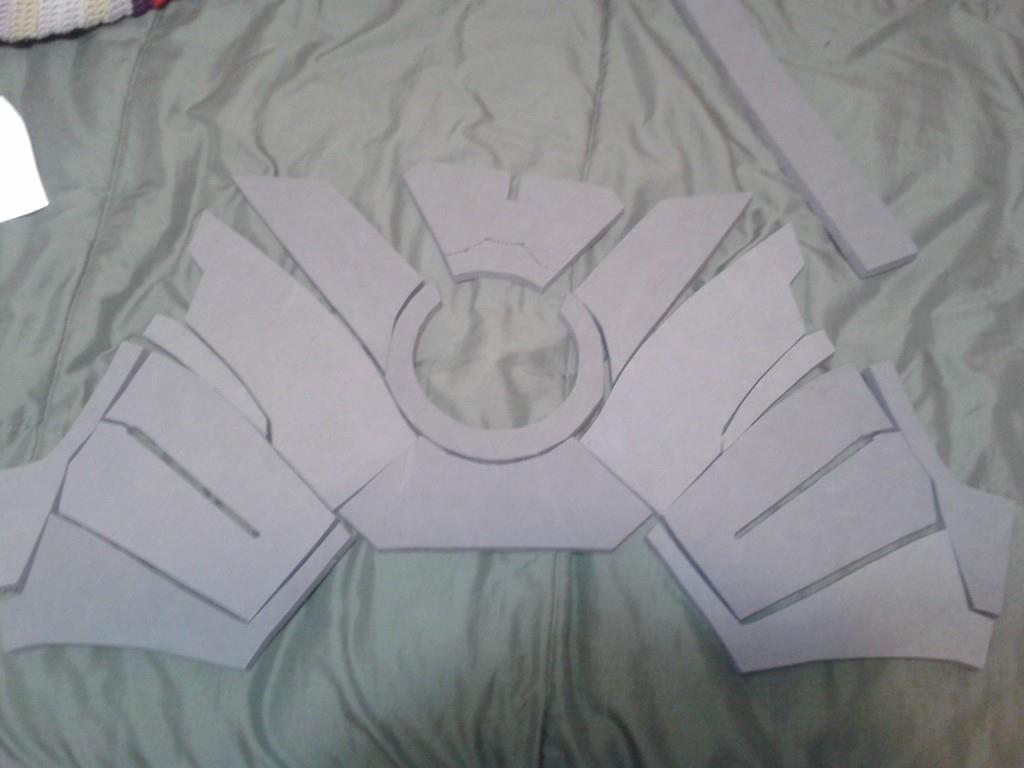
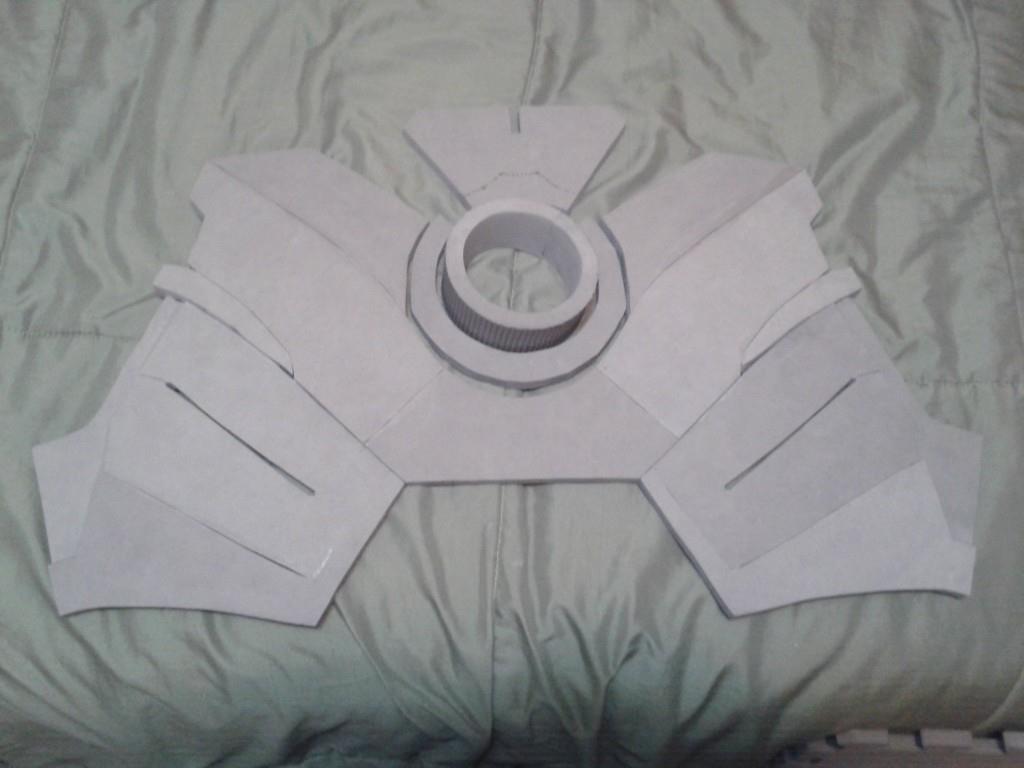
 The final of the mass cram session before Anime Banzai, to give me a wide variety of things to show. Only had a few days left, so I couldn't make this as correct as I could, but for a speed build I think it turned out great! Let's get started. I started out by making a blueprint of the hammer head, so that I could size it out to the staff I was going to use. 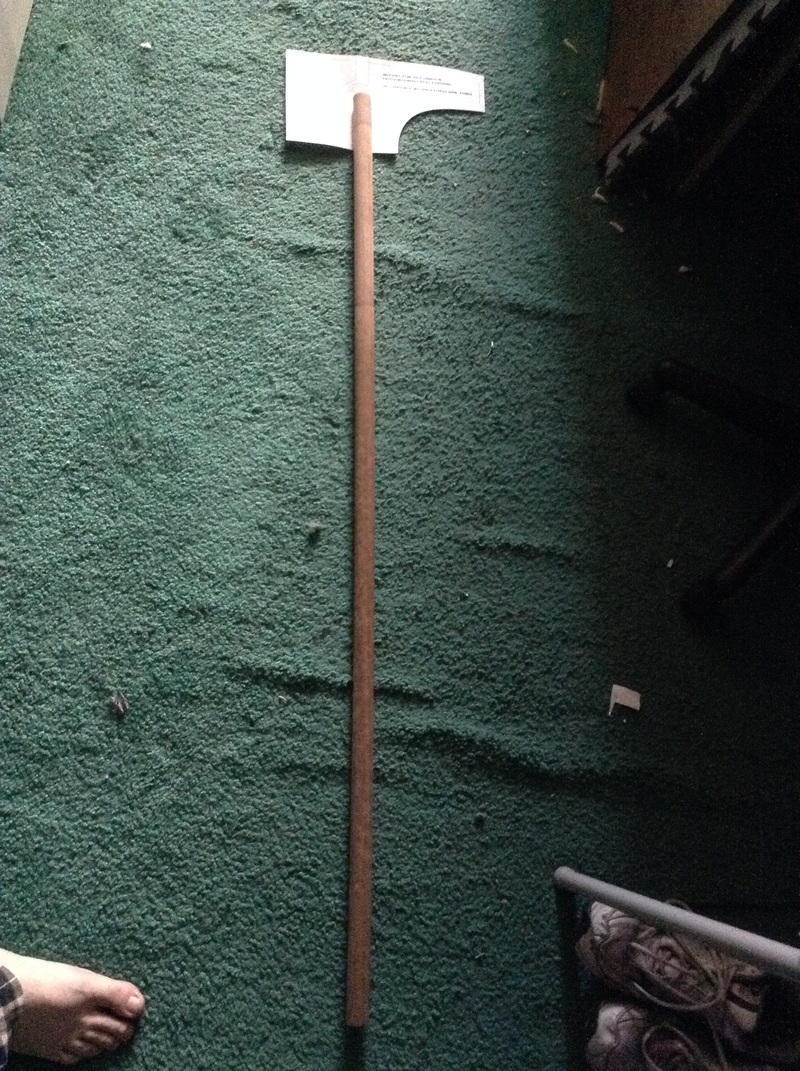 The staff is a 1.25" dowel, four feet long - a remnant of back when I was part of a medieval sword fighting group. That means it's got the scars of battle behind it, what with all the dings and dents! Perfect height for the warhammer. The hammerhead may look small in this shot, but I didn't have anything to scale it to nearby. Once the scale was set, I started cutting parts out! 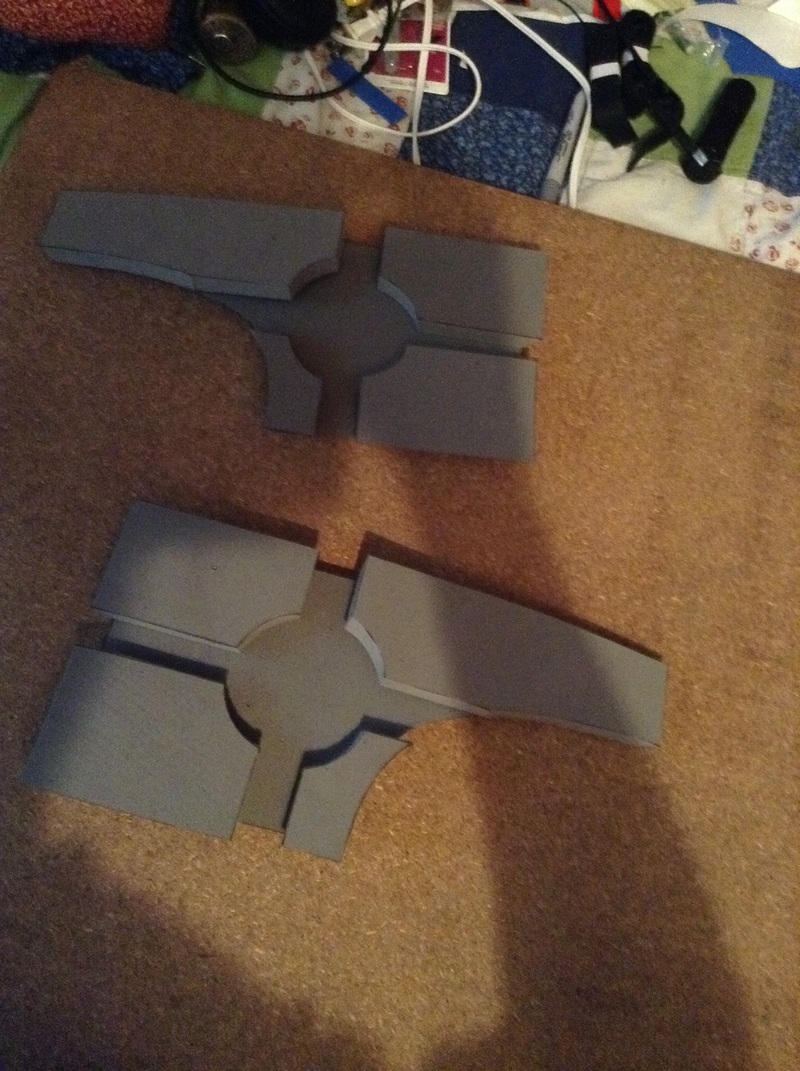 I did the hammerhead in two full layers: the inner support layer, and the outer detail layer. Both were the 1/2" floor mat foam. Once the side sections were cut out, I started making the three dimensional parts - that is, making a whole bunch of boxes! 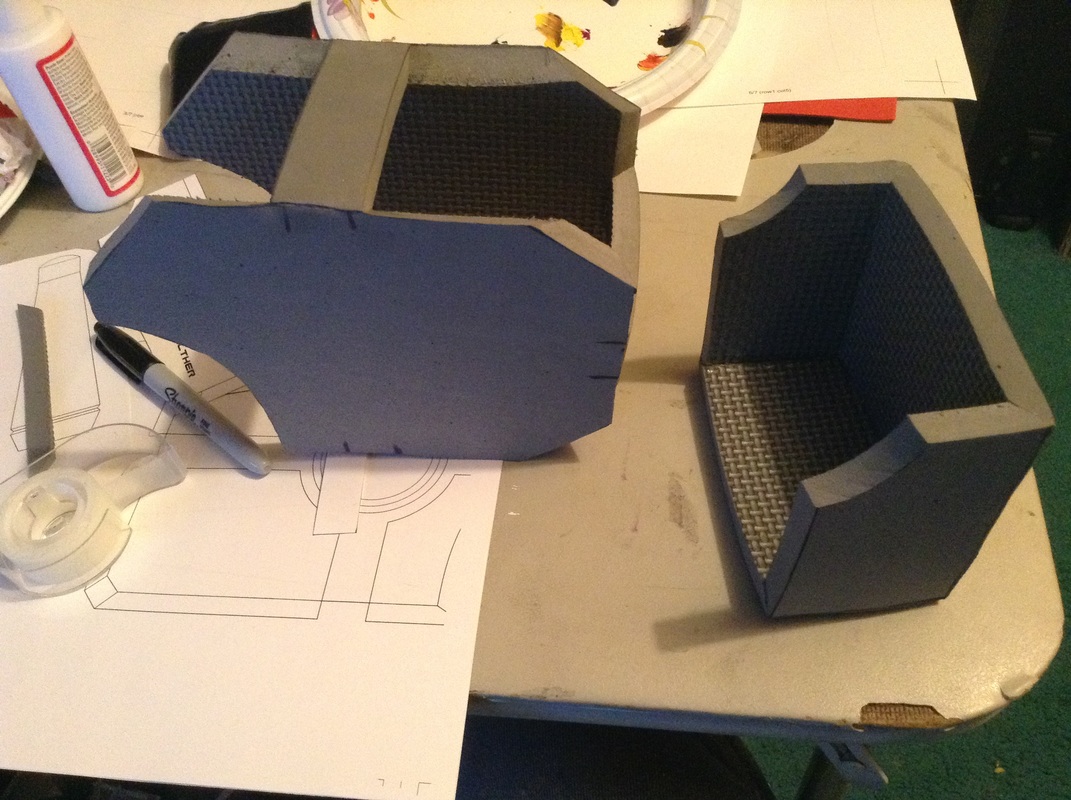 I marked off where each outer layer piece would sit, then made a strip a little wider than the marking for the inner track to support everything. Then I assembled the inner box and used that as a guide to freehand the sections to attach the outer details together. Worked like a charm! 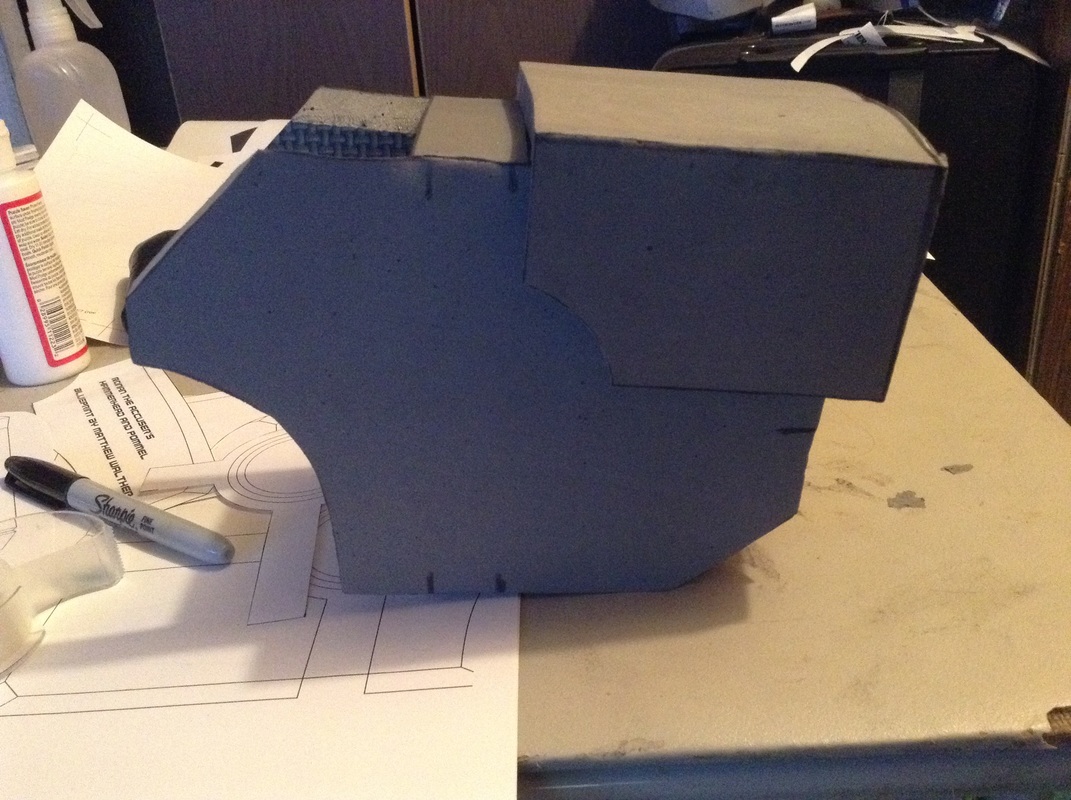 The upper back area has a curve, which meant interesting measurements to get everything to fit right. In the end it worked great though. 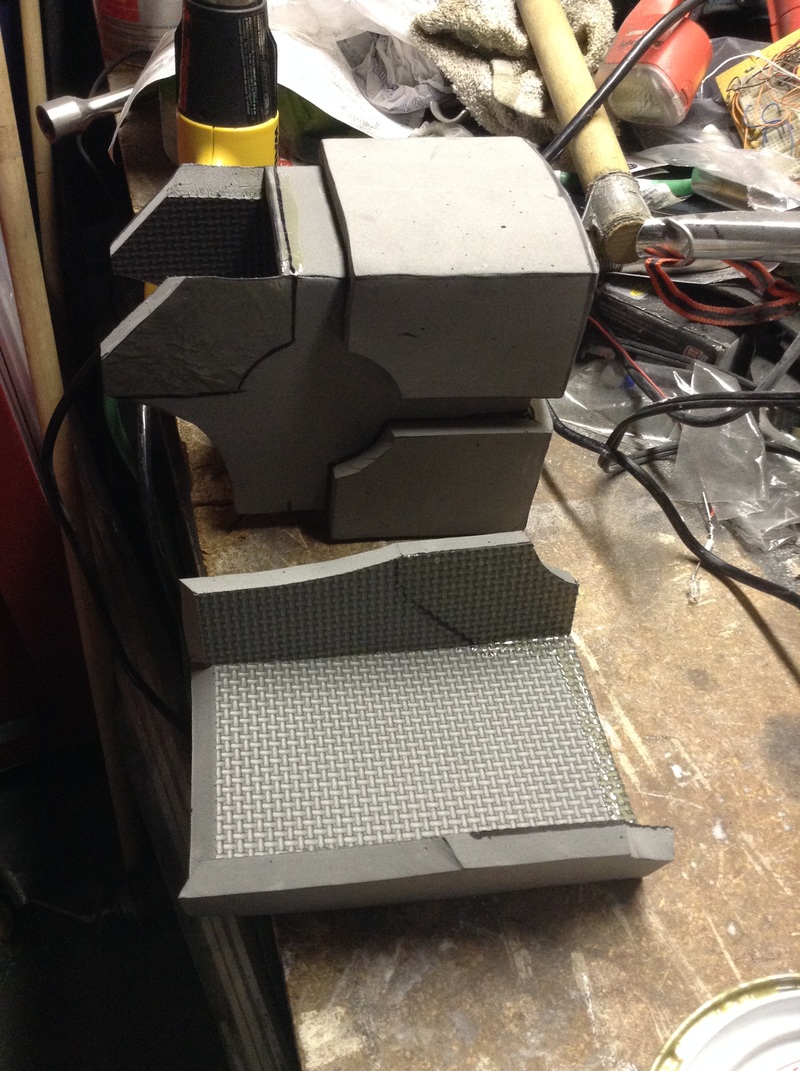 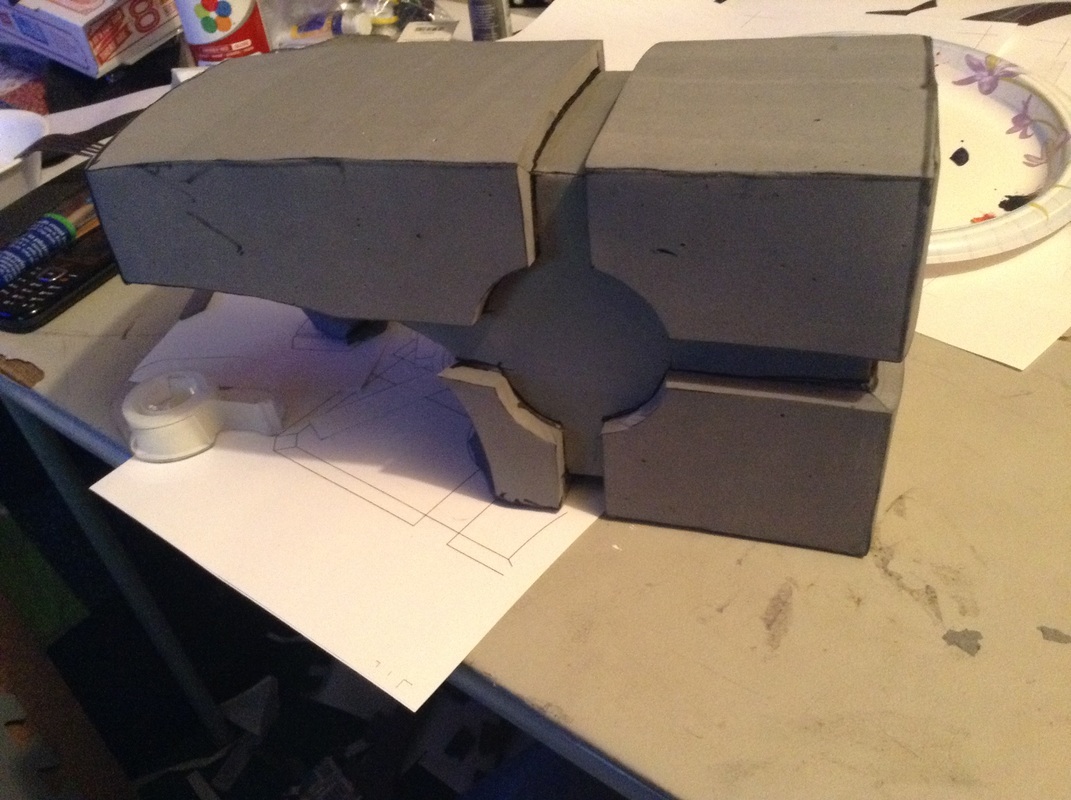 The last section was the most difficult, as it wasn't just one flat area - it was three. Two angled in and curved from the sides, and one final piece that connected it all at the back. And all that connected to an odd shaped piece in the very back for the hammer's claw. For this, I made the back and bottom piece to the shape I wanted, then attached them and used the opening to trace the shape I needed. After that it was a simple thing to cut it out and give it a slight curve with the heat gun, though gluing it was an absolute pain.... Got those on, traced and cut a hole for the staff, and hot glued that right in! After that, all it needed was the discs in the center and the pommel. This was easily done with layered craft foam on each side, and by rolling and gluing some 1/2" foam down at the bottom. Nothing fancy, nice and simple. Size-wise, I think it turned out juuuuuust right! No time to spare, it went right into the paint. Covered the foam sections in Plasti Dip, then covered the whole thing, staff included, with what turned out to be exactly how much Krylon Ruddy Brown primer I had left. 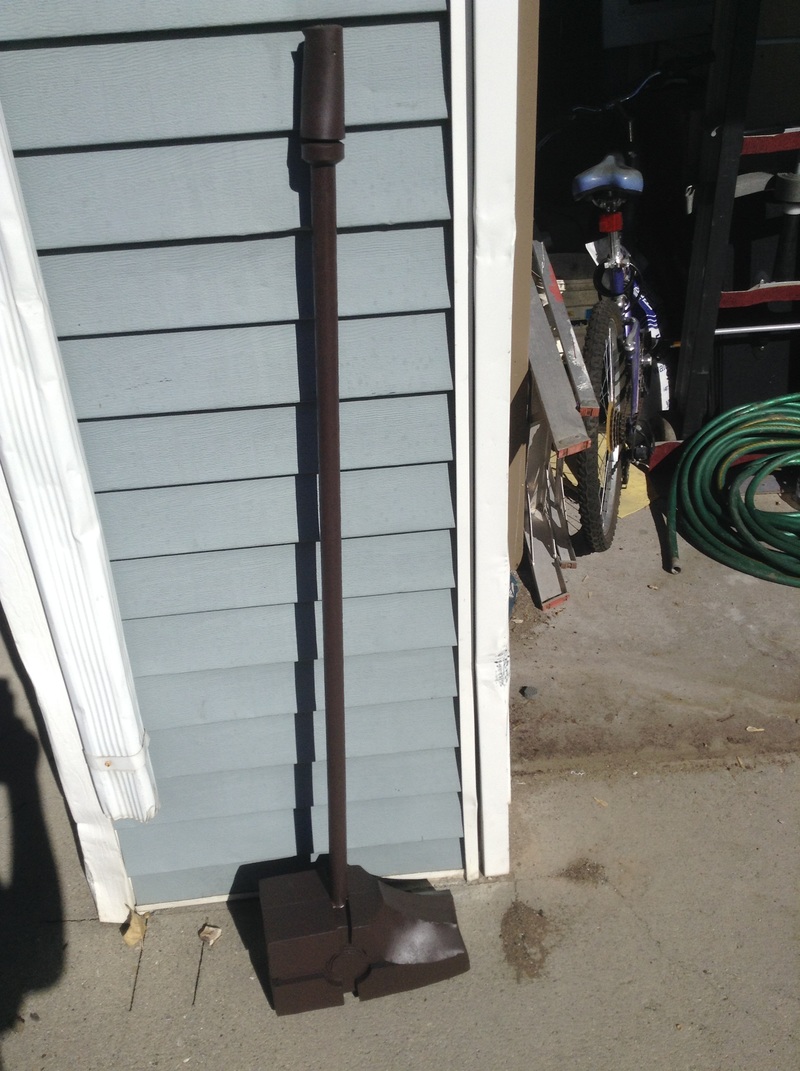 After that some metallic silver. No, the staff isn't leaning. That's it resting on the curved part of the hammer, the only way it would sit still long enough for a picture! 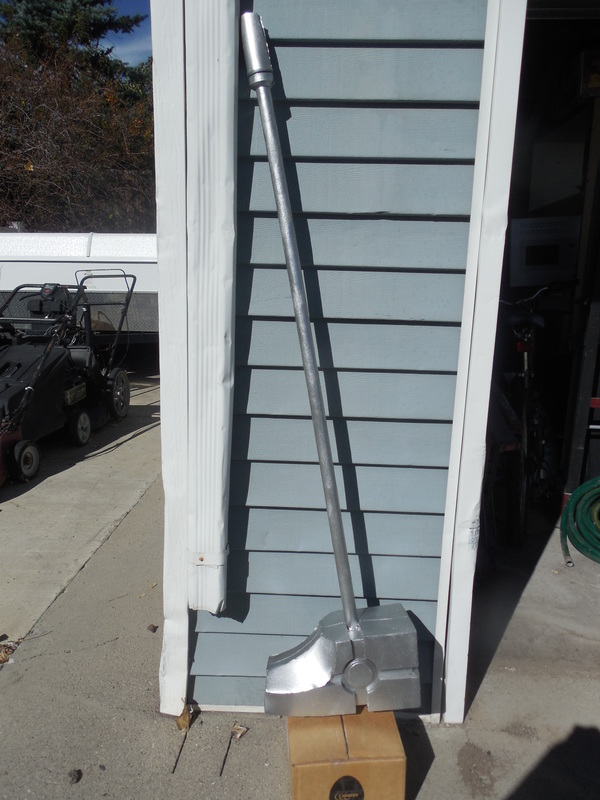 And then, out of time and needing to let it dry, I did a quick spray over some areas with more of that automotive gunmetal I had, including where the indents of the staff would normally be. I would have preferred to actually cut those out, but I just had zero time left. And that was done just in time! It was another big hit at Anime Banzai, though once again no one bought it despite the low price point I put it at. Oh well, no big deal! Just means I can toss it on the wall once I have space to! Thanks for reading! Enjoy some final pics of it and the rest of the pile I took to Anime Banzai! 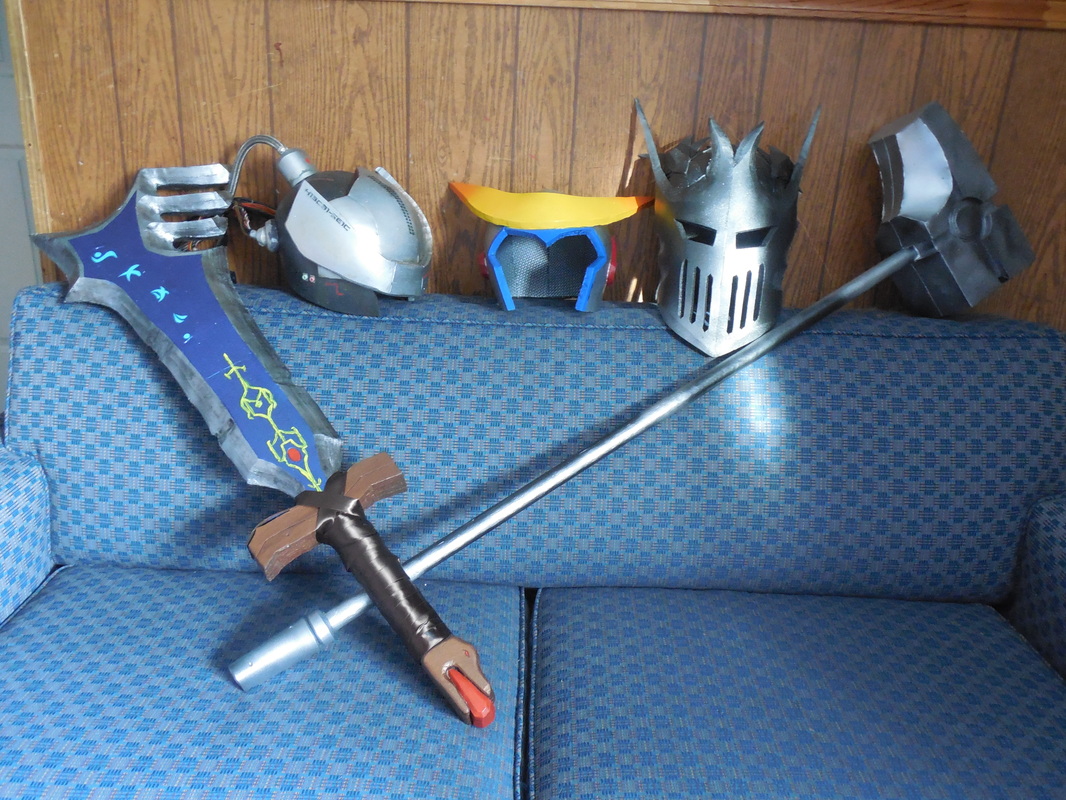
0 Comments
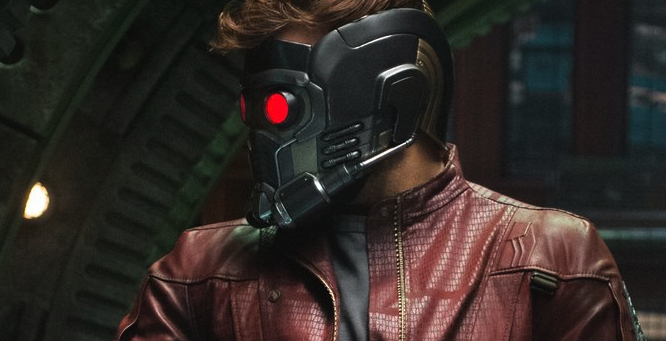
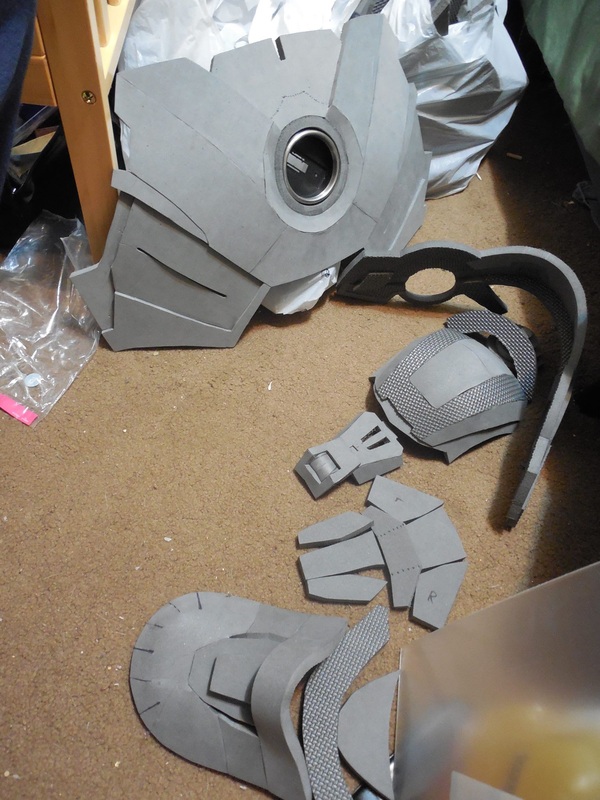
Okay, okay, so I couldn't just stop at the pistol. Everybody who was anybody was building this helmet for the upcoming Guardians of the Galaxy release, and when I found a great foam pep unfold on the RPF, I decided to join in. Why? 'Cause I can. ;) So, naturally, I printed all the parts after sizing it to me, cut out all the paper templates, then cut out all the foam. 
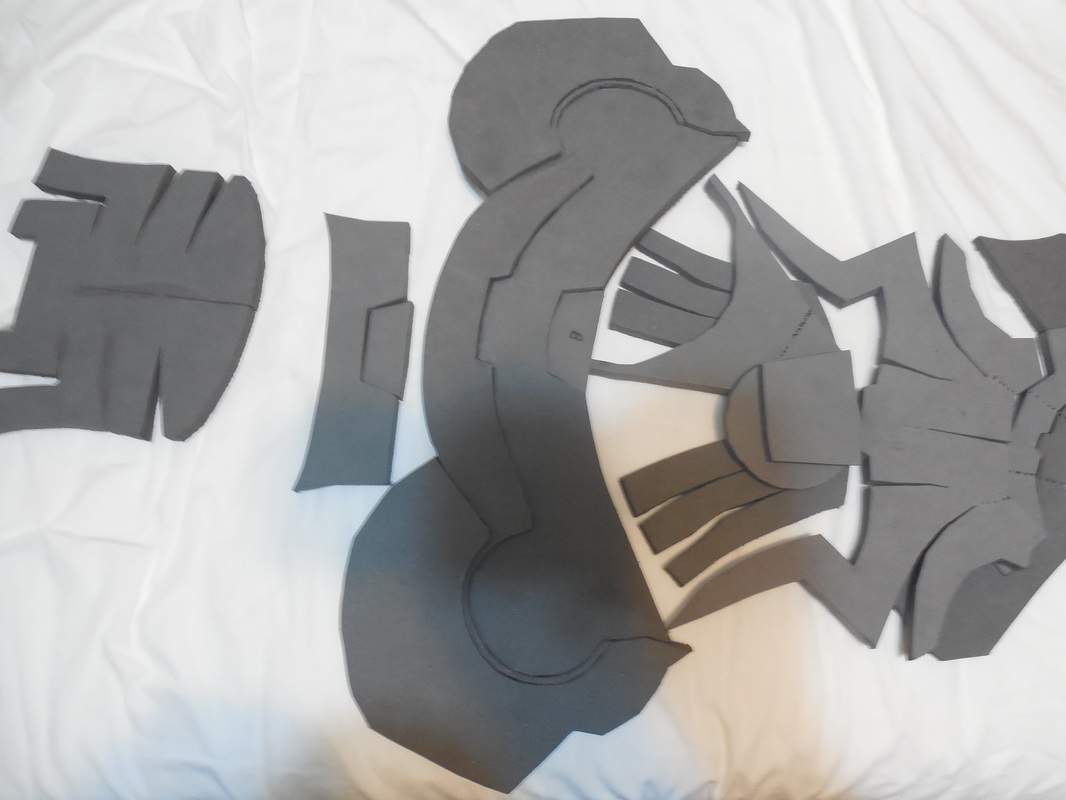
Just for a bit of perspective, on the left are all the pieces for an N7 breather helmet, and on the right are all the pieces for this one. Muuuuuch simpler overall, though obviously with its own difficulties. Organized all the cut out pieces, then started the assembly! 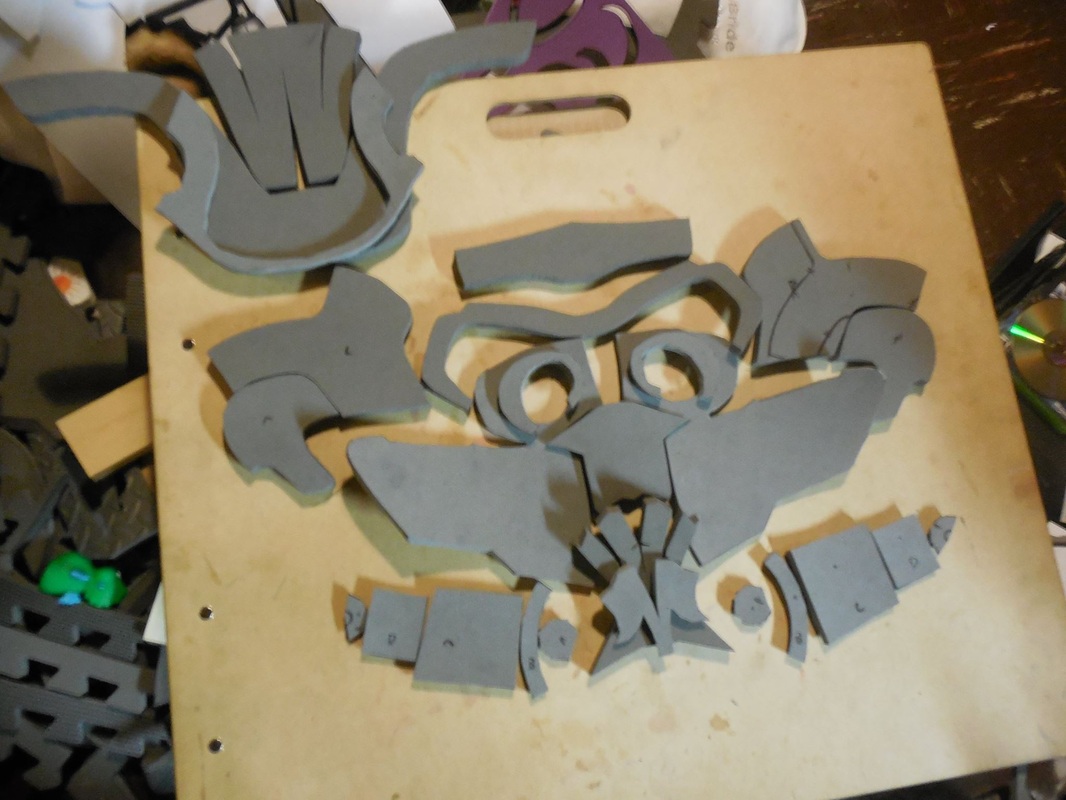
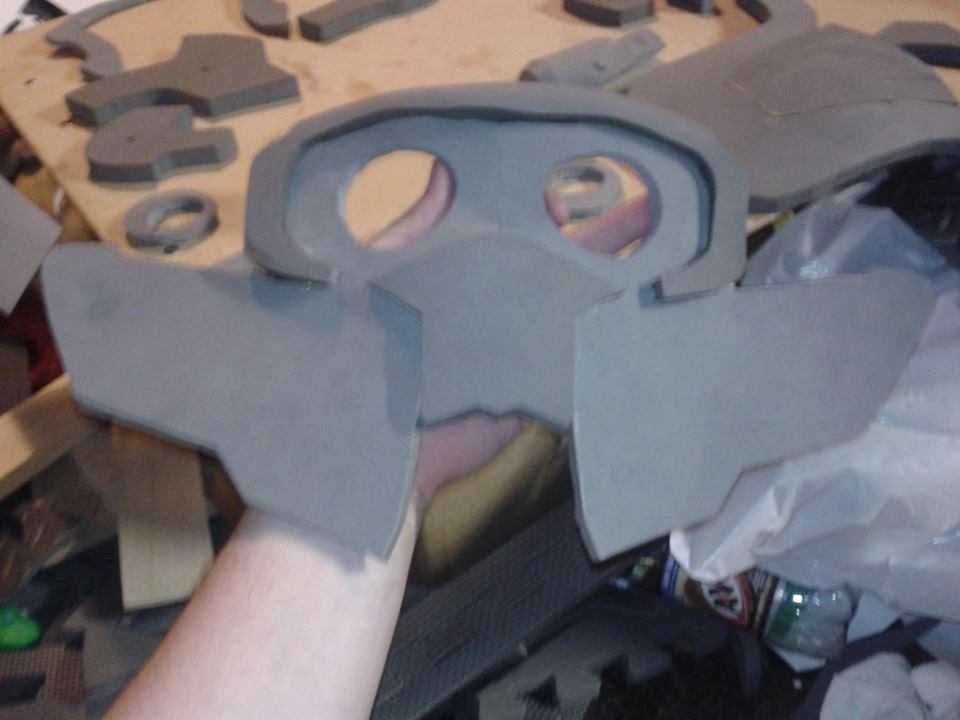
Totally laughed at this part, because it looked to me like an aviator platypus or penguin or something. XD 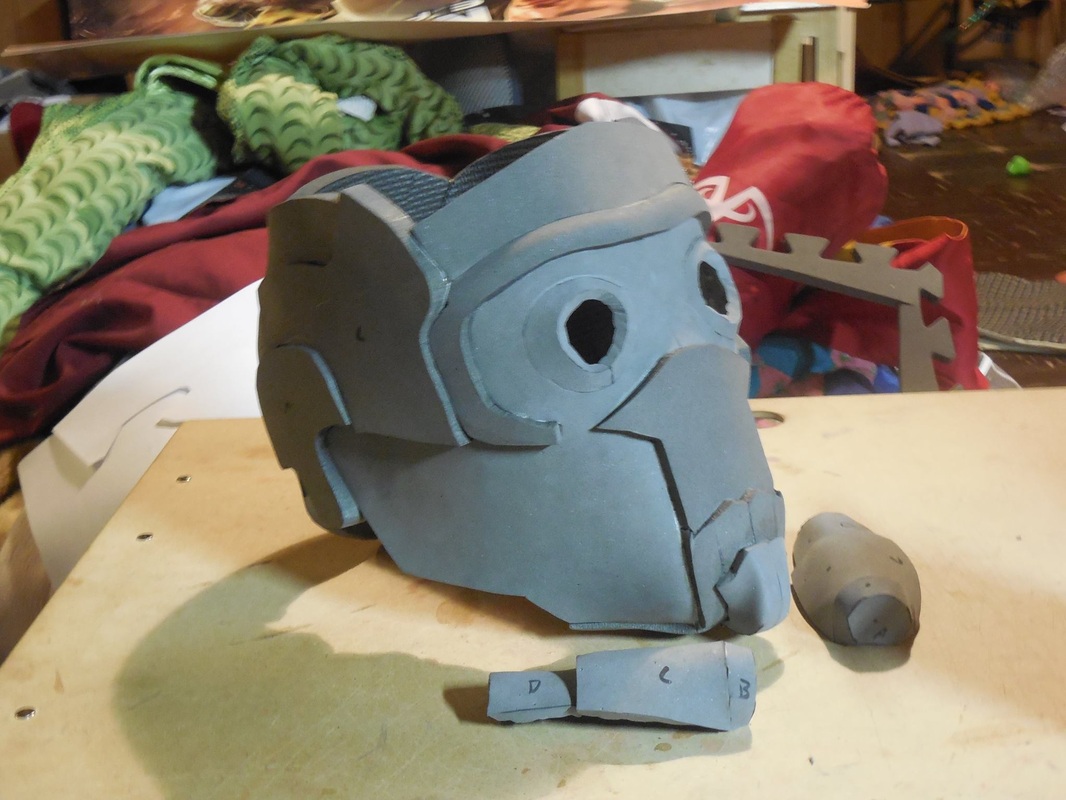
Got it all pretty much assembled, then put it aside for a bit while I finished off a couple other projects. This was for me, so other stuff came first! Once I was able to get back to it though, I etched in the lines with the xacto/heat gun combo. 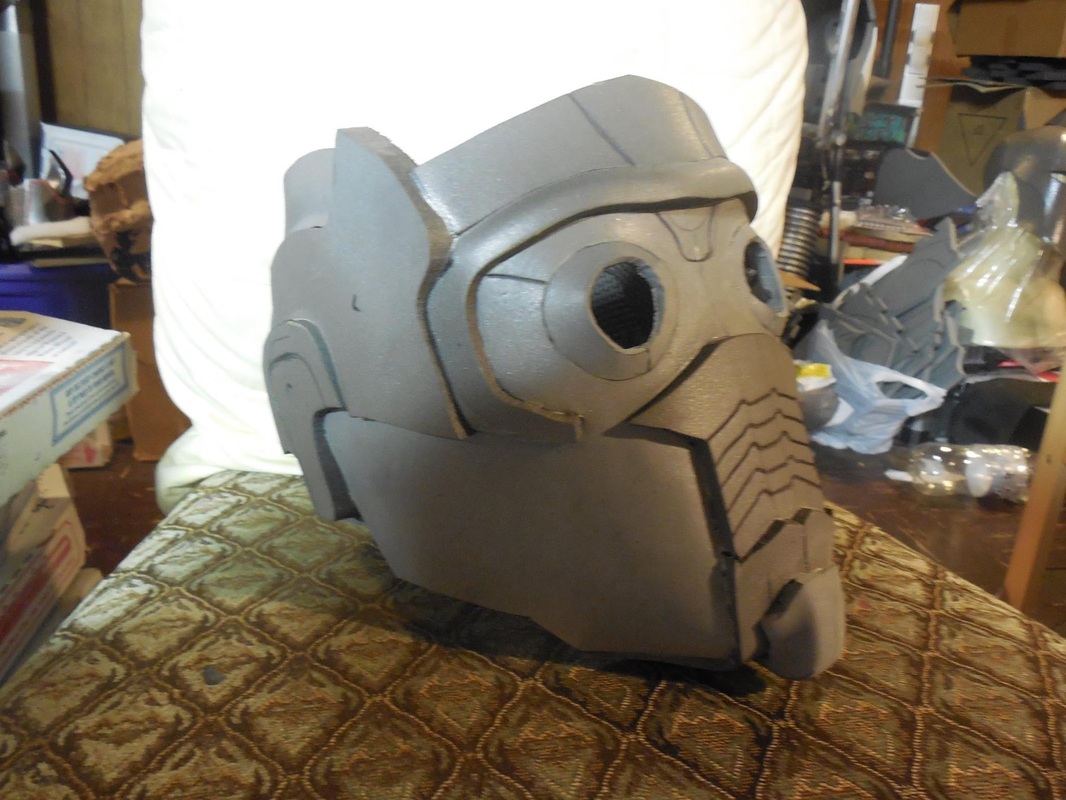
Starting to look more like it! Attached the breathing tube things on the sides, as well as simple craft foam bits on the cheeks. Nothing fancy or crazy about the build, just getting what I can done with little time to spare. 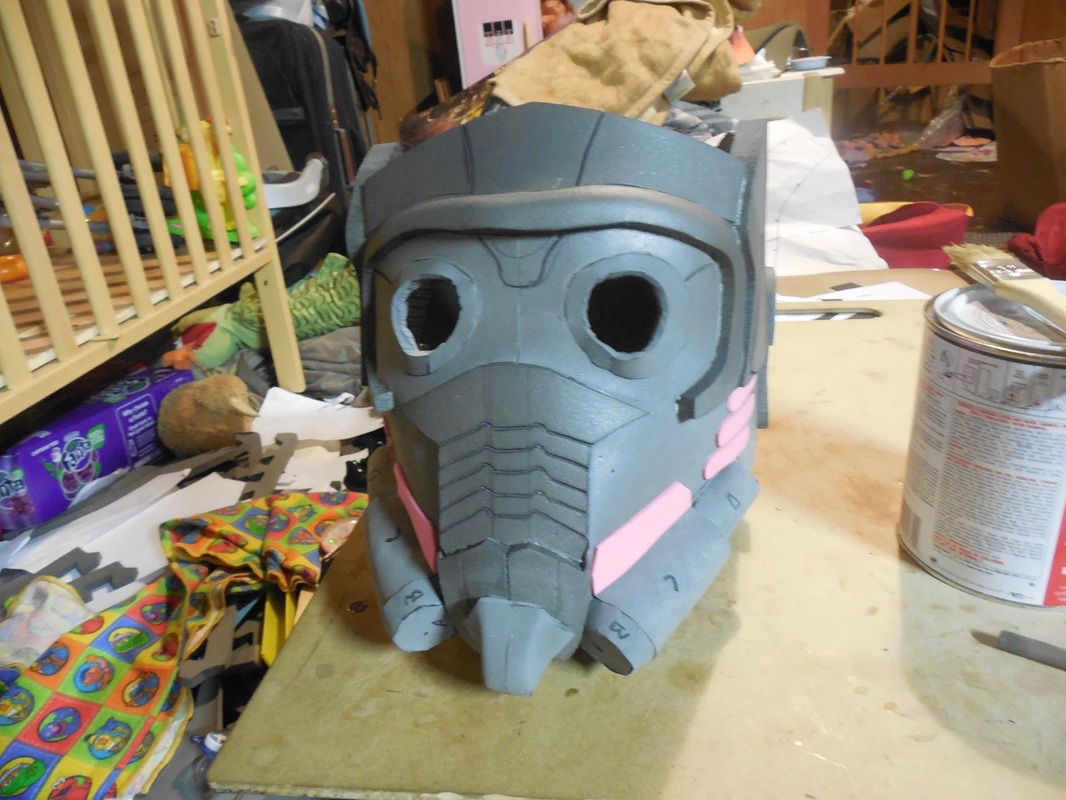
Tried to find some bendy straws, a trick I saw someone on the RPF do for the tubing, but I didn't have any. Instead I grabbed some old ethernet cable I had lying around and glued all that on. 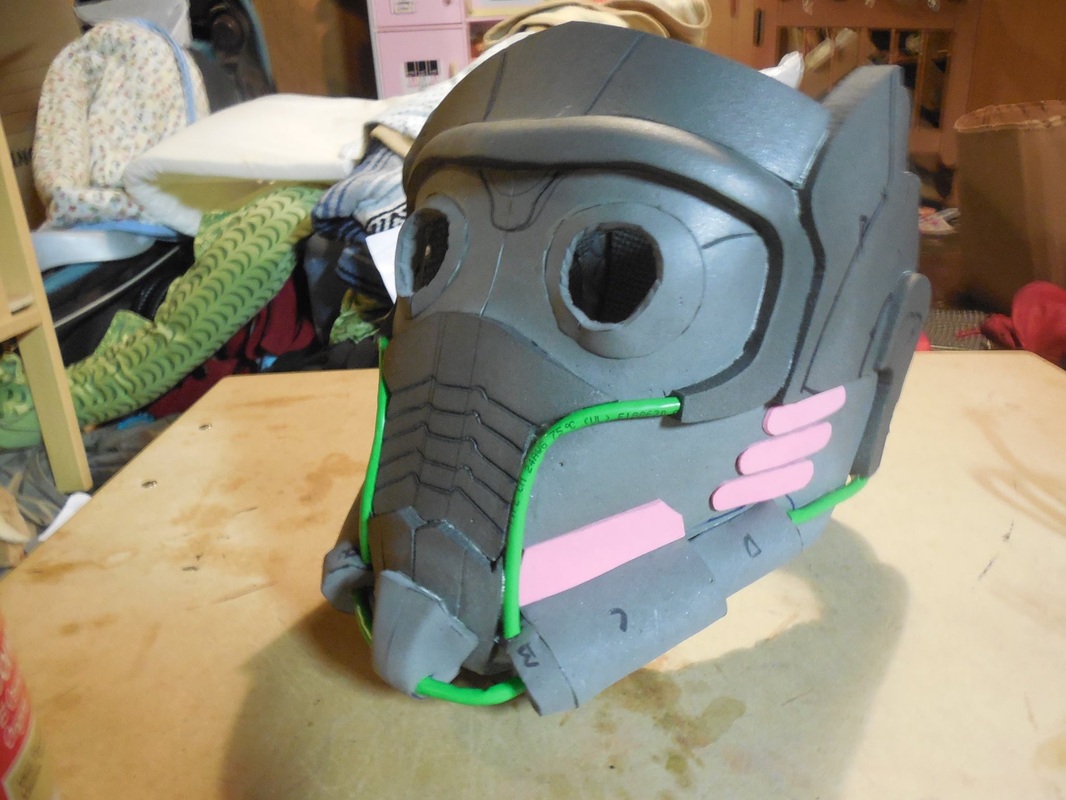
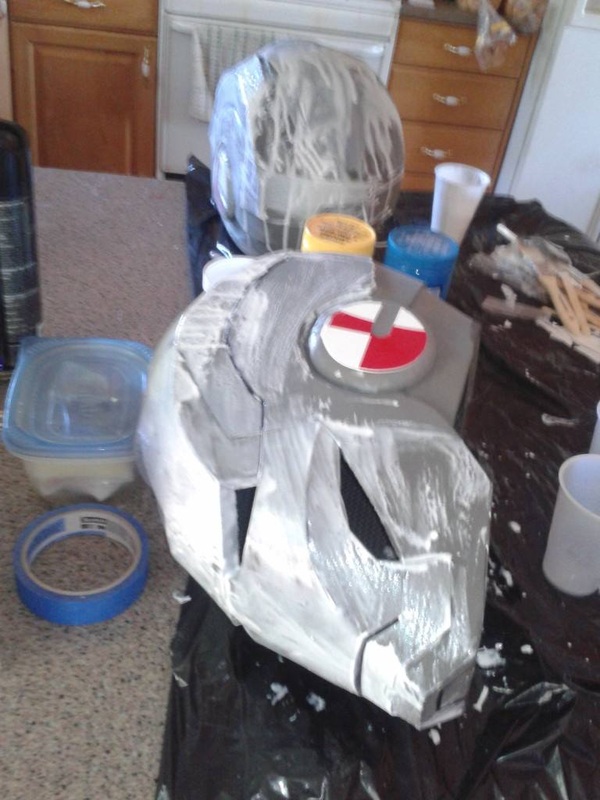
Sent that out for paint so quick (and rushing to get it done the day of the release) that I forgot to take pictures. Sorry! I did take a quick shot of the acrylic discs for the eyes, done with the same red acrylic I used on the Terminus helmet. 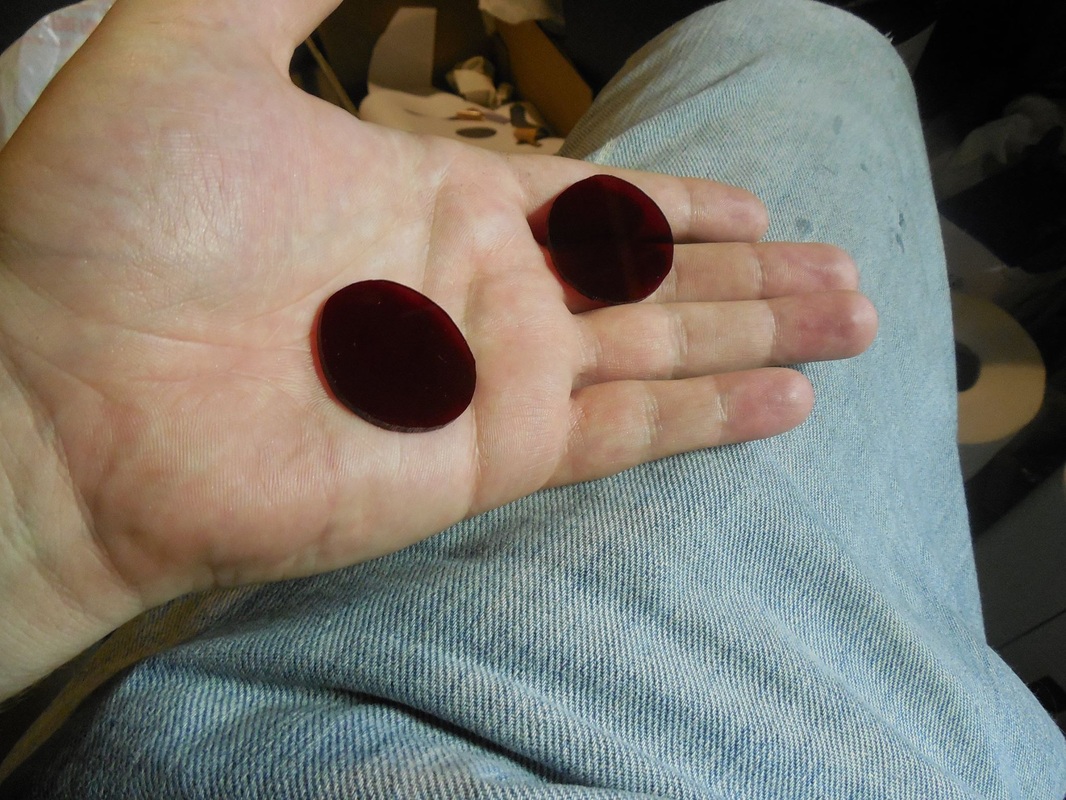
For the paint I used Plasti Dip (naturally), metallic gold, and a satin aluminum I had lying around. No weathering, no clear coat, and no gunmetal, since I didn't have any and we were out the door soon as the tape was off and the acrylic eyes installed. 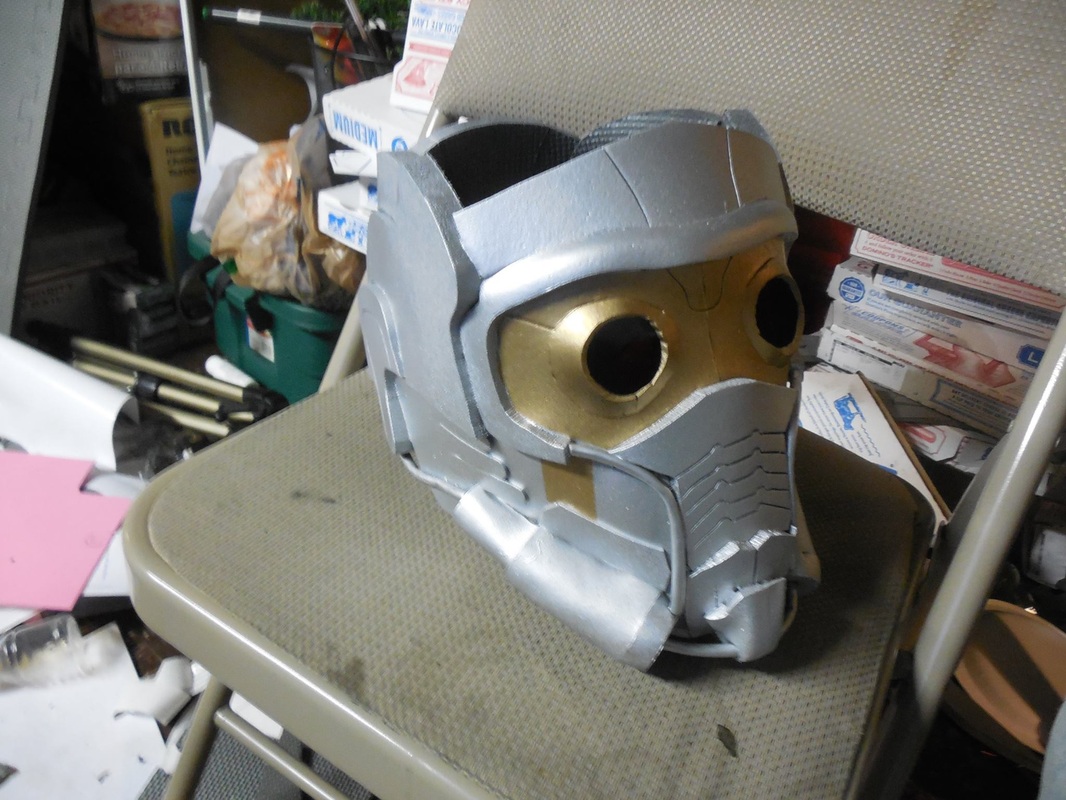
There's still a bunch of work I'd like to do on it, and some shots of me wearing it I'd like to get, but it currently sits in the state you see here, in a giant pod with all my tools and belongings, in Pennsylvania. While I sit here in Utah.
Once I get it back though, it's a nice casual cosplay that I can wear, carry, see out of, all that. I'll be putting the final touches on it just for that. It also needs some beveling and edge work, so expect a possible repaint when that happens. Either way, I think it turned out pretty great!  In the large mass of things to build from the Ninja Turtles '90s movies, I was asked to make Shredder's spear from the first movie. This was another simple build, though I used some new techniques (and tested out my size comparison-ing) that really made things fun. First off, had to get some more 1" dowels after finishing the 'chucks, since they took up a bit of the third dowel and all I had left was enough for the spear points. Not a big deal. 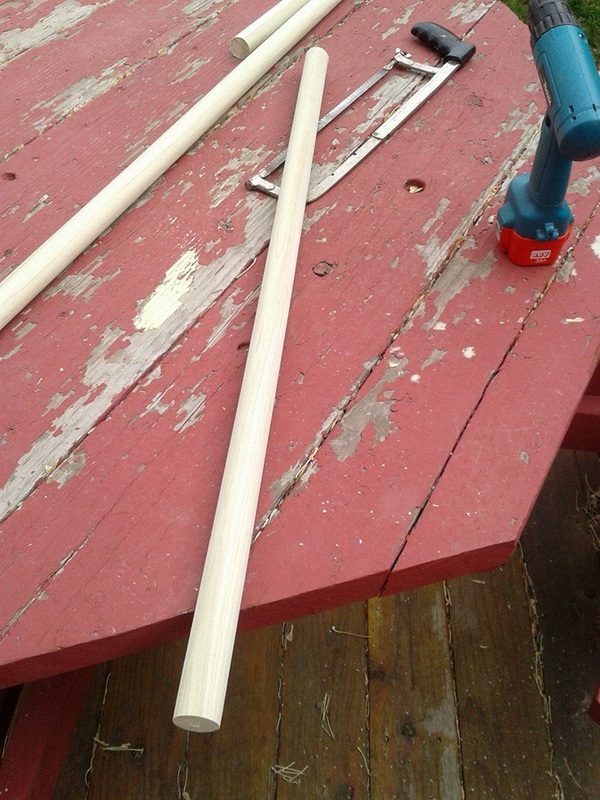 More hacking! Chopped a couple 13" long sections off the dowel, drilled a small hole on each end, and prepped a small scrap chunk of the other remainder to test out my brand-new lathe. 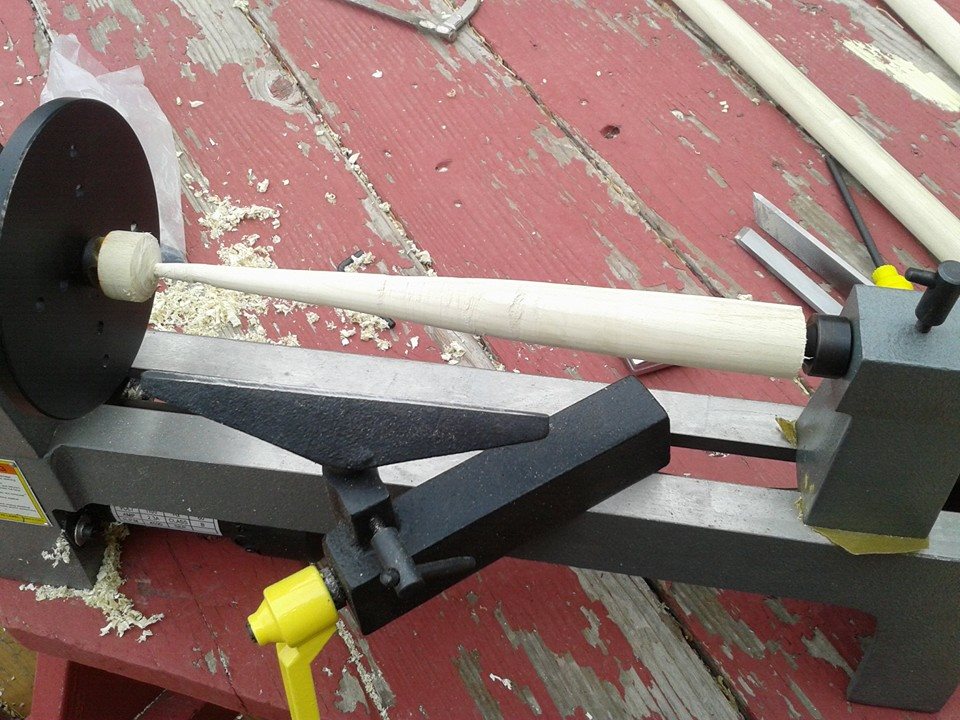 The test piece wasn't perfect, but it was literally the first time ever that I had used a lathe. The shape was there, but lots of rough spots to clean up and it wasn't very even. Taught me a ton, and was quite a bit of fun! And no, all you lathe users, I didn't leave the cross bar that far away - just moved it for a better picture. Trudged on, tested some more on the piece, then bit the bullet and spun out the actual spear heads.  A lot smoother, but I still had to clean them up quite a bit with sanding. Also don't have the right chuck to pop the end chunks off, so ended up cutting those off and cleaning up the rest with my belt sander. In the meantime, I cut the staff section to length, around 3 and a half feet. The spear in the movie wasn't very large, and since the spear heads were so long I needed to compensate. (Still think mine ended up bigger than the movie prop, but that's okay). I also drilled a hole on each side, so that when it was time to attach everything I could secure the heads a bit better with a small dowel, kind of like I did with Caliburn. I decided to use another stain, a dark cherry color, for the staff. Since I was using wood, it would be a better match to the color and sheen of the movie prop, which looked like glitter paper or something over a length of PVC.  I kept the spear heads rounded a bit, so that it was a little safer for conventions and whatnot. I sanded these as smooth as I could get them, then primed and painted them a brilliant metallic silver, again to match the sheen of the movie prop. Unfortunately I don't have a progress shot of those, but here's the staff with its second coat of stain. 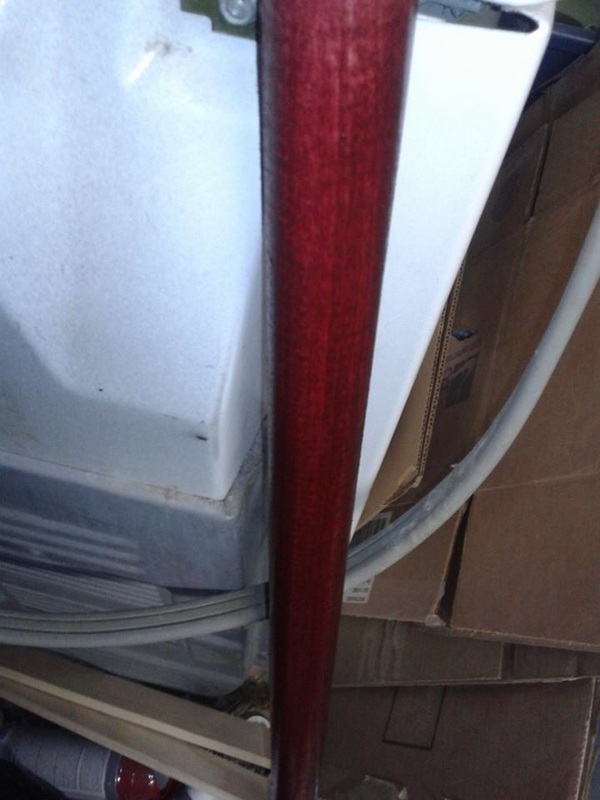 Really nice, super rich red. I was extremely happy with it at that point. Now, the reason I don't have progress pics on the spear heads, or for any of the rest of the build (save the final shot) is because of an accident. After two coats of the silver, I headed outside for the third and final coat. Our dogs decided to take that opportunity to push past me and run outside. Since it was mid November, we had ice all over the stairs I had to go up and down, and the push knocked me off balance and sent me flying. Landed hard on my leg and hip, as well as my back (which had been injured before, flaring it up in the process). Knocked me out of commission for a few weeks, nearly to mid December. Luckily that gave the pieces plenty of time to set, so after a week my brother kindly helped bring the parts in to me so that I could attach them all together. I was stuck in a chair, barely able to hobble around, but with his help I was able to get it all done. The finished spear: 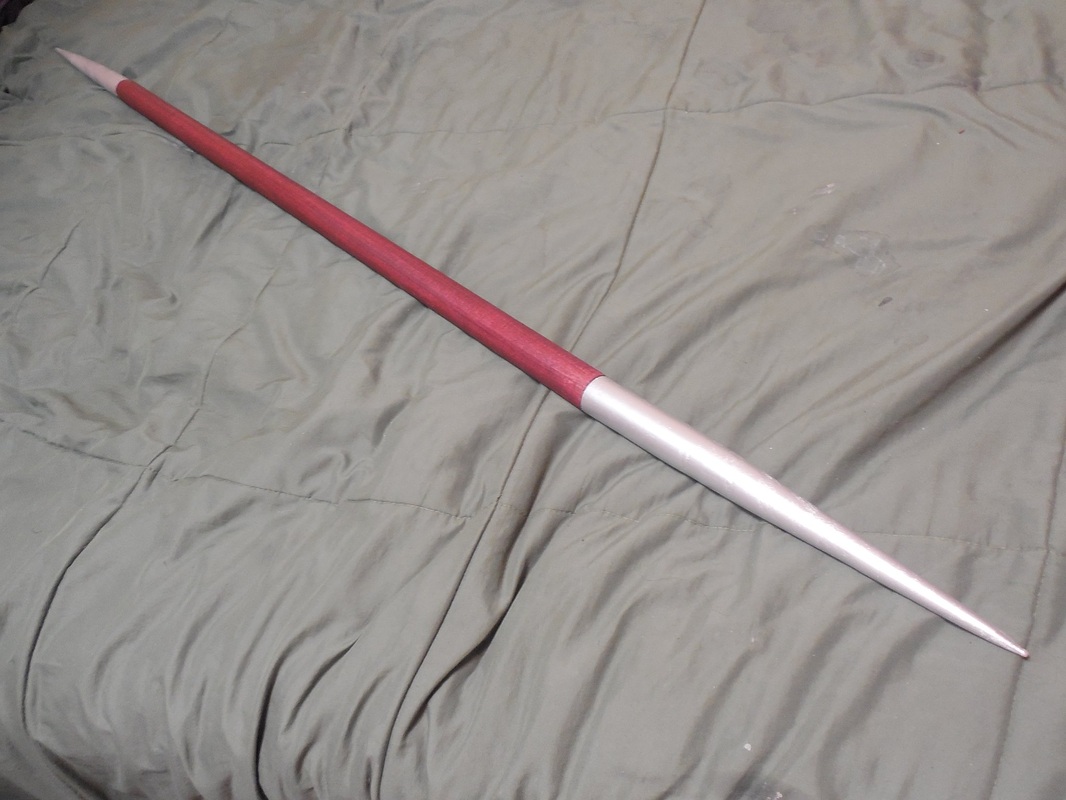 I'm really, really happy with how it turned out, despite the mishap near the end. So much so, that I may make another one for me one of these days. Learned a new skill and got a new tool too, so it all worked out! :D
Ah, the Ninja Turtles. Or the Hero Turtles, if that's how you know them. I've actually got a number of items I'll be making from the 1990s movies, so stay tuned on those! First up, Mikey's 'chucks. This is a rather simple build, so it's a quick write-up. Figure it's a good one to start on though, since I haven't done a write-up in aaaaaaages..... Anyway, I started with some 1" dowels. 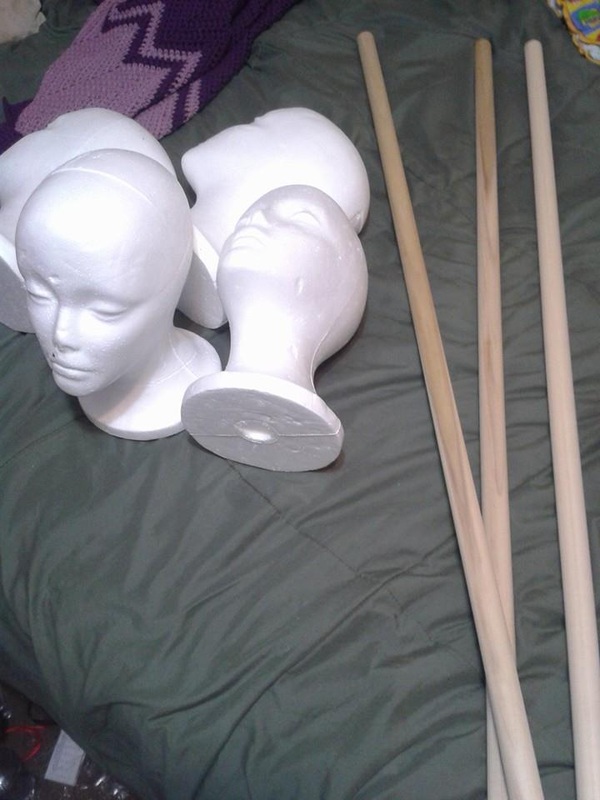
Yes, there are 3 there. I was making 2 pairs of the 'chucks, and since that means 8 individual sections, roughly 12" each, that meant a lot of wood. Of course, the third one is for something else, but we'll get to that. ;) Since my bandsaw is only 9" wide, and I didn't have access to a chop saw, I ended up cutting each bit out by hand with a hacksaw. Monotonous, sure, but it got the job done. 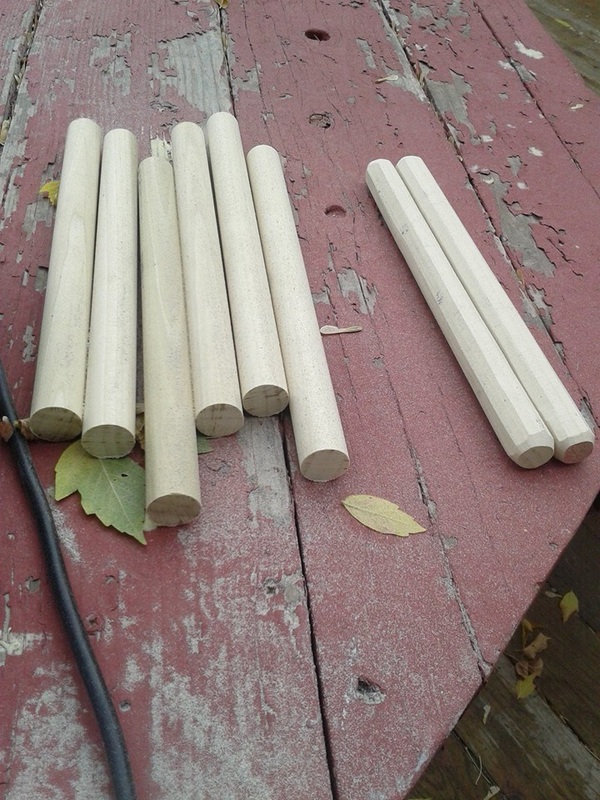
Since the wooden sections aren't actually round, but octagonal, I dragged my belt/disc sander combo out and sanded down the sides. Not too worried about uniformity here - these still needed to look used, and a little bit of bumps and jagged lines adds to the look. Once all the sides were angled, I started drilling the holes I'd need to connect the pieces together. 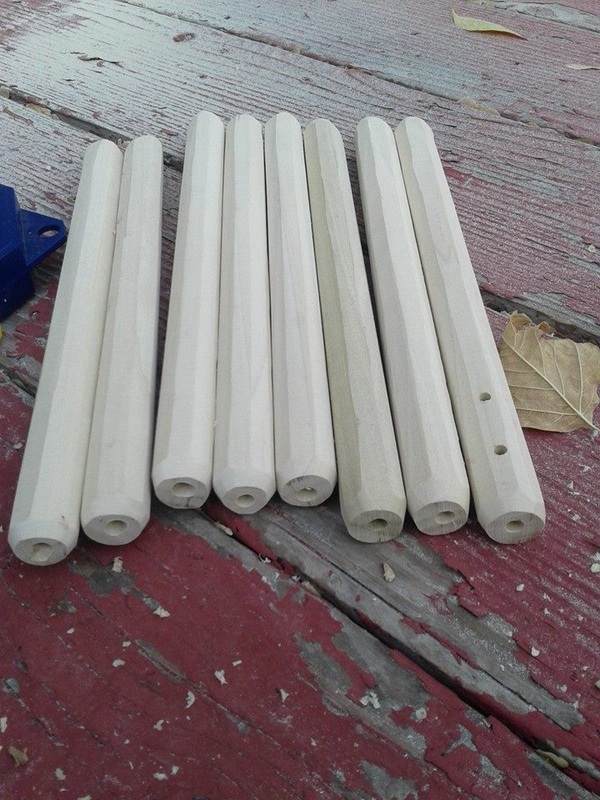
In hindsight, the holes on top should have been a little wider than I made them and the holes on the side should have also had a trench to sink the leather I'd be using in a little bit more. I also didn't have a drill press at the time, so some of the holes are off-center on the tops. Still looked really close though, so I went with what I could. Holes drilled, now I started staining the wood. I could have painted them all with a solid brown color, but the stain made it look more like the movie prop, and won't chip off if they bounce into something. 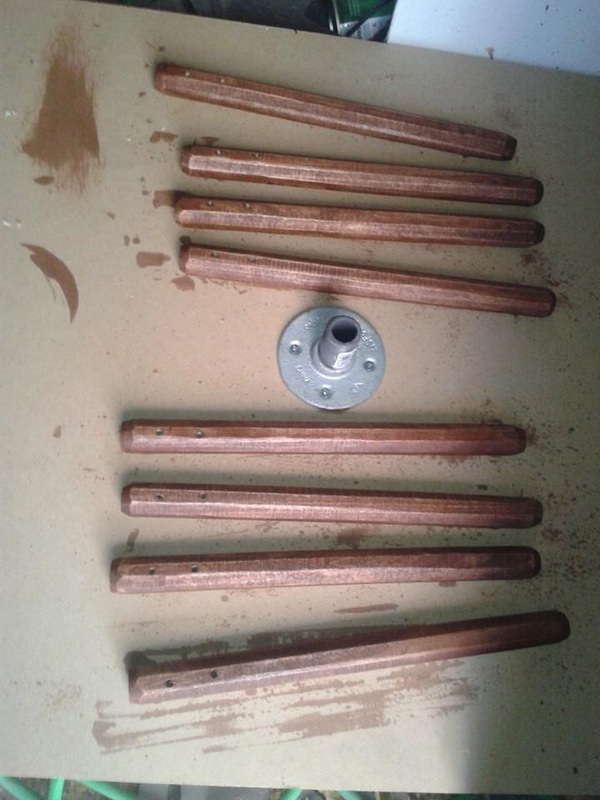
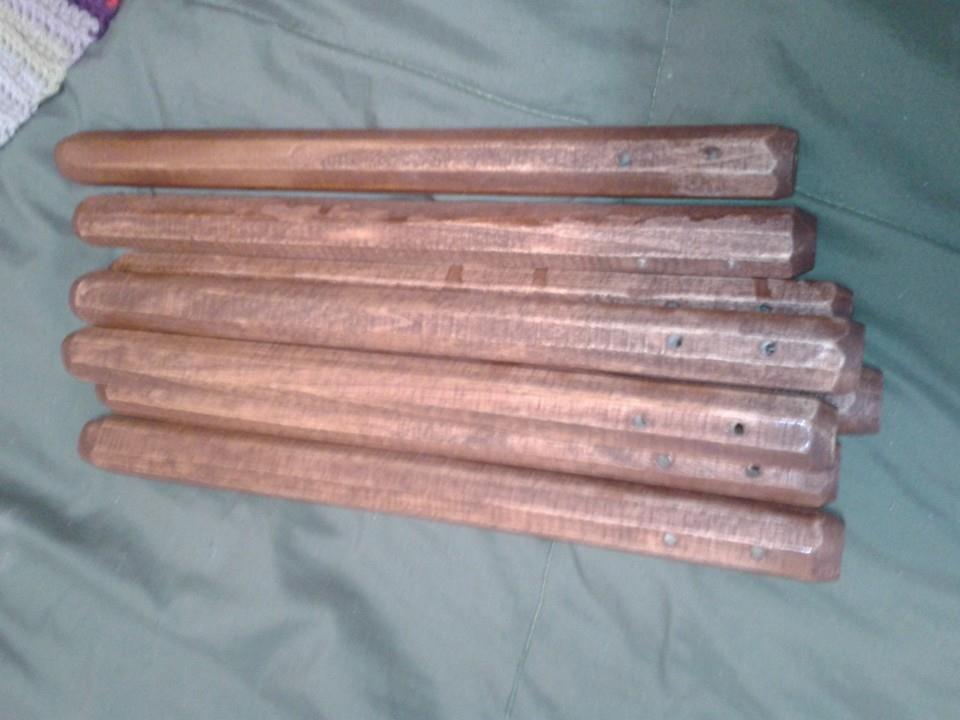
Some of the stain dripped a bit, but the glaring ones I sanded down a bit. I also sanded down the edges after staining, again to give them a nice "I've used these on the Foot for a while" look. After that came the strapping. 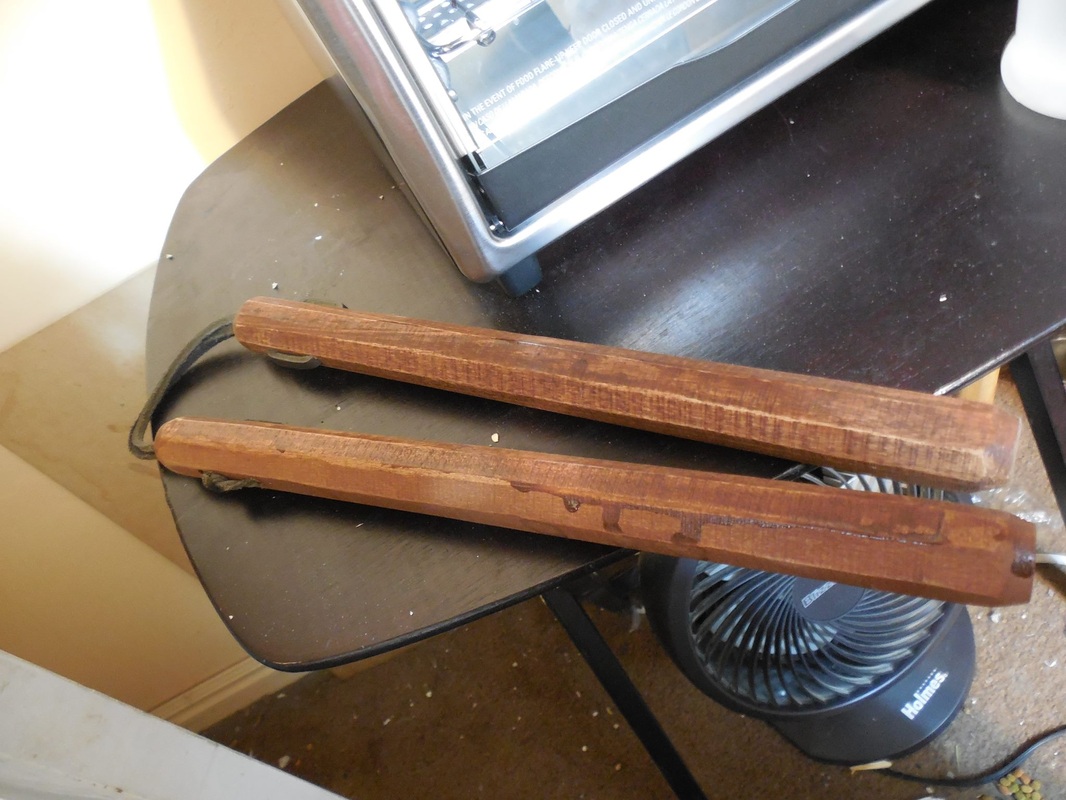
This was a huge pain, given that the holes at the top were so small. Still came out great though! Why leather though? Most 'chucks have chains or rope, but from what I could find out for the originals they were strapped together with leather strips in most scenes, and the famous finger-twirl Mikey does actually uses a length of twisted fabric (and some hidden movie magic I won't spoil, not that you can't figure it out nowadays lol). For those of you interested in how I did the wrapping, here's a step by step. First, I put one end through one piece, poked it through an upper side hole, through the whole bottom side hole, then used some spare electrical wire to pull it back through the final upper side hole and through the top. Snug fit with the tiny hole on top. Then I pushed both ends of the leather through the top of the other piece, split them through either upper side holes, then threaded one through the bottom and tied them off on one side. I cut off any excess after setting the length, and secured the knot with some superglue just in case. Once I had all eight connected, making the full set of 2 pairs, I hung them up to let the stain set a bit more and stuck my hands in an ice bucket. They *hurt*! 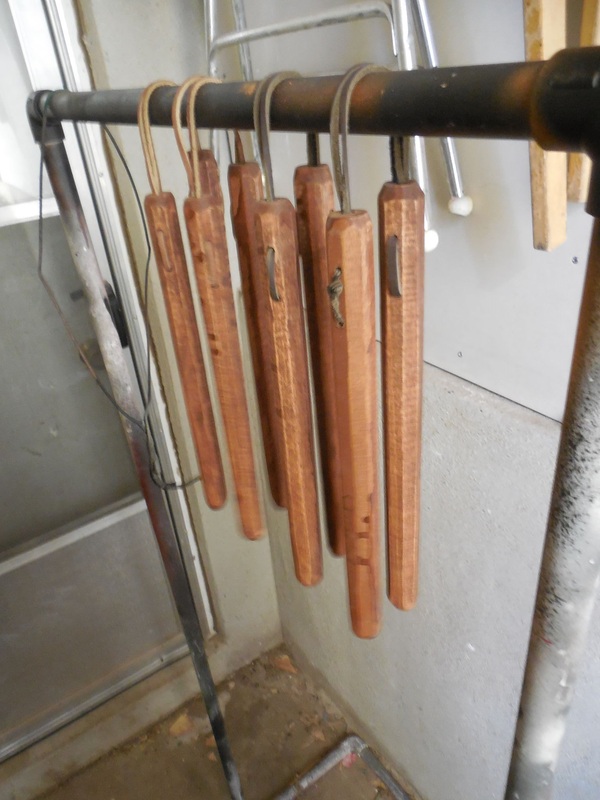
These ended up looking really great, and it's unfortunate I don't have any other finished pictures of them. I do have a few improvements I'd do if I made them again, but I'm still really proud of how they turned out. Hope you enjoyed!
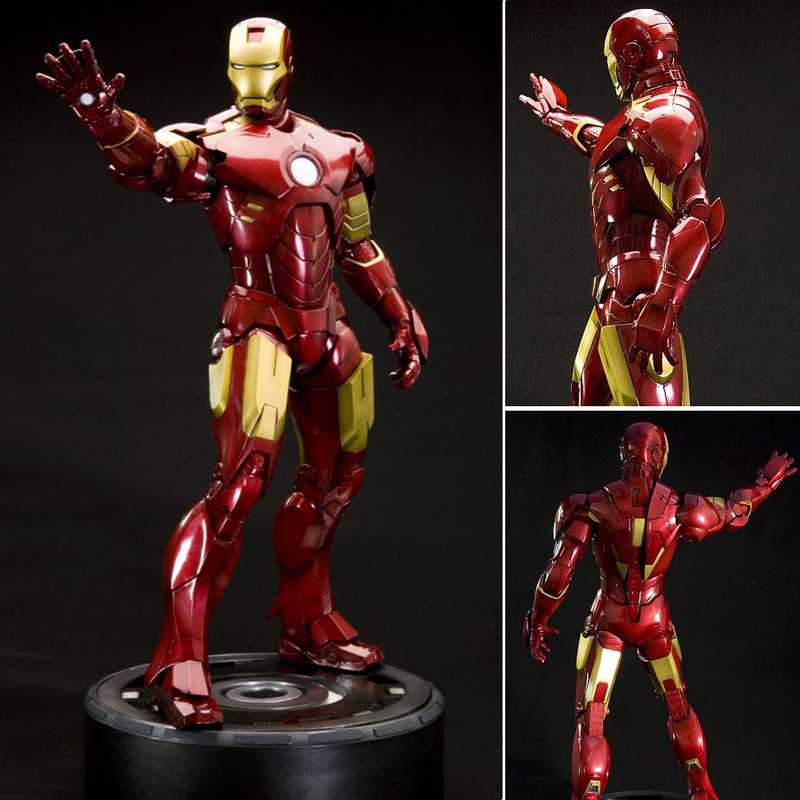
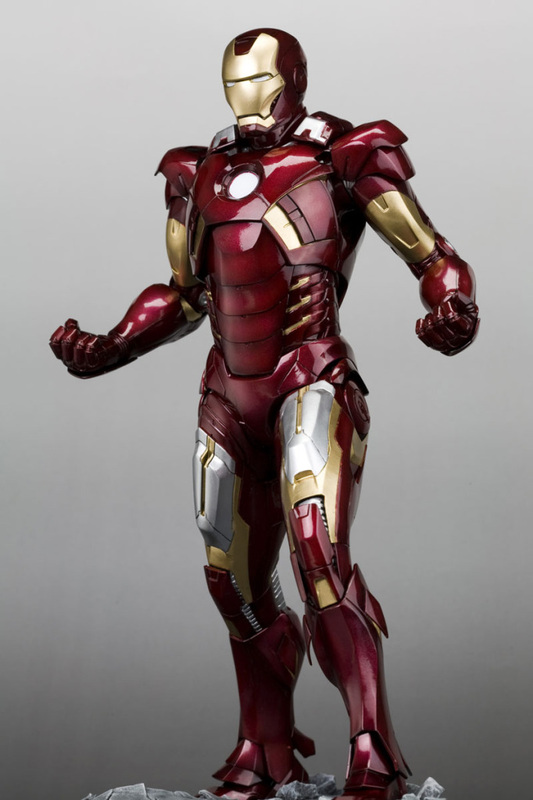
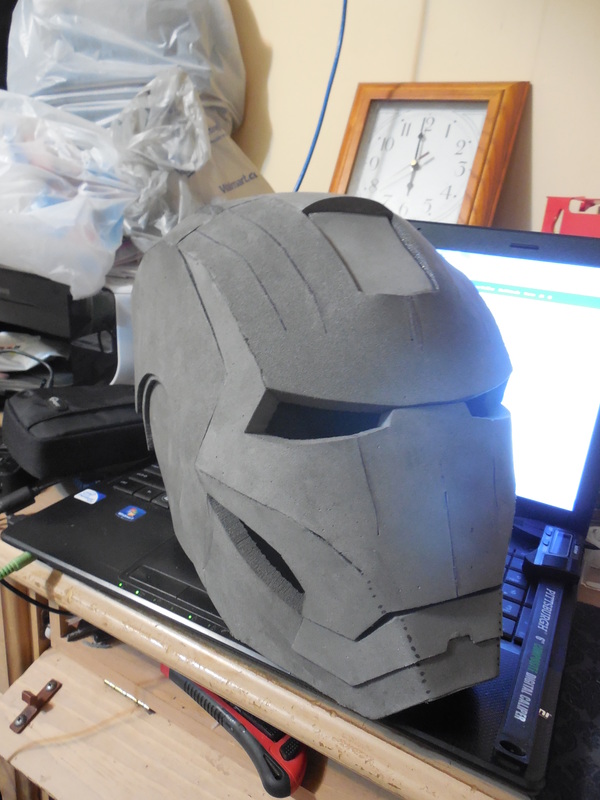
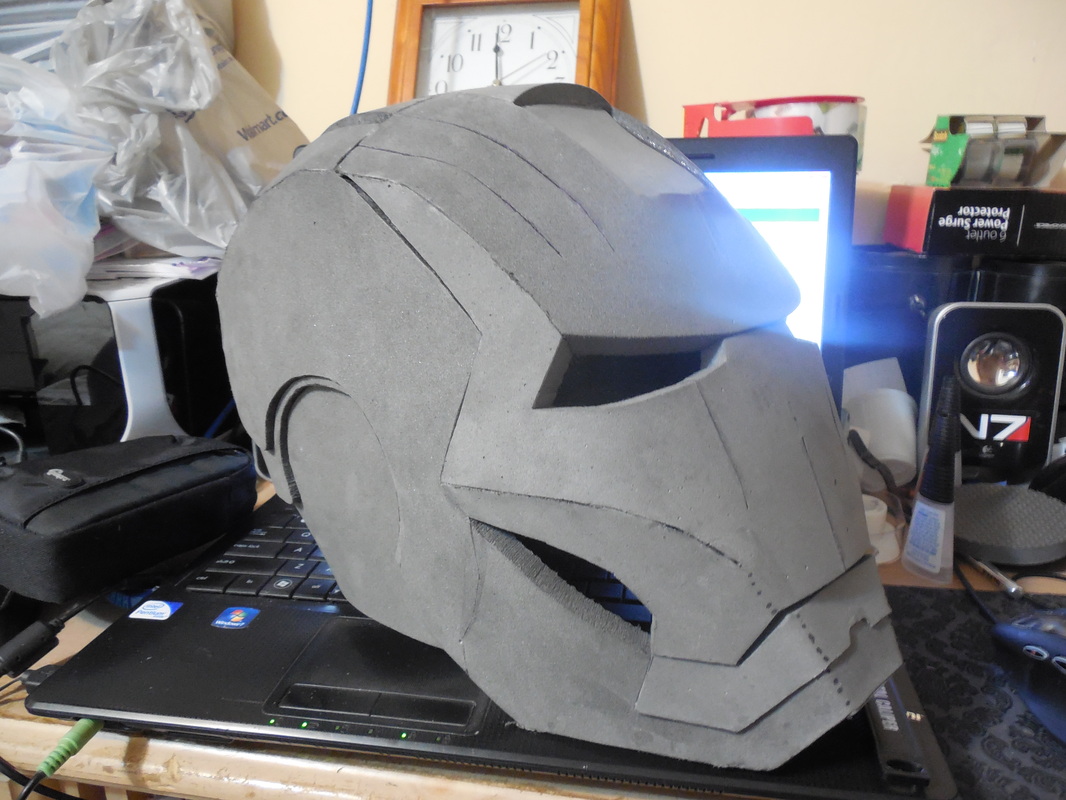
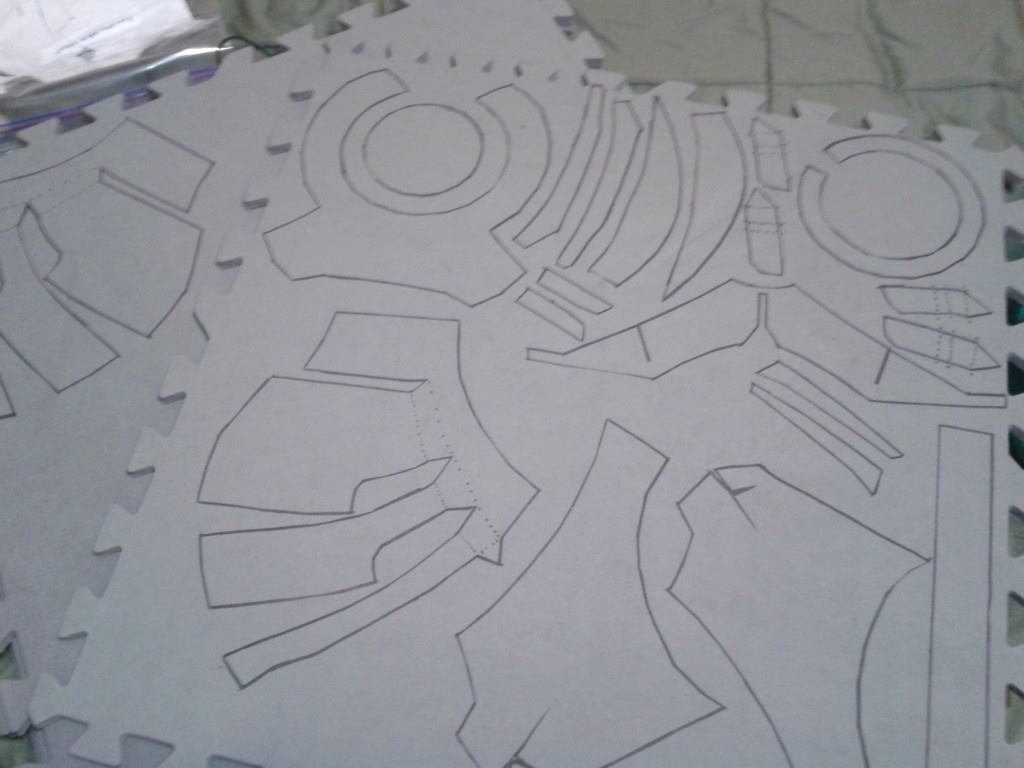
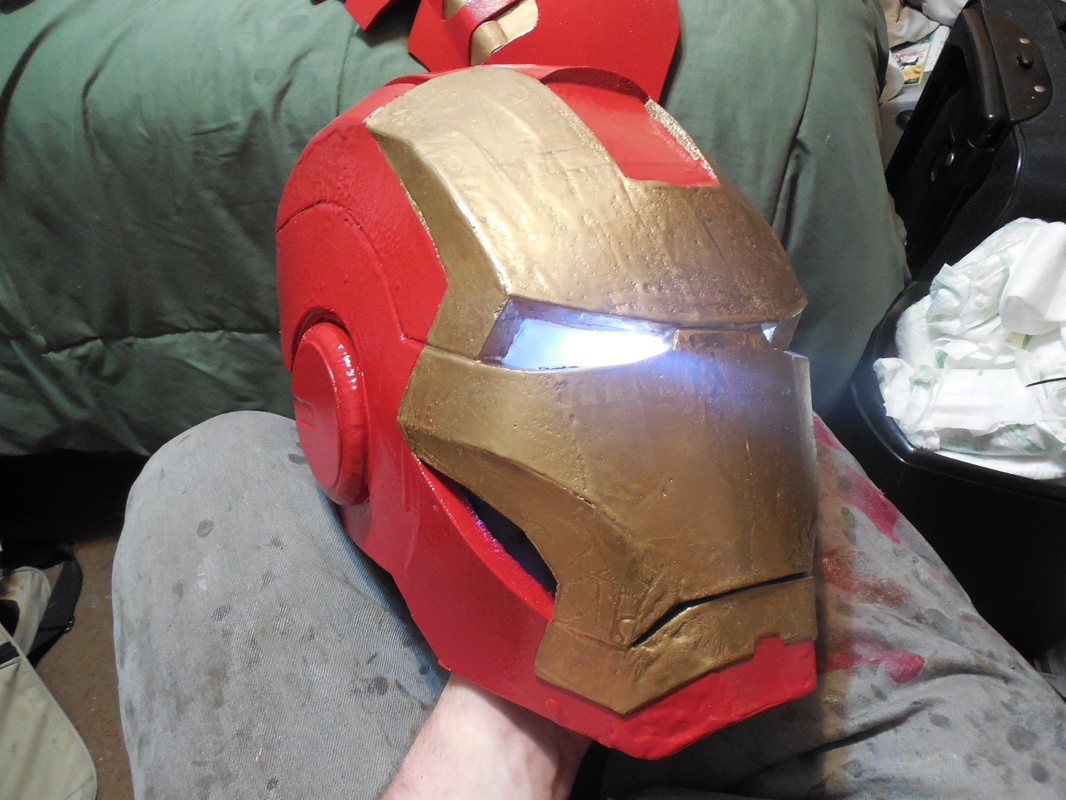
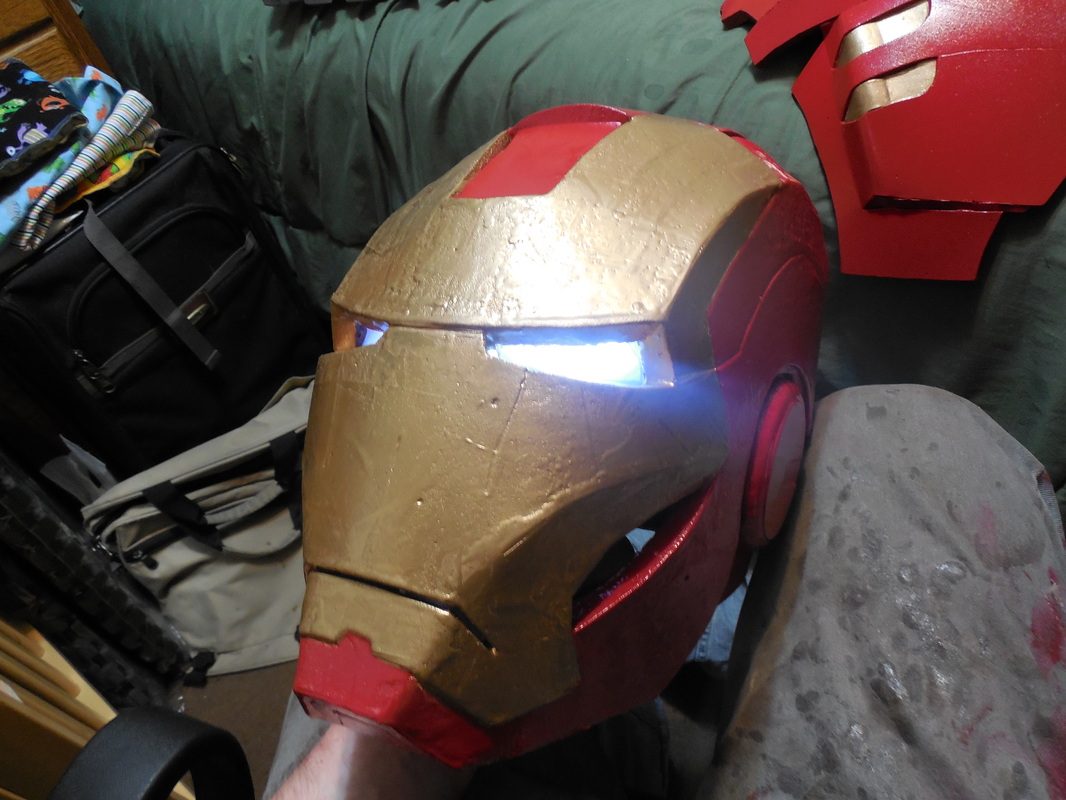
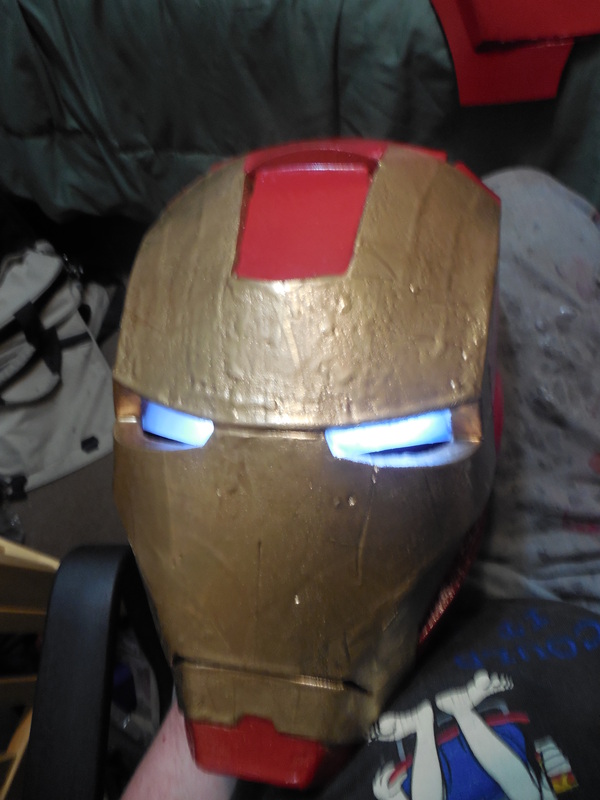
And now, for something not Mass Effect! Been commissioned to make an Iron Man Mark IV suit out of foam, so I decided to do two at once - one for them and the Mark VII (from Avengers) for me. As you can see, there are some major differences between them as Tony upgraded movement, software, you name it. I think the Mark VII looks the best so far (yes, even compared to the newest movie), and since he's always been my favorite, I want one! For this build I started with the helmets. The first one I made was too round and too small, but it worked in a pinch for a Tony Stark cosplay as a carry-around prop. This started, as before, from a pep file adapted for foam. 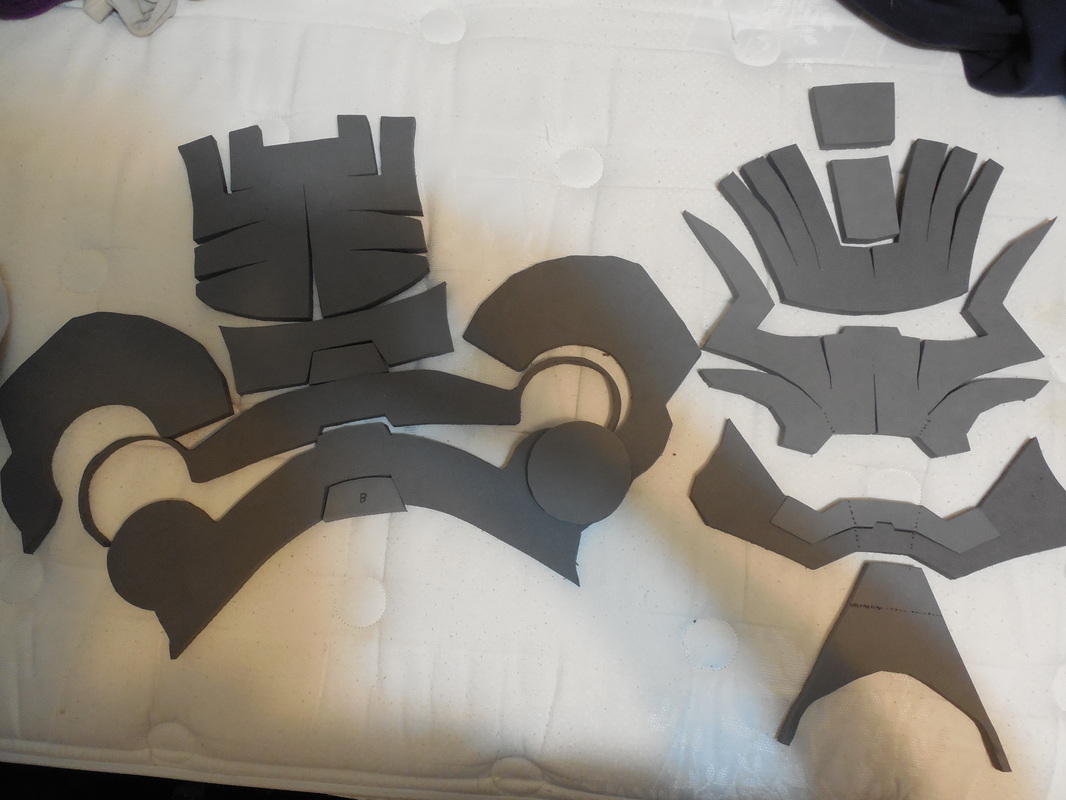
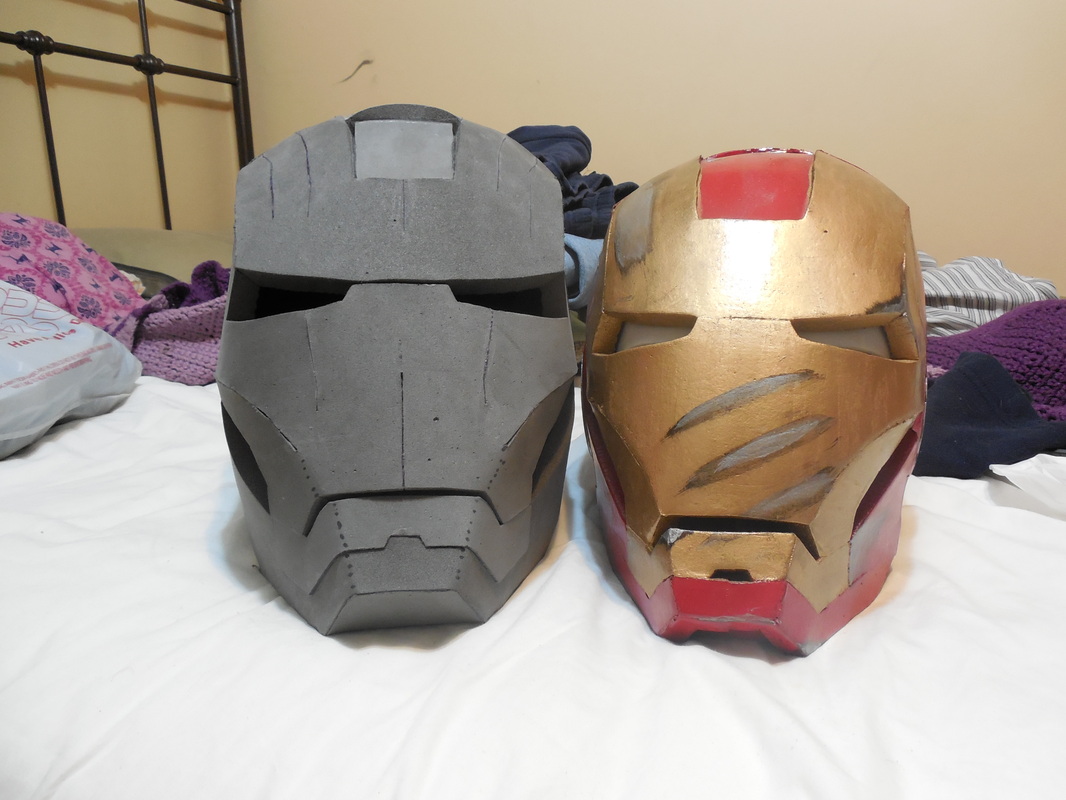
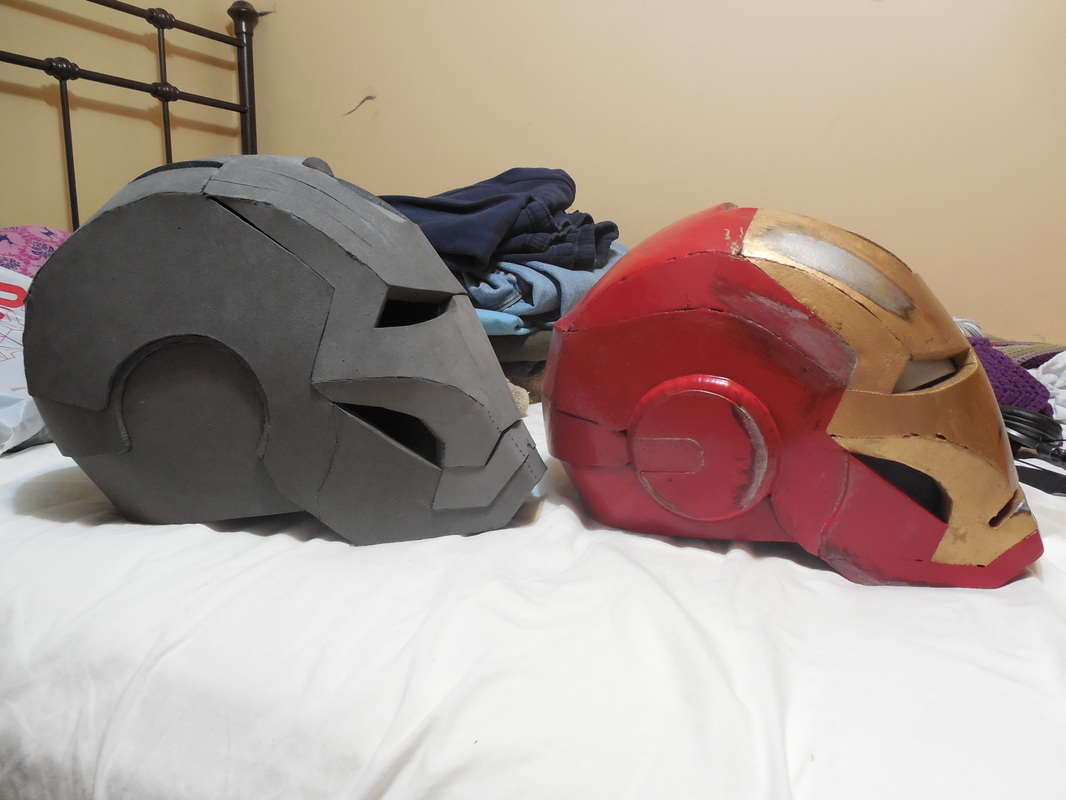
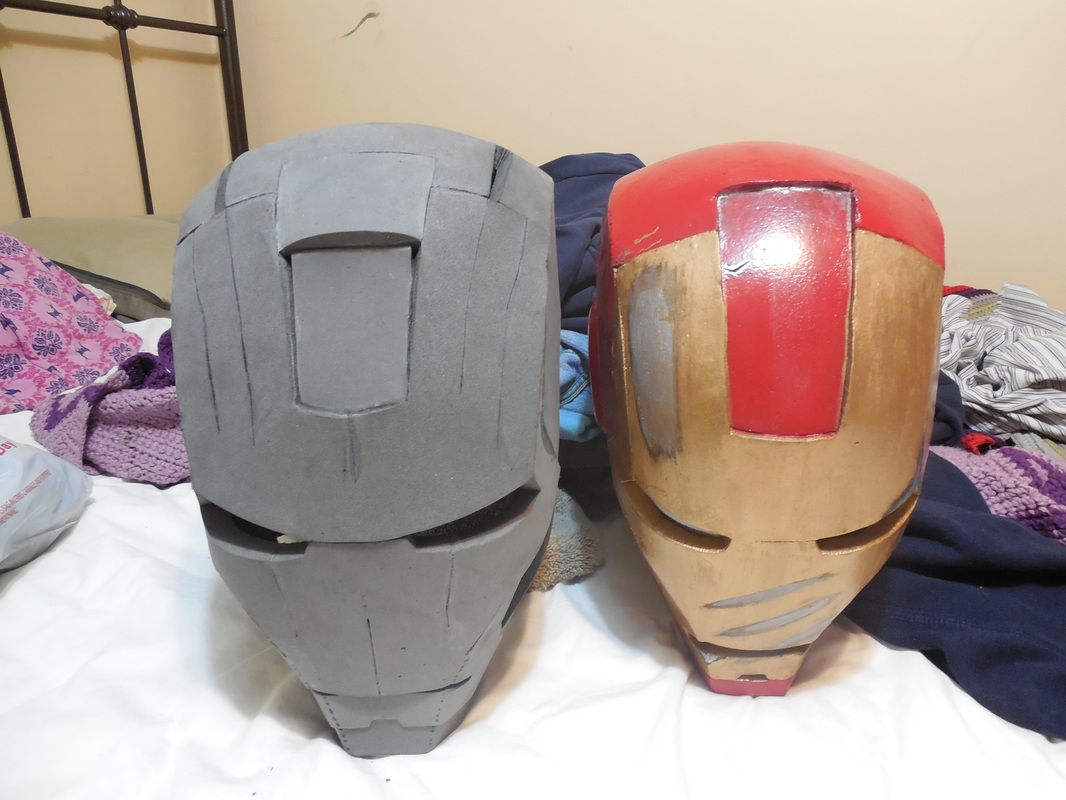
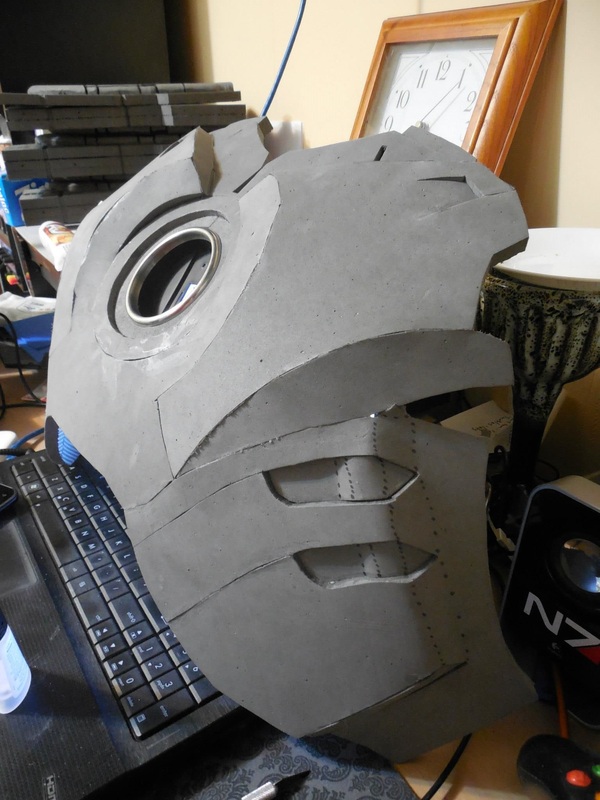
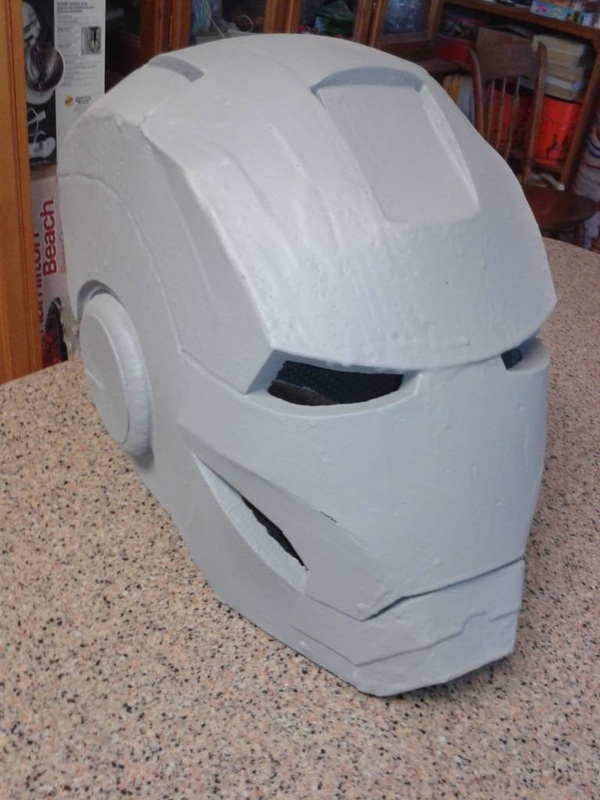
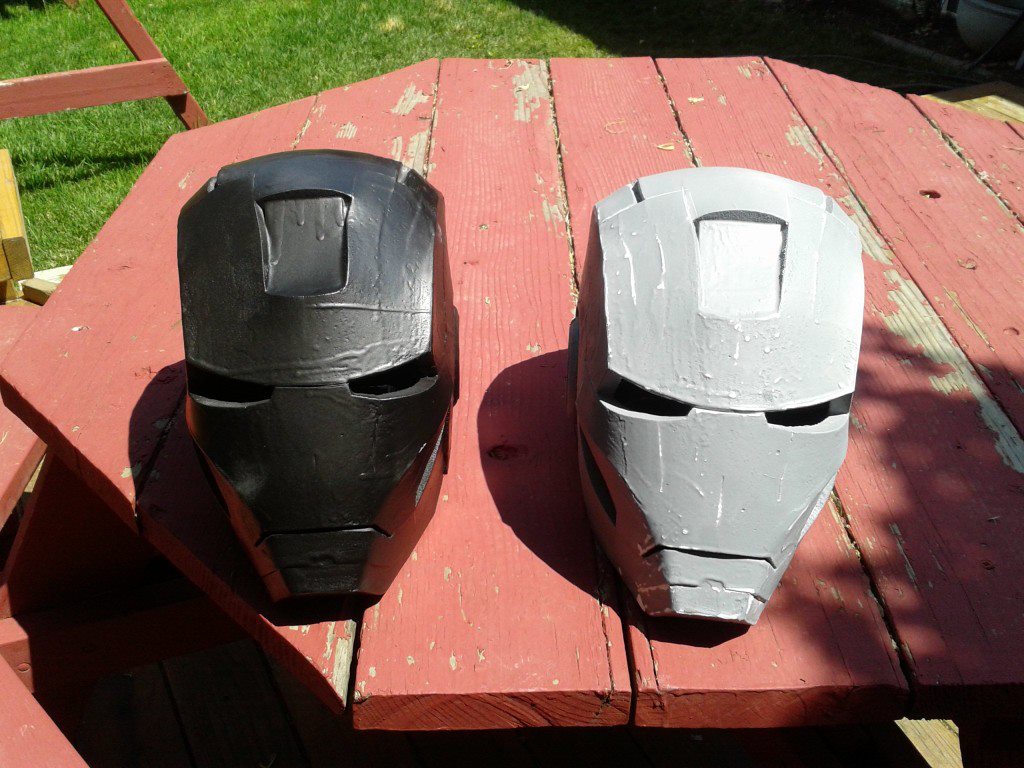
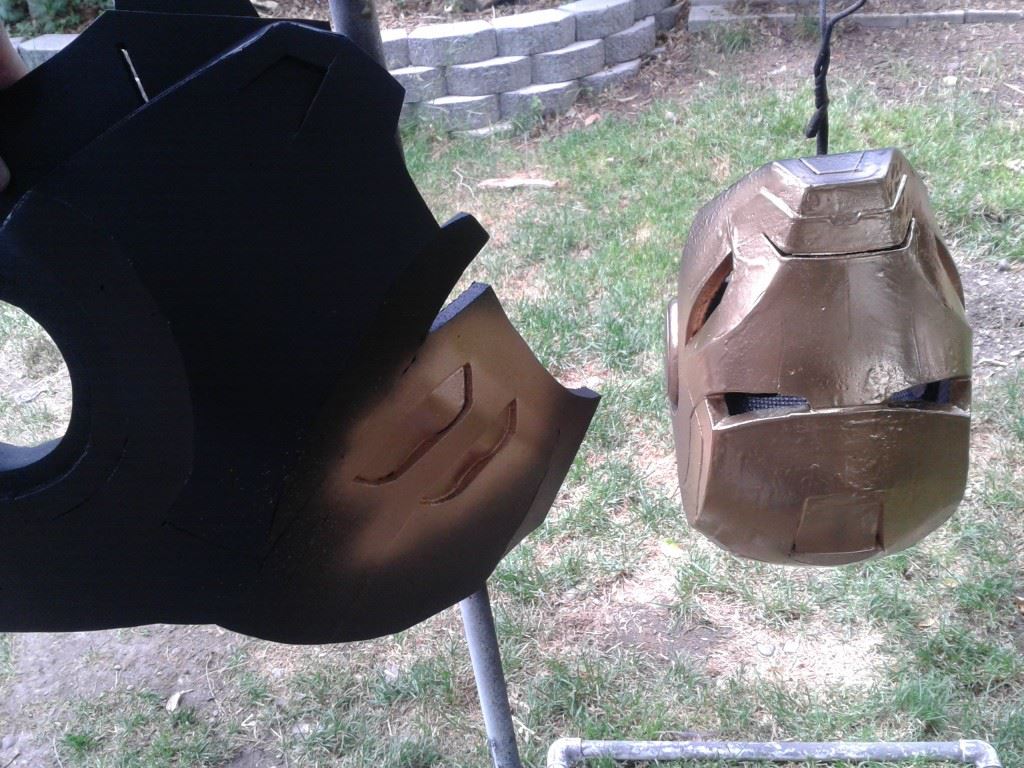
As you can see, several pieces fit together quite well, but others will need some work. For these, I used my great little tiny belt sander, angling certain edges to give a harder corner. The dotted lines you see are spots I took an xacto knife to, cutting valleys almost all the way through to fold up but remain a single piece. This saved on gaps and holes when gluing the foam. The final product: Astute fans will notice that this is the Mark VI helmet. The Mark IV is similar with some slight differences in the screw locations, and the Mark VII has a different chin altogether. I, personally, prefer the look of the Mark VI, so for my Mark VII build I'm going with this one - at least for now. The Mark IV though will get the proper treatment. As for the first helmet attempt, here are a few comparison pics to demonstrate how off it was. As you can see, the new one is not only bigger, but is a better sculpt overall. Cleaner, harder lines, better profile, and looks a lot closer to the mark than the old one. Not that I hate the old one - it just doesn't look quite as good. After that was ready, it was time to throw on the ear pucks. These I made with foam again, rounded down with my table router, and a shaped piece of 1/16" styrene (remember those For Sale signs?) on top for detail. 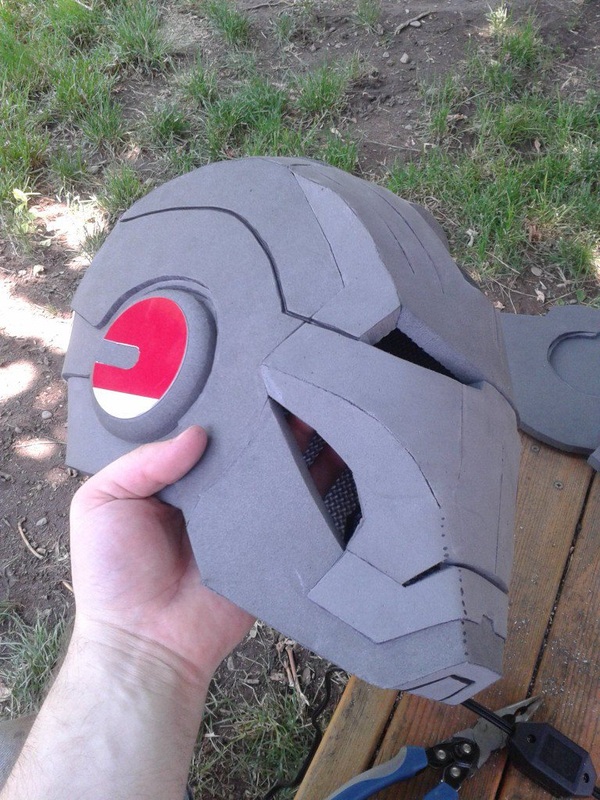
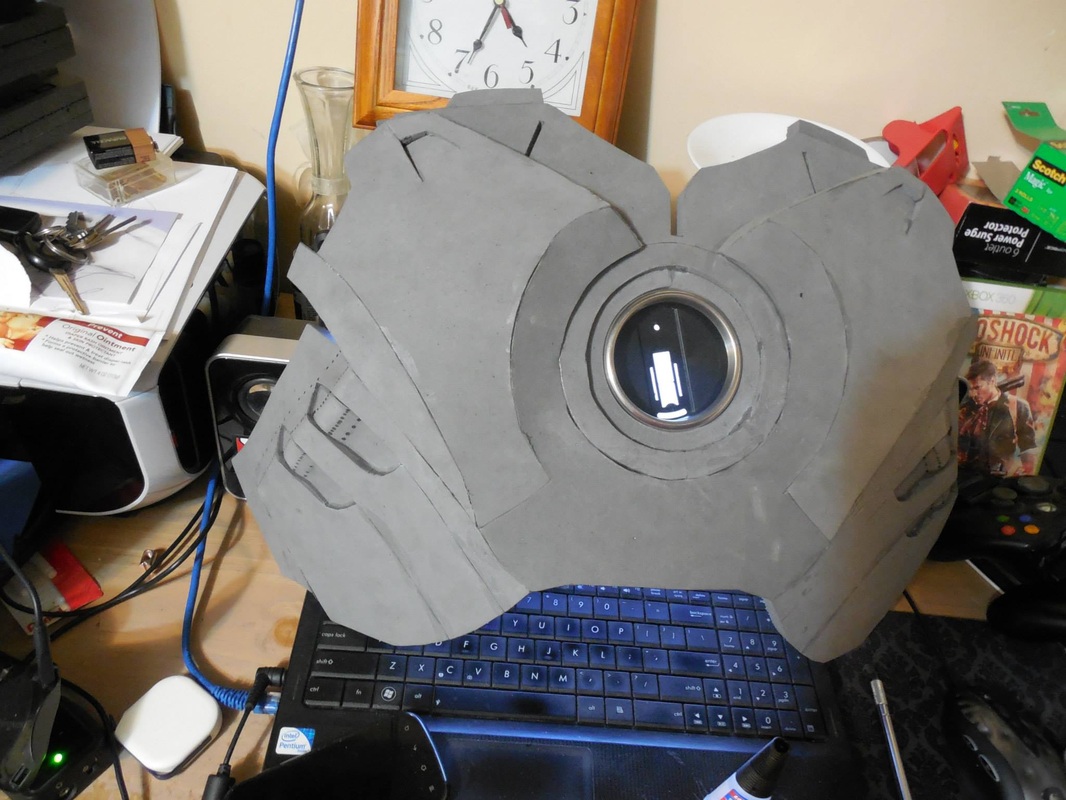
Once those were put together, I started sanding down edges and etching in extra details, like the line on the side of the face and the chin bits. Two helmets, assembled! 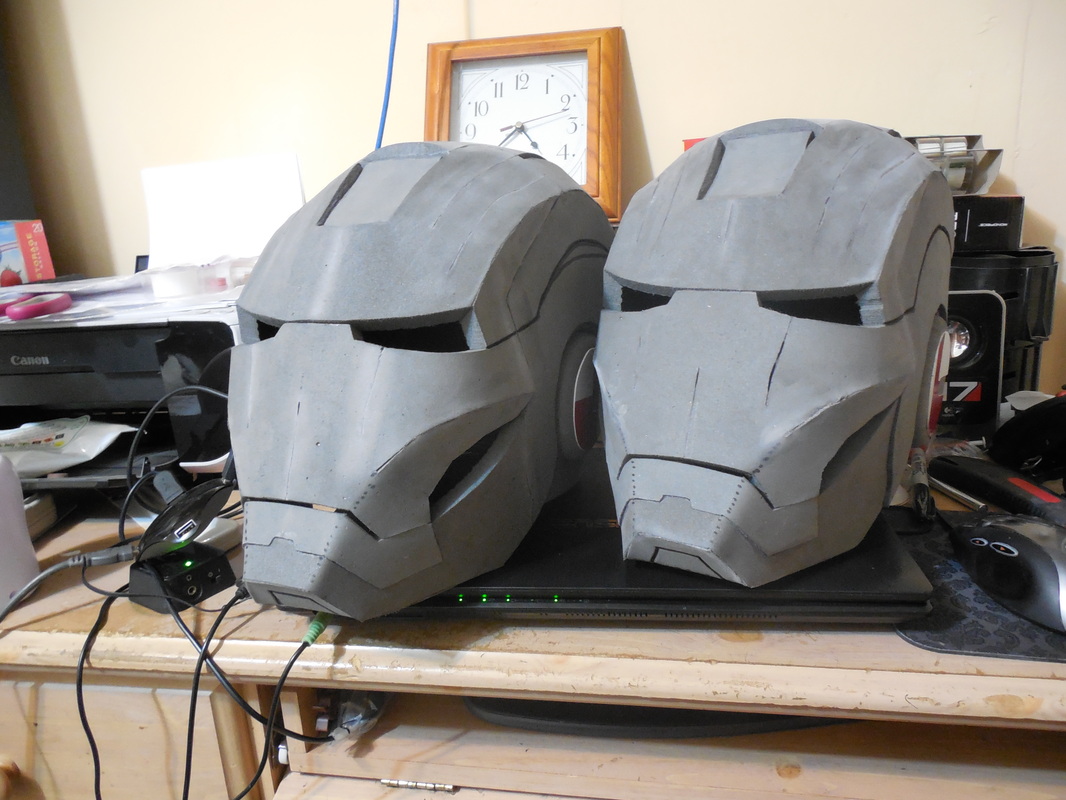
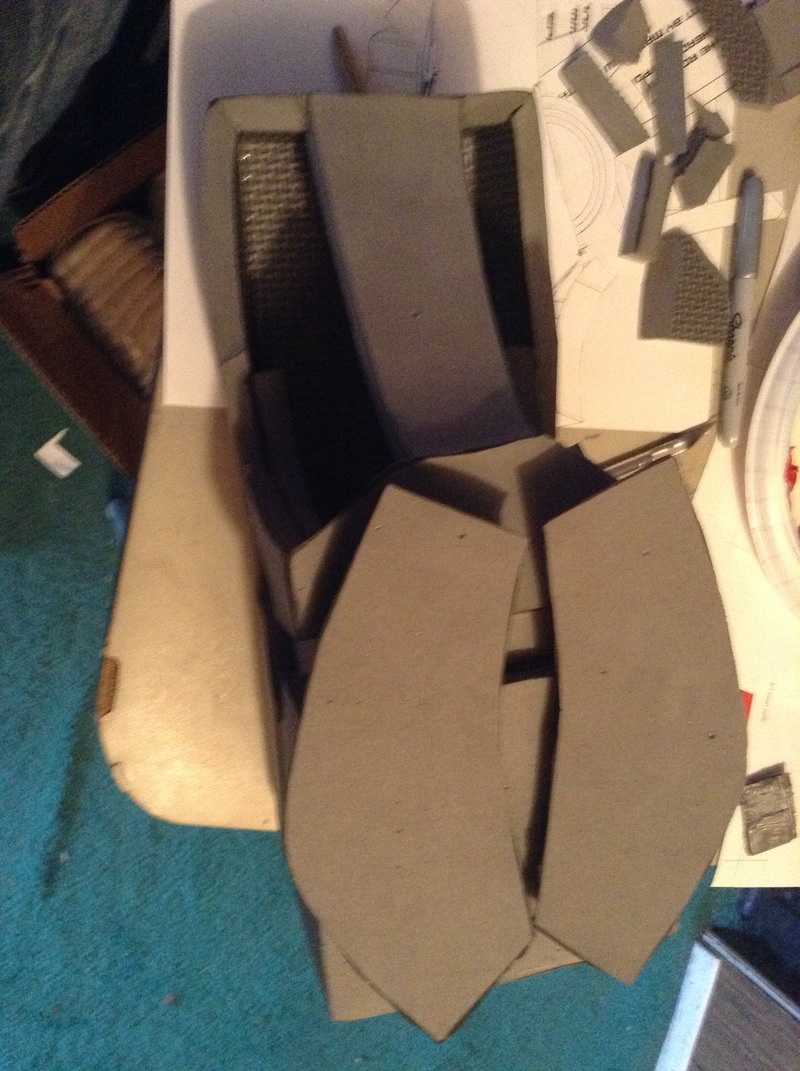
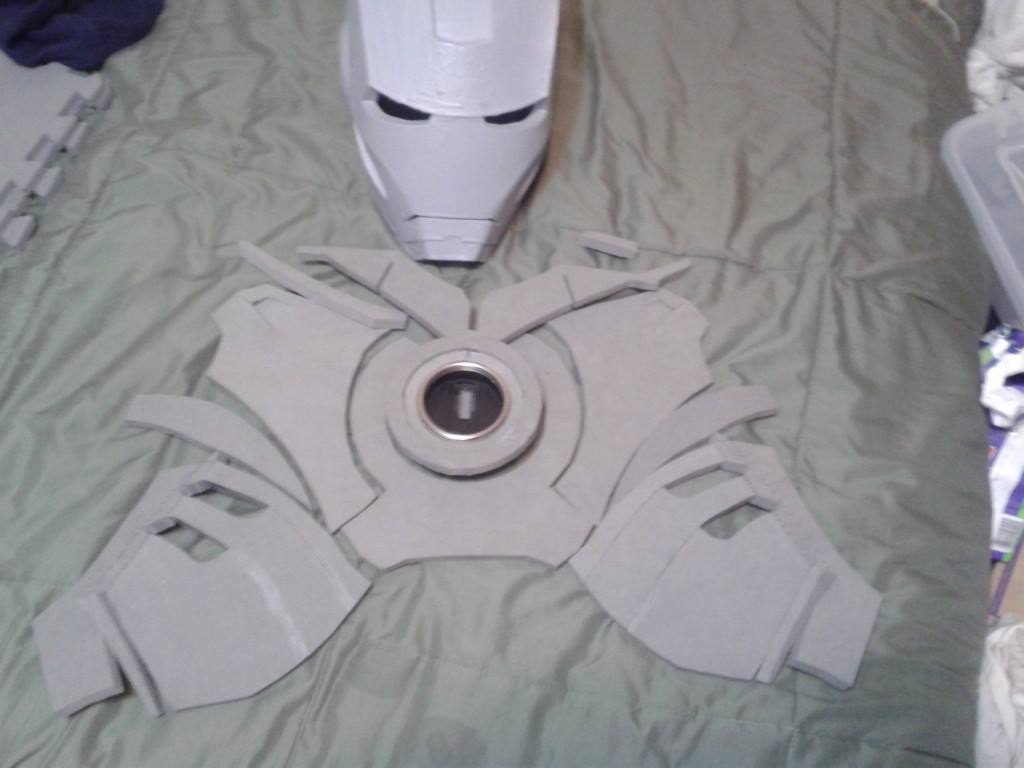
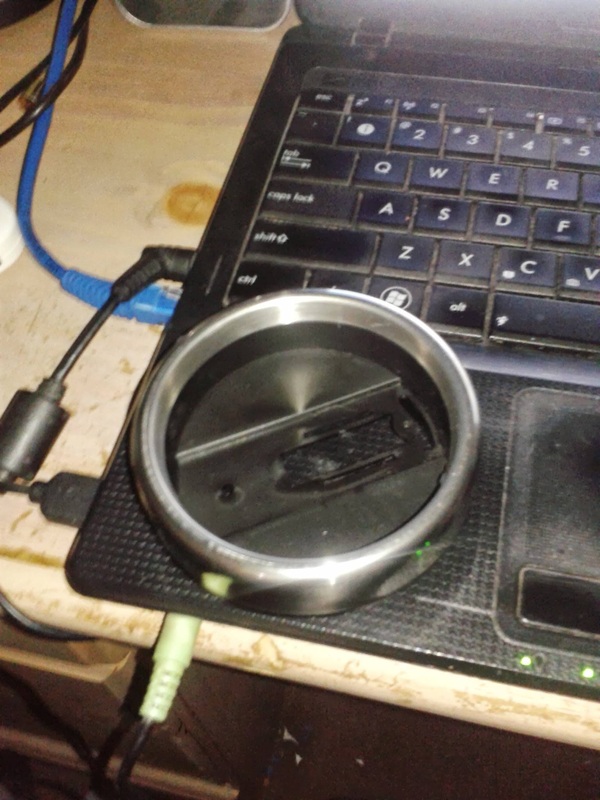
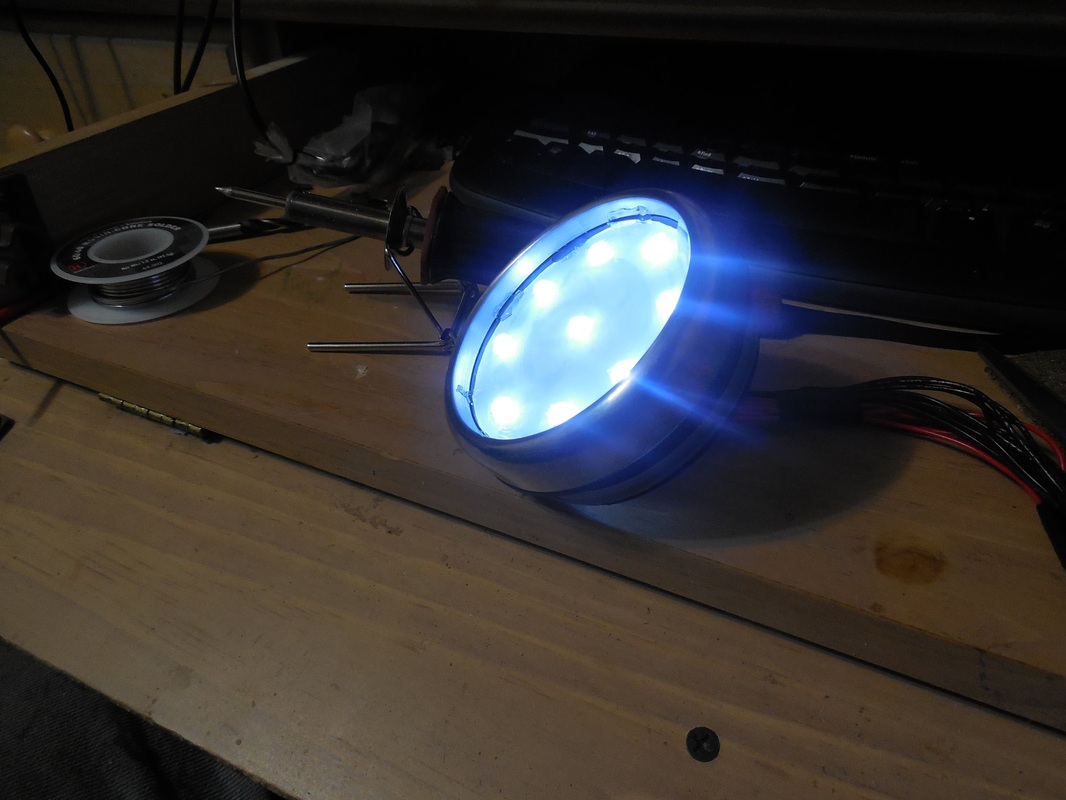
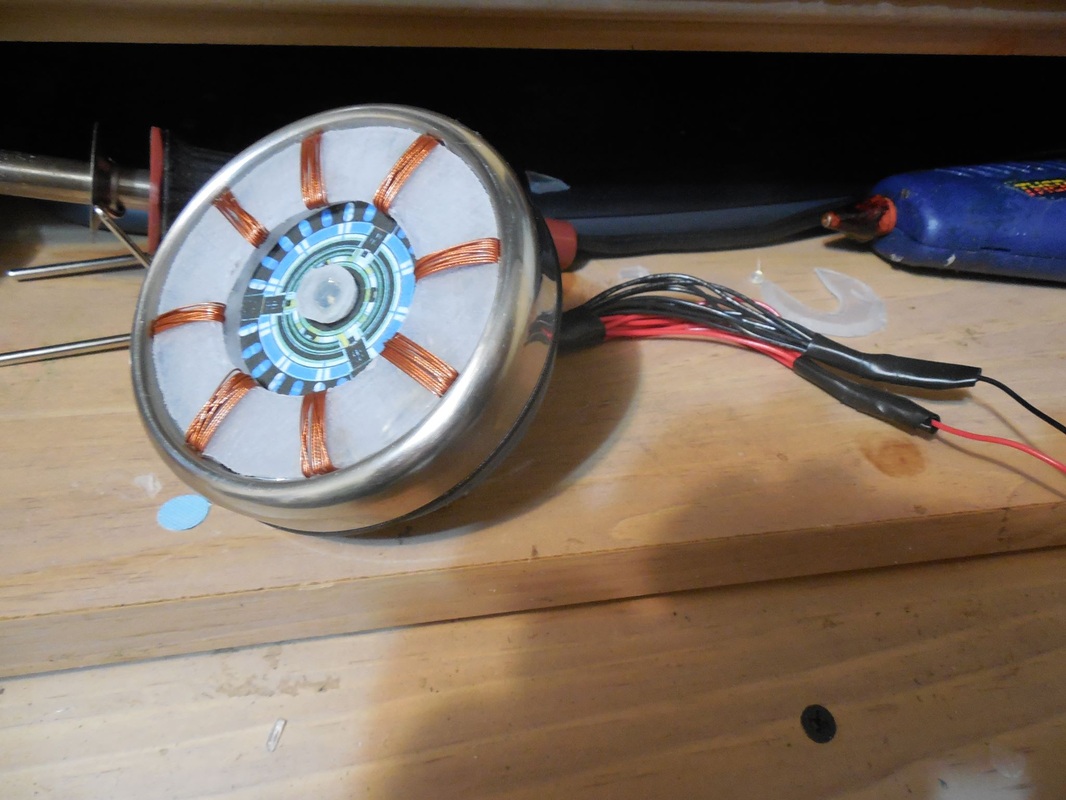
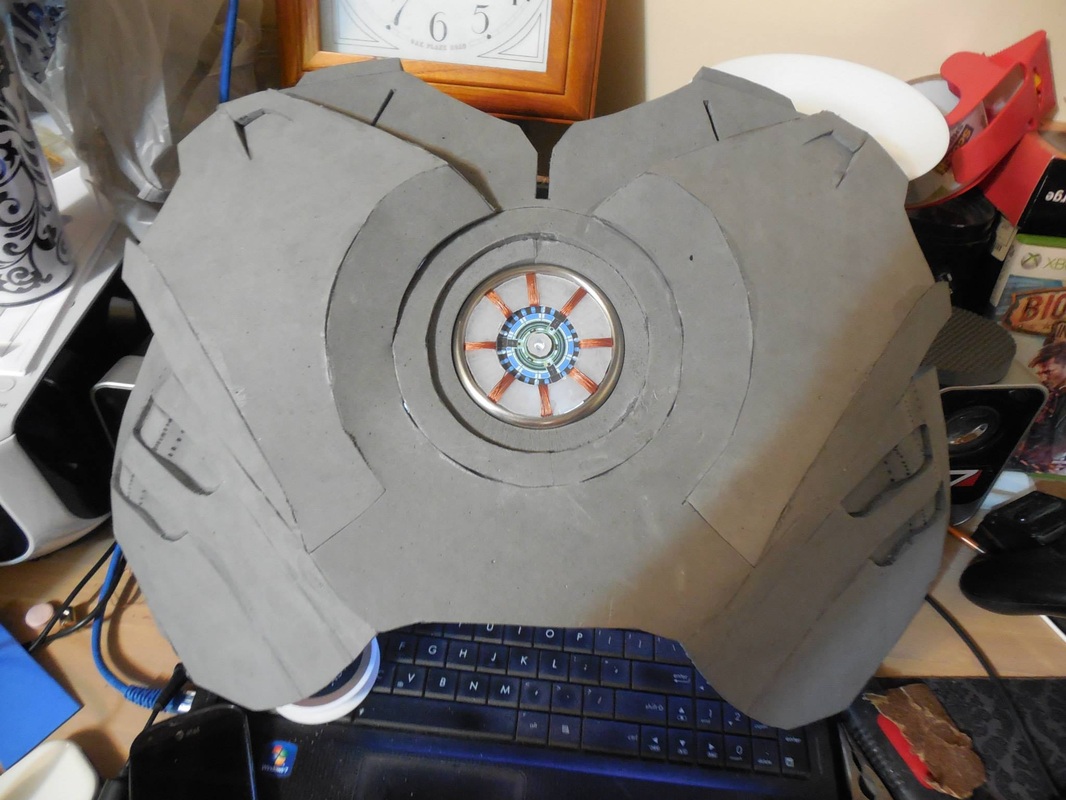
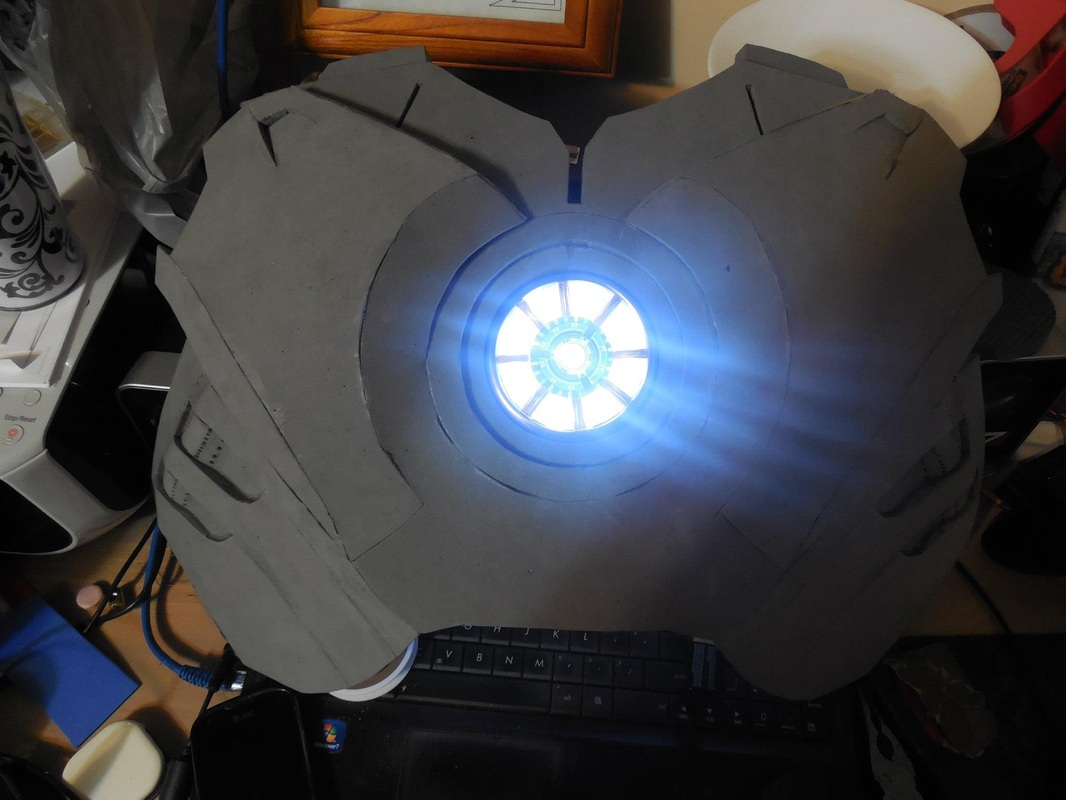
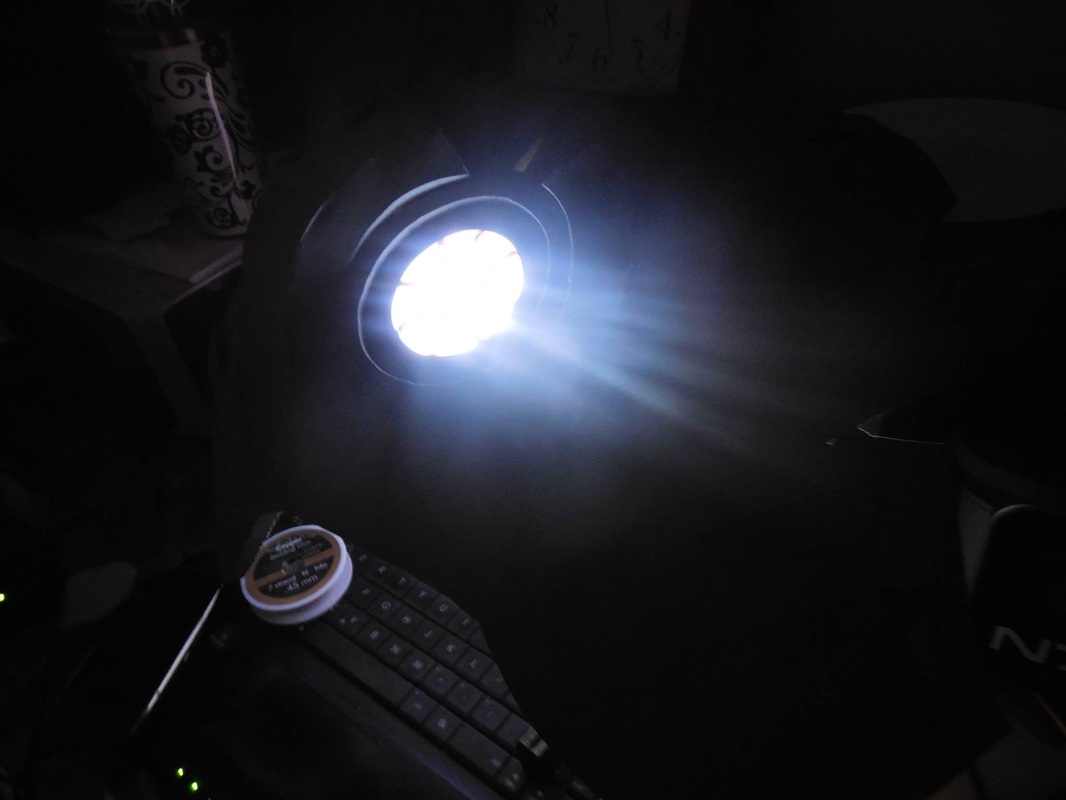
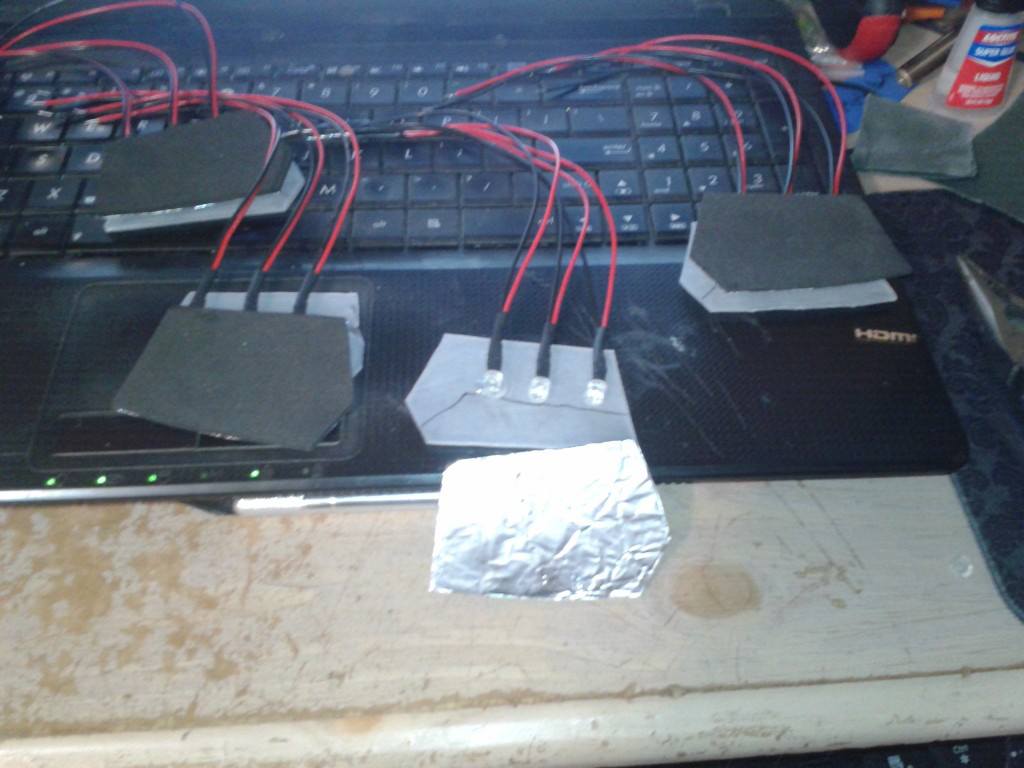
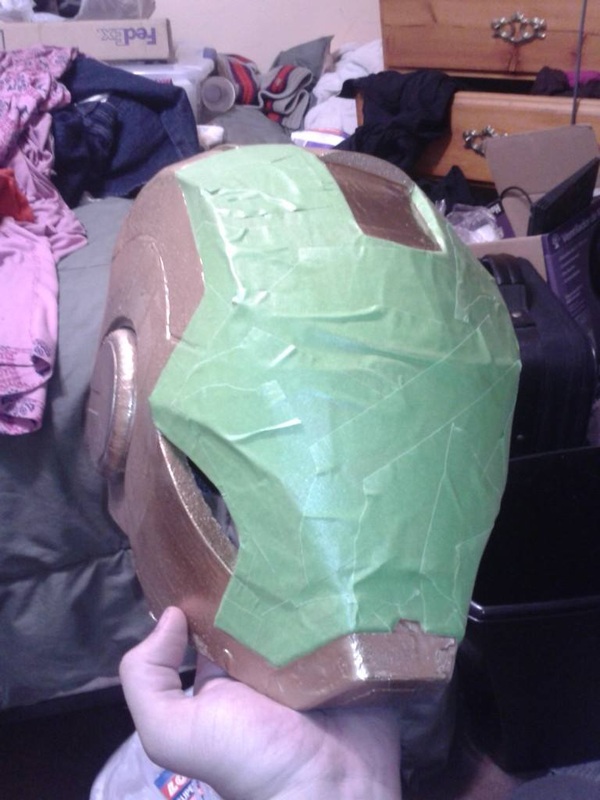
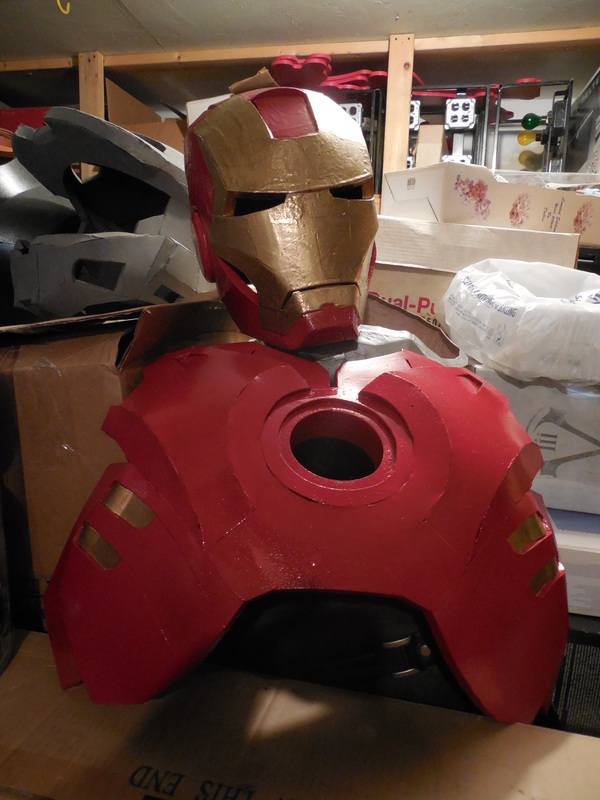
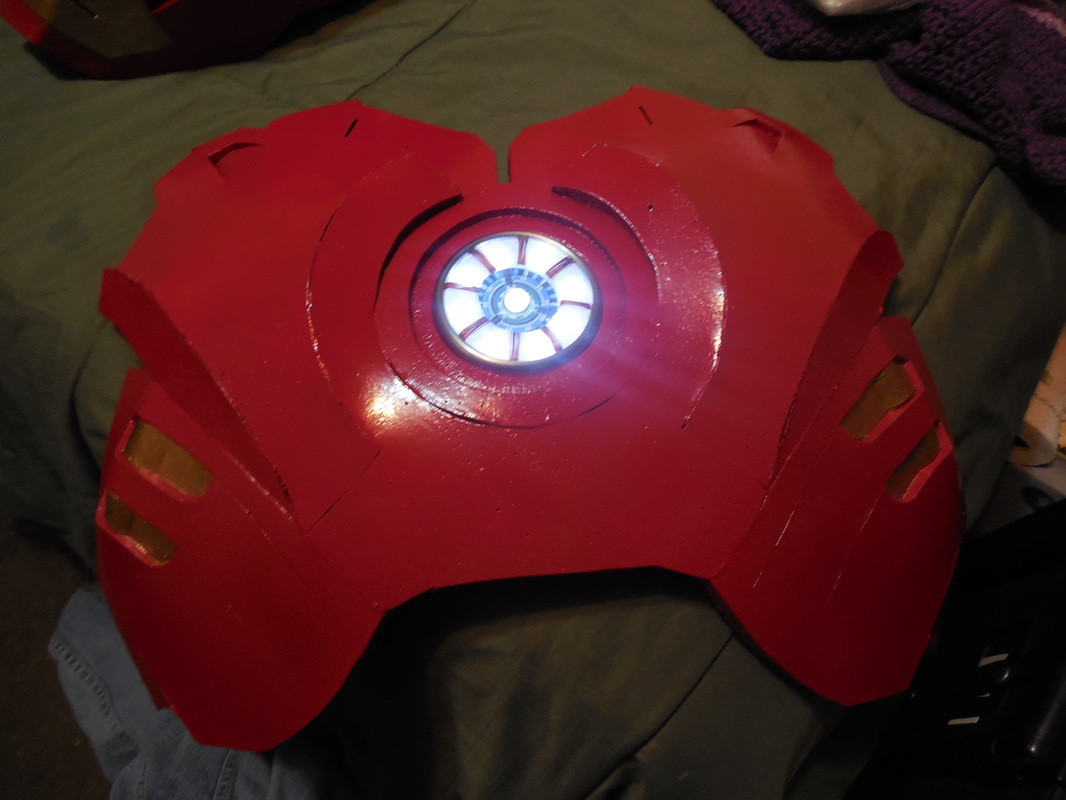
Then I started on the chests. Again, these both have different designs, so I couldn't just make both and do some small adaptations. First off, the Mark IV. Lots of curves and folds in this one, so it was a bit harder to get everything even. The center part of the chest moves in like three different directions too, so that made things interesting. I used the mini belt sander to get the angles right again, and it turned out just like I wanted. :) The Mark VII was easier: (Shown with random N7 Helmet build) Lots more basic shapes, meaning easier making but I'll have to wait to paint until the back section is ready to attach. Needs the curve to be just right! The helmets, if you're wondering, were both being painted while I worked on the chest pieces. Since I'm making two suits at once, and one is for a customer, I'm trying to multitask as much as possible to speed up the process. Now, there were quite a few seams I wanted to cover, so I tried out a new technique: resin. Of course, I thought that meant polyurethane, and now know that means Epsilon, so watch and learn from my sad mistakes. When I spread the resin, it dripped everywhere and left long lines and bumps. Of course, it was 105 degrees outside, which made the normally 15 minute cure time turn into 2, so I couldn't spread those well enough. Drip marks everywhere, wasted resin left and right, I was not a happy camper. I pushed on though, priming it for sanding. That took forever and barely worked, so I decided to test paints on them while I gathered funds to get Mod Podge to smooth that all out. Before that, though, I took a break from foaming and decided to have a go at the Arc Reactor and the lighting for the eyes! Everything you see in the above pictures came from recommendations by The Heroes Workshop, headed by Stealth (an awesome Iron Man cosplayer with a YouTube channel full of great tips and tricks). The wall and casing for the reactor? A coffee tumbler lid. The LEDs are diffused by a piece of plastic from an old tote, sanded and scratched up on the back side, as well as the higher outer ring. The inner detailing on the reactor is a print out of a high-resolution shot of the actual reactor, cut out and glued in, and the copper wiring is simple copper colored wire from Walmart's craft section. It's cheap, it looks good, and it works. In person you can still see the individual lights, but as you can see in pictures it shows up perfectly diffused. For the eyes, it's the same plastic sanded up, backed with black craft foam that has tin foil attached. This spreads the light a bit better, and keeps it from blinding the wearer. Back to the painting.... Painted the gold first, since that was easier to tape off on the helmet and the inset sections on the chest. On the chest is just plasti dip, unlike the helmets, since I didn't want to risk wasting more resin and having it look terrible again. After the red was dry, the tape came off. Chest looks great, and the reactor fits perfectly snug without any adhesive. As I mentioned before, the helmet is not complete and the eyes are not yet attached, but this gave me a good chance to test the fit, which worked wonderfully. There are a lot of tape lines all over it, but I'm not worried as I still need to clean it up a ton (as you can see).
Unfortunately I haven't done any work on either of them in several months, as the person who commissioned me originally has dropped out of contact. They wanted the helmet by the release of IM3, but have only paid the deposit with nothing since. If they haven't made any more payments by the promised completion date, you may see at least one of these helmets up for sale. We shall see though! I will definitely post more updates on this when I have a chance to make more of mine. Onward! |
|


 RSS Feed
