 These gloves were a lot of fun to make, and a neat experiment with some new super cool electronics stuff! The Tensor gloves are a creation of author Brandon Sanderson, from his young adult novel Steelheart (which is awesome, go read it - actually go read everything he's written!). They are described as "thin glove[s]...[with] lines of metal along the front of each finger. The lines joined in a pattern at the palm and all glowed softly green." 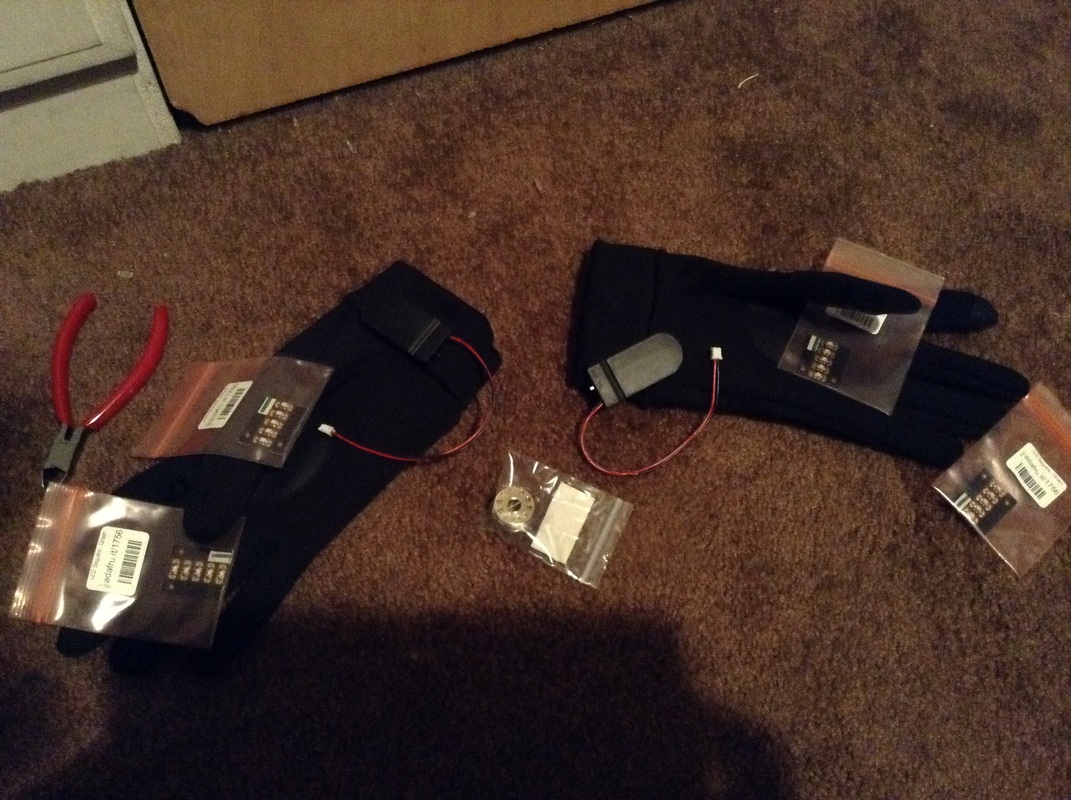 This commission was for my brother, who had made a set before but wasn't too happy with it. We collaborated on the plans, and he bought and shipped me the materials he wanted me to use. What you see here was the fruits of our discussions! We opted for: Adafruit Green Sequin LEDs Adafruit Conductive Thread and a 2-pack 2032 battery pack to power it all. Once it all arrived, I got to work! 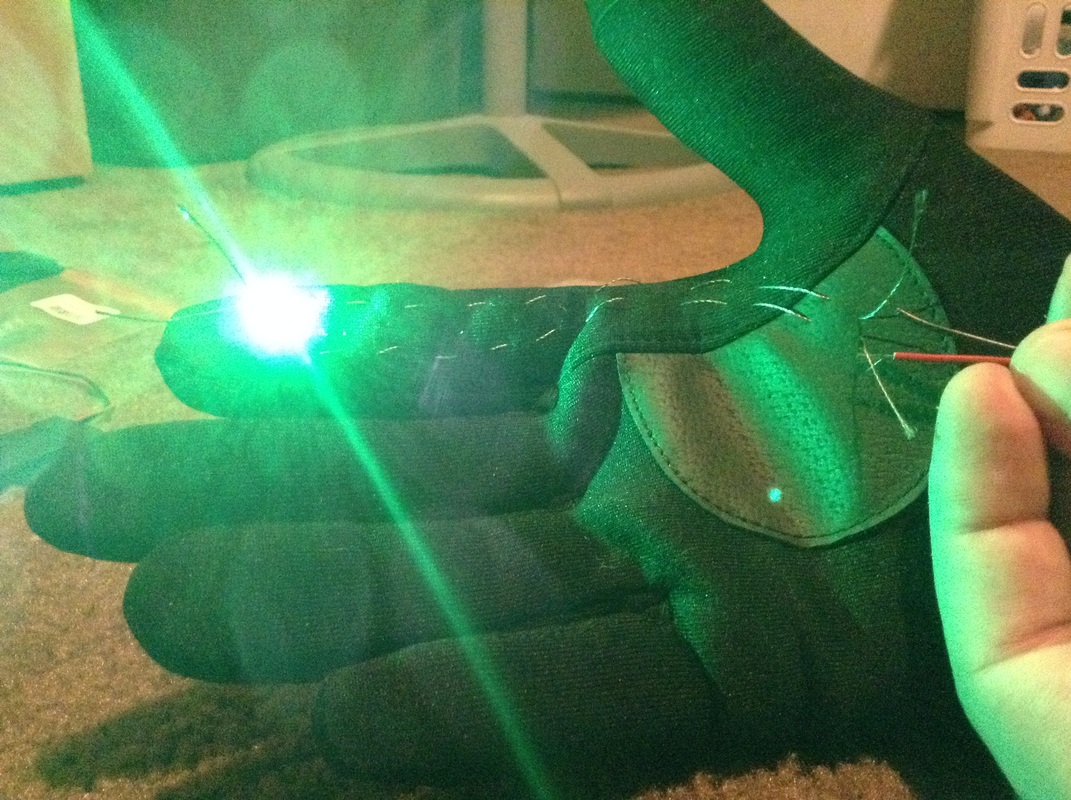 These suckers are bright! The thread sews really well, though if it frays it's hard to get it into the needle (can't wet it and twirl it like normal thread). And yes, that's totally done by hand. Took forever! I highly recommend both of these products, since they're so easy to use and work so well. The thread doesn't shock you, and only has issues if you try to ball your fist, since the wires cross at that point. Luckily the battery packs have on/off switches, so you can turn them off and eat, buy things, you know - the important things. :D 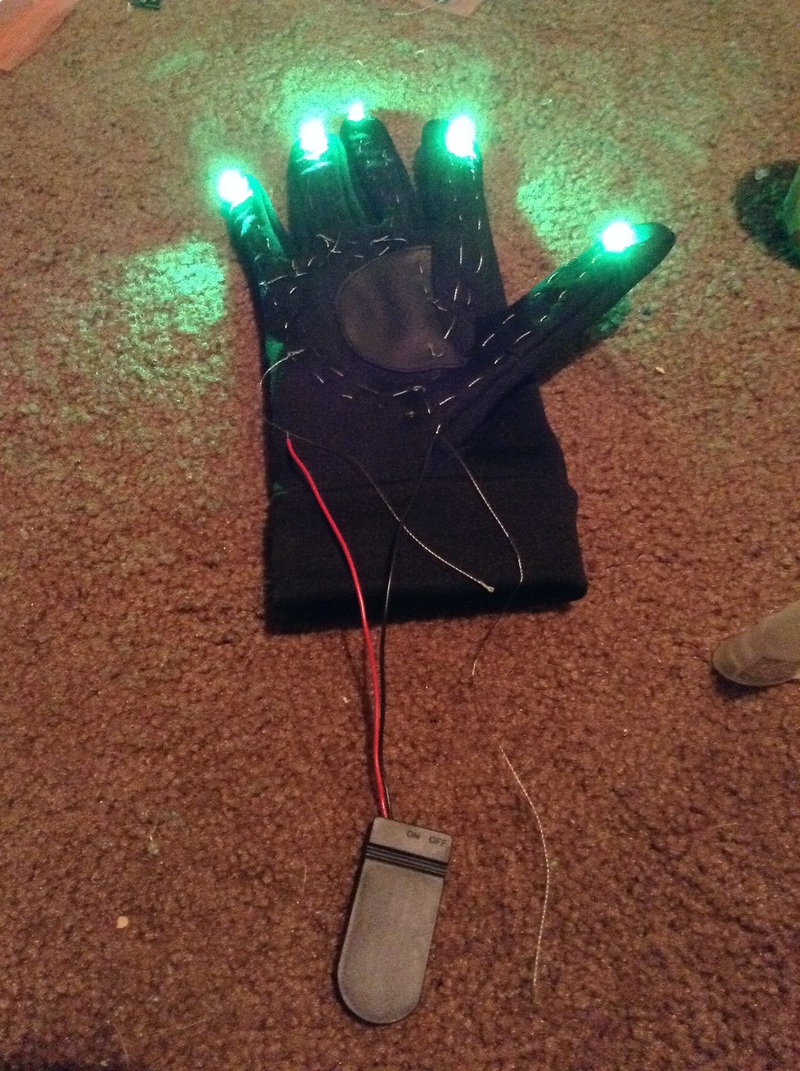 Did some readjusting with the threads after some wires ended up not working well, and finally got all the fingers attached! Dabbed a tiny speck of superglue to where the thread connected to the LEDs just to make sure they didn't come untied - no soldering here, didn't want to burn the gloves! Once the fingers were done, I threw on the next five lights, this time in the palm. 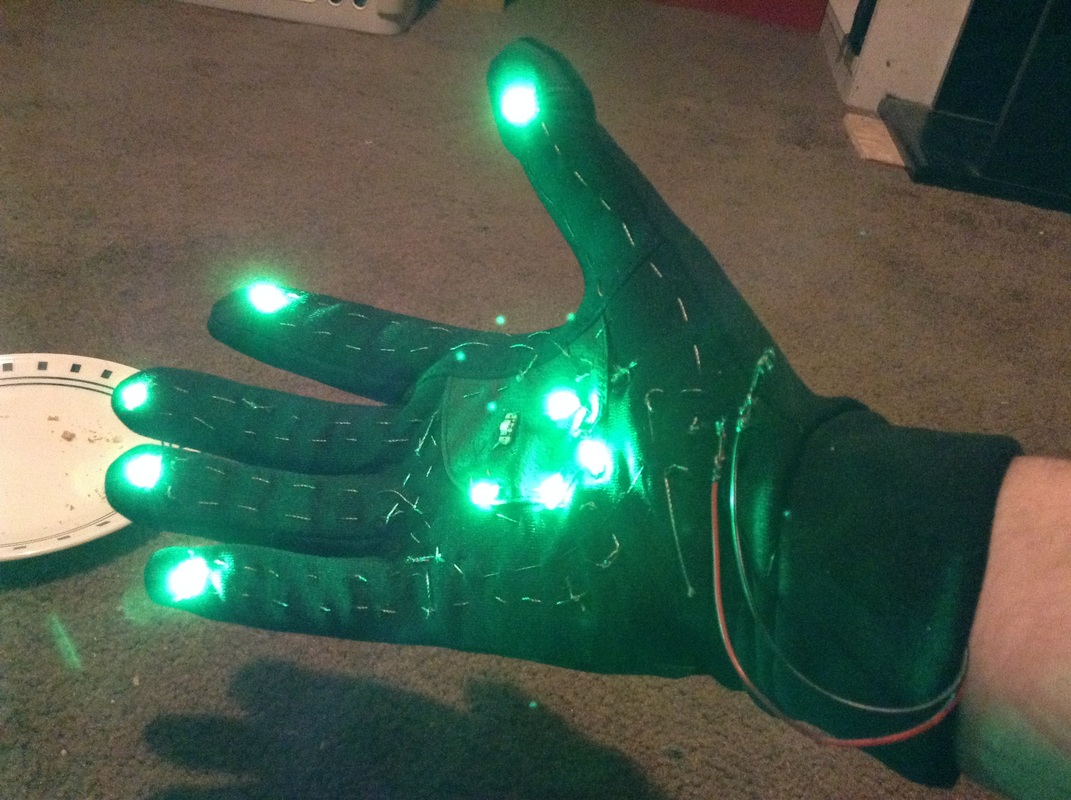 That one light gave me grief until the very end, when I finally gave up and added some solder to get the connection going. I also wrapped the wires to the battery with electrical tape to keep them from touching and shorting out. Left the wires hanging out though, to give it the hodgepodge wires 'n' metal look they're supposed to have. The wrist part of the glove was secure enough as well to hold the battery pack underneath and out of the way. One glove down, on to the other! 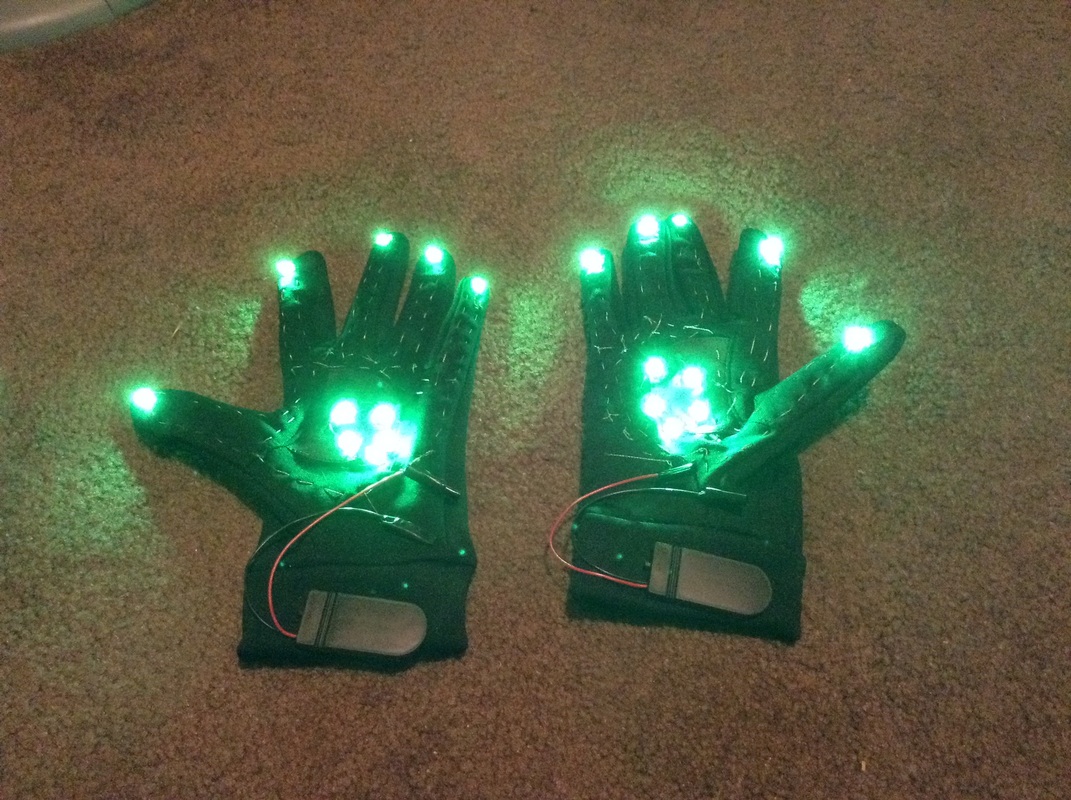 The great thing about this build is it can totally be adapted to other genres. People were suggesting magic effects from various games and movies, and even my Mass Effect peeps were saying they were perfect for biotics! Future ideas..... ;) Anyway, my brother loved them, and most importantly the author himself loved them! My brother showed them to him, cosplaying as one of the main characters, Prof. 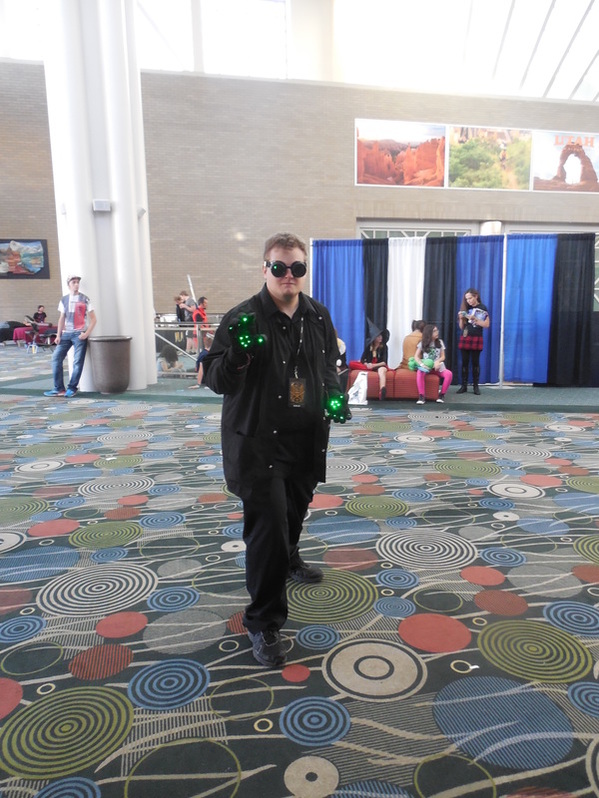 All in all, a fun, simple build!
9 Comments
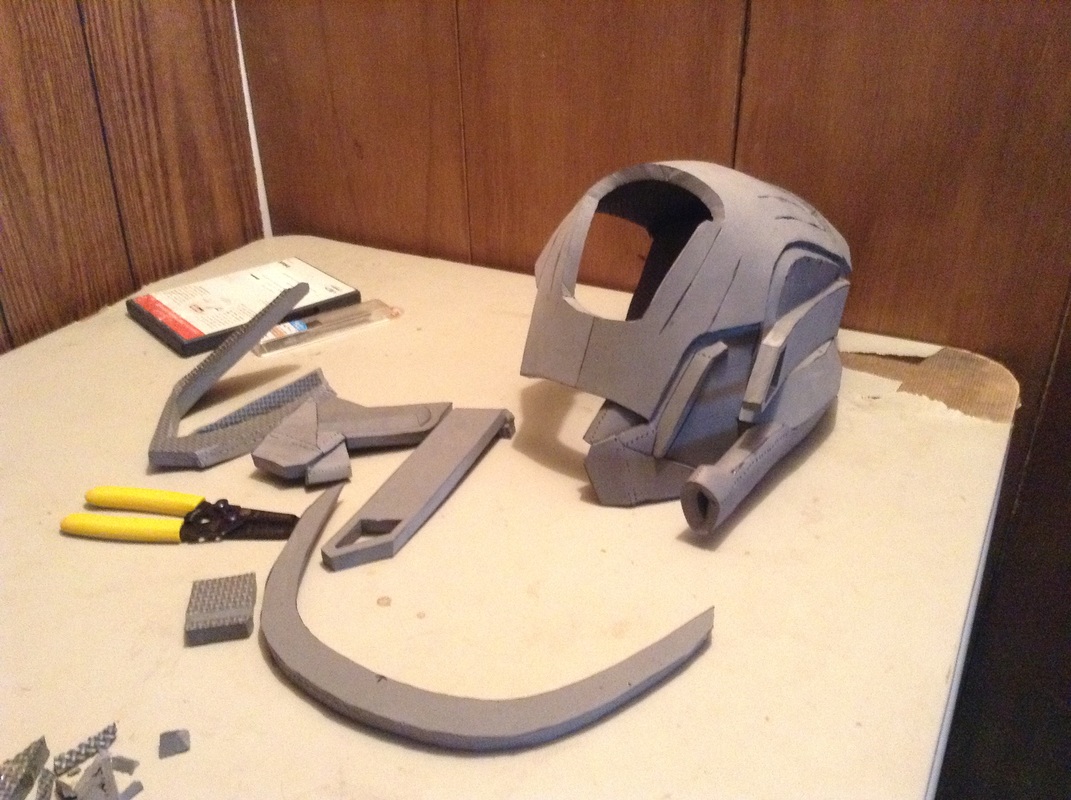
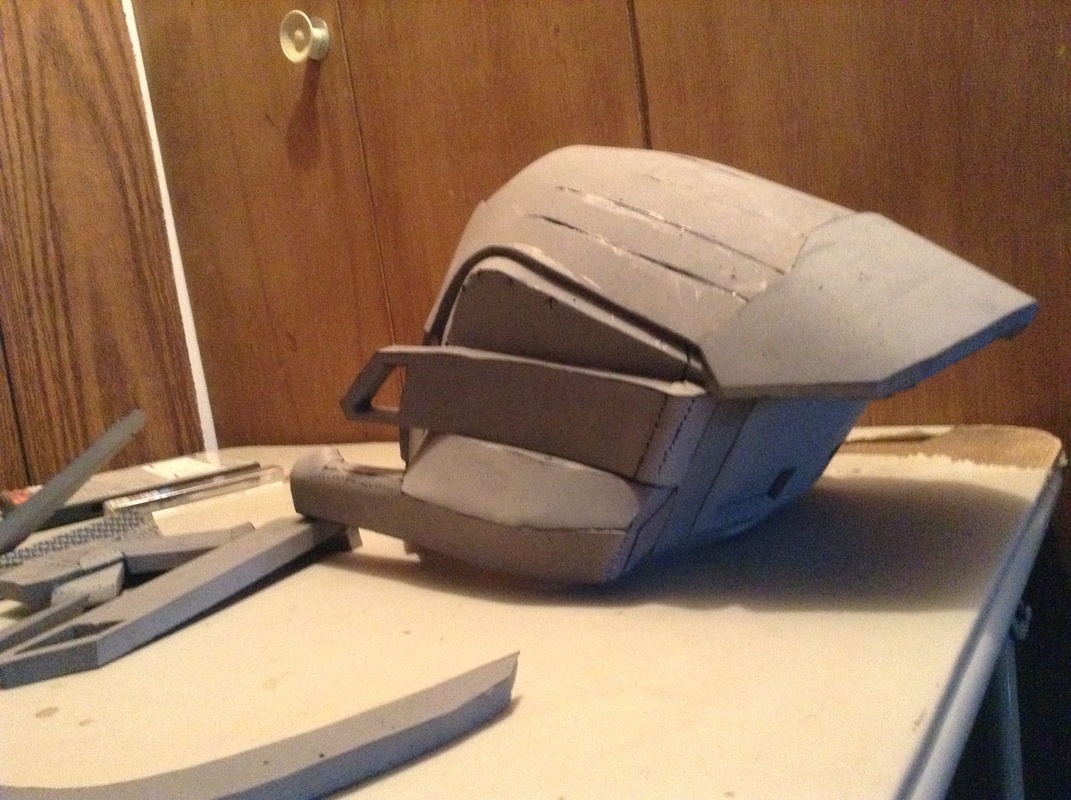
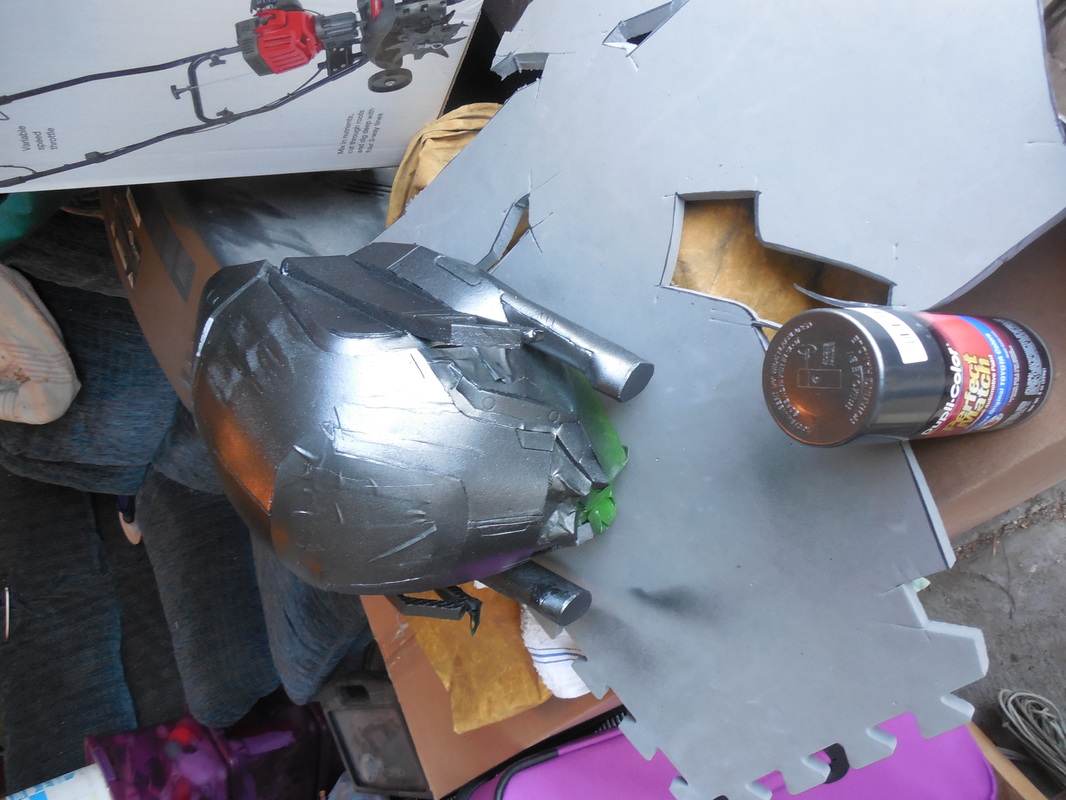
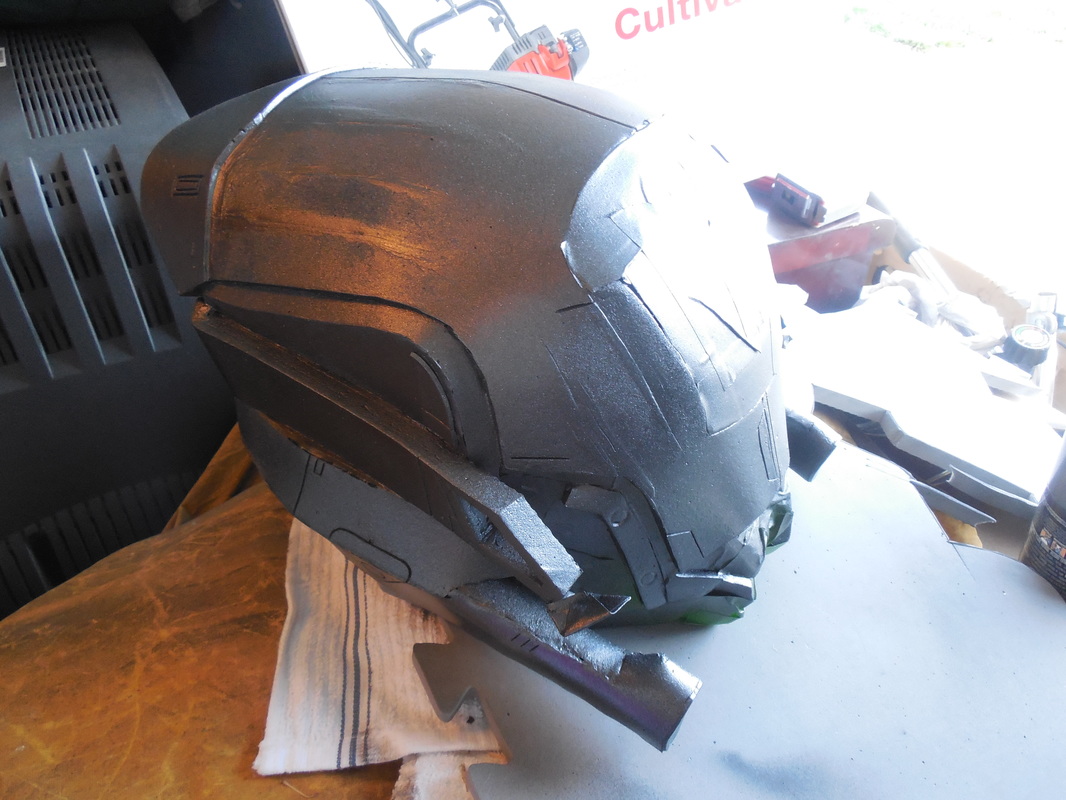
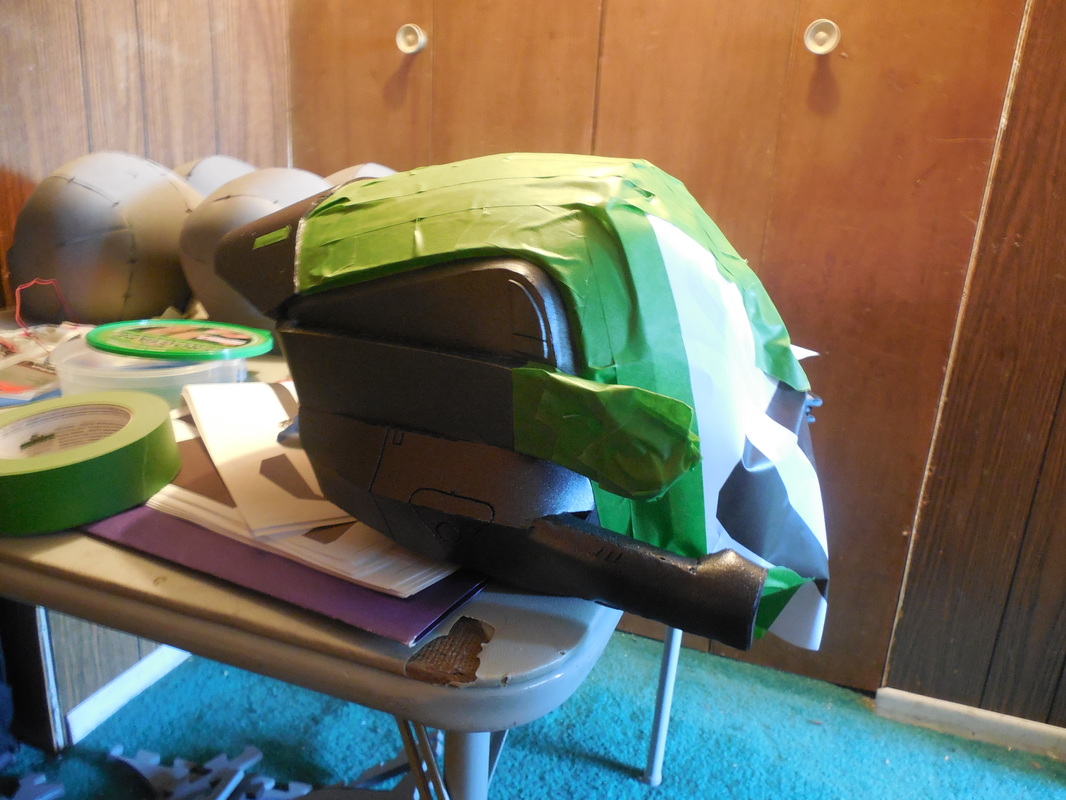
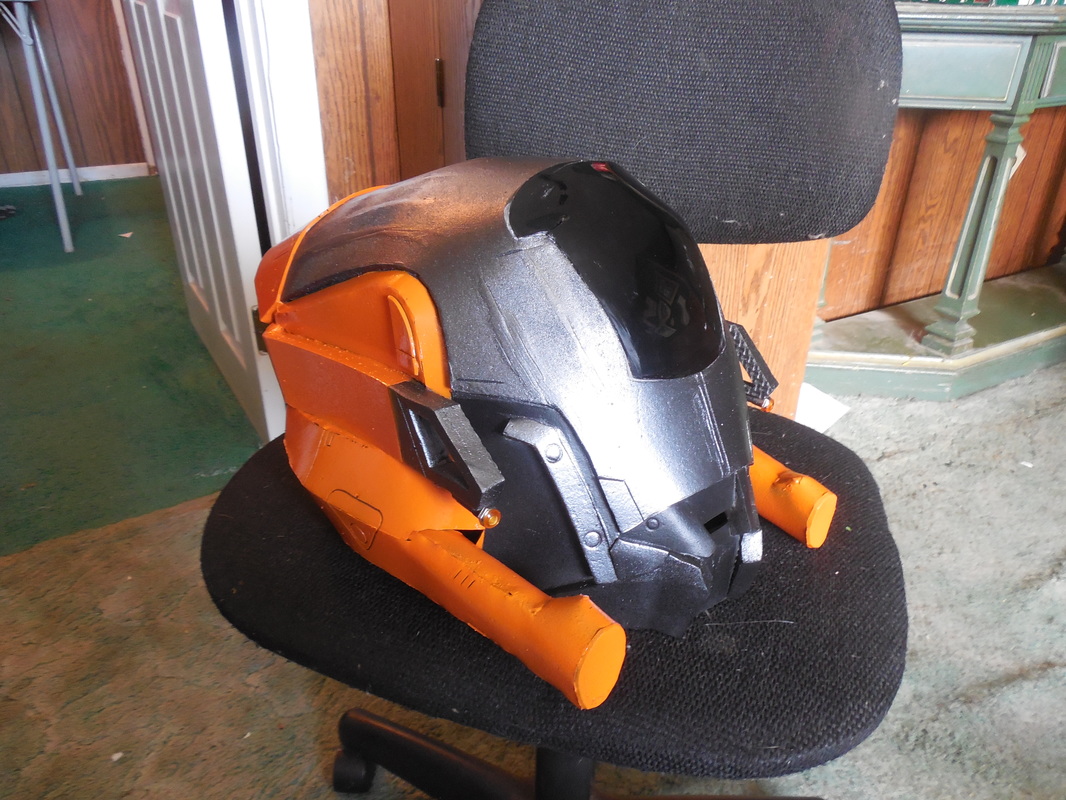
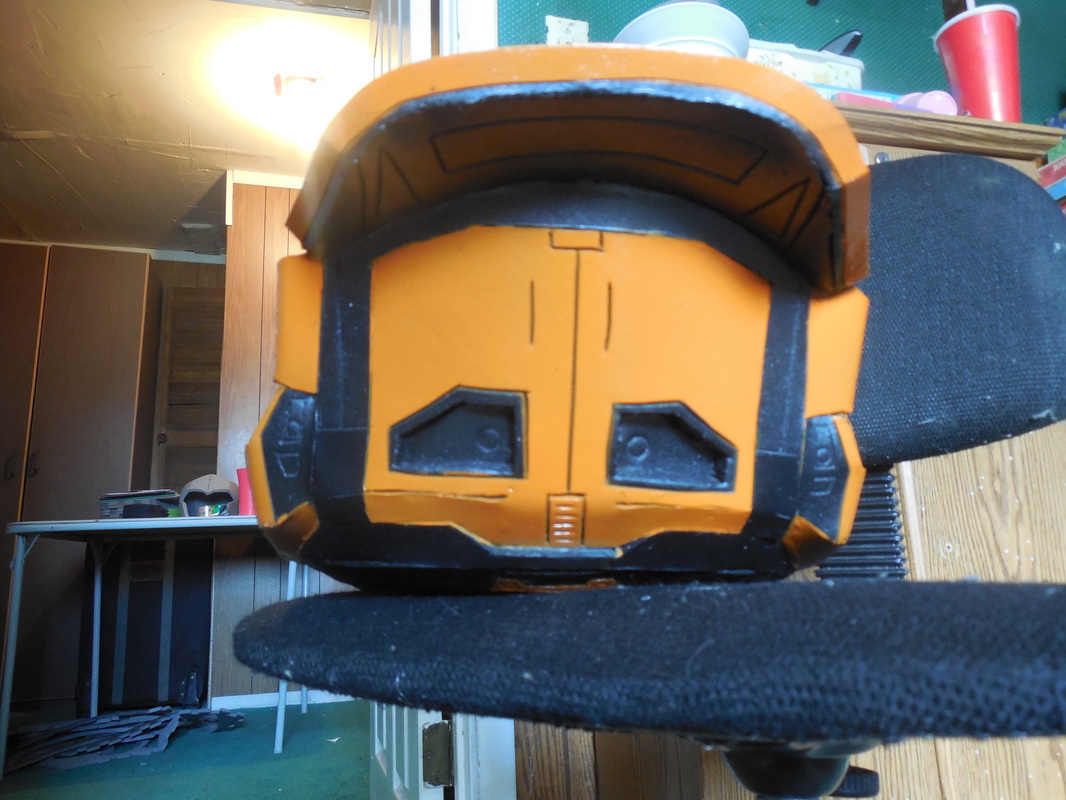
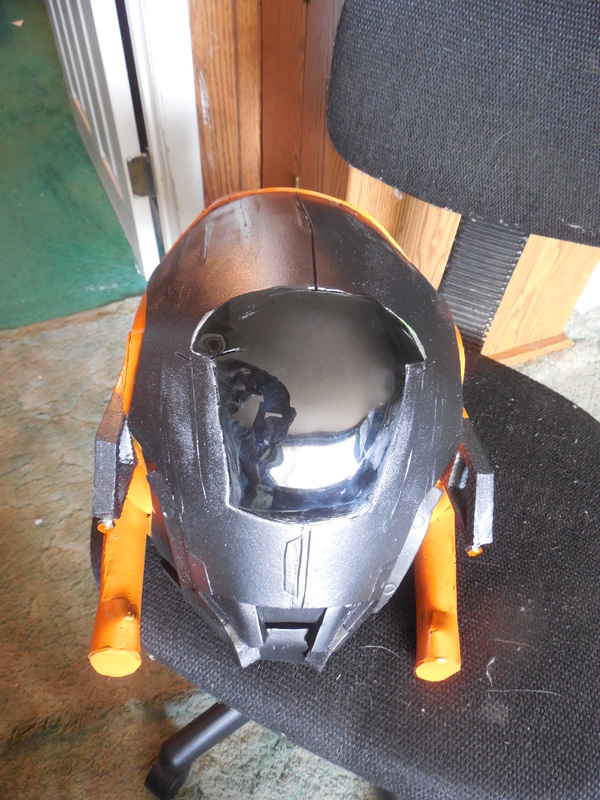
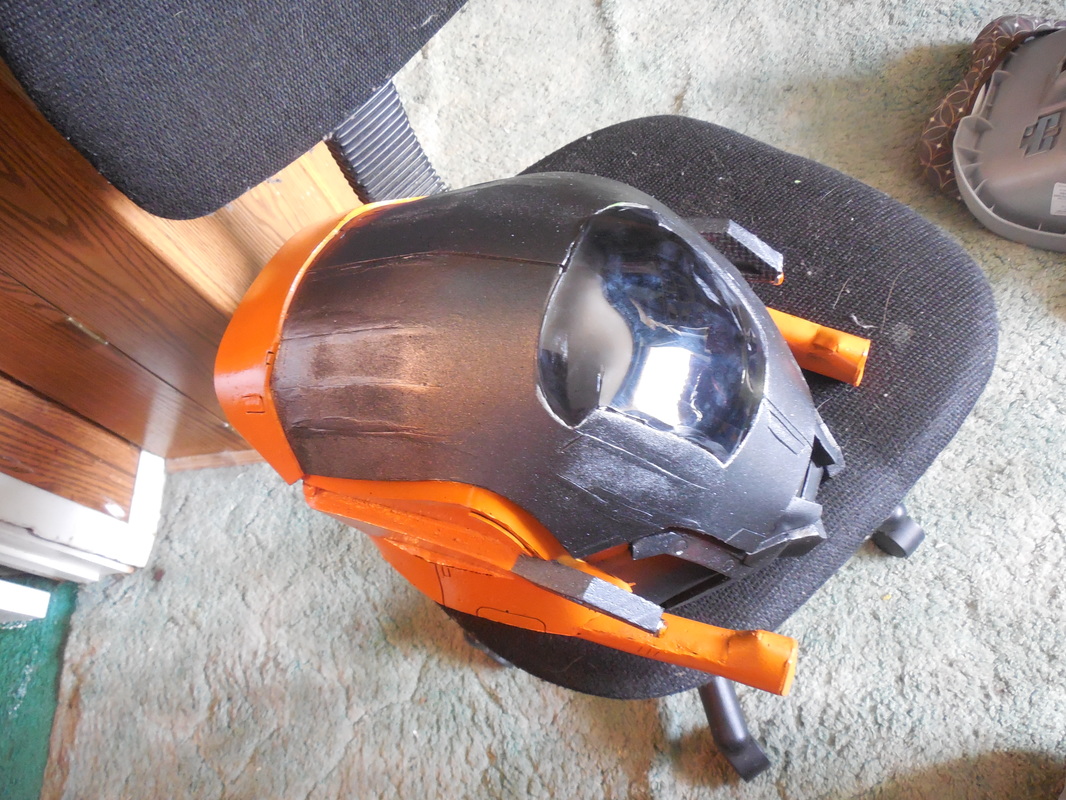
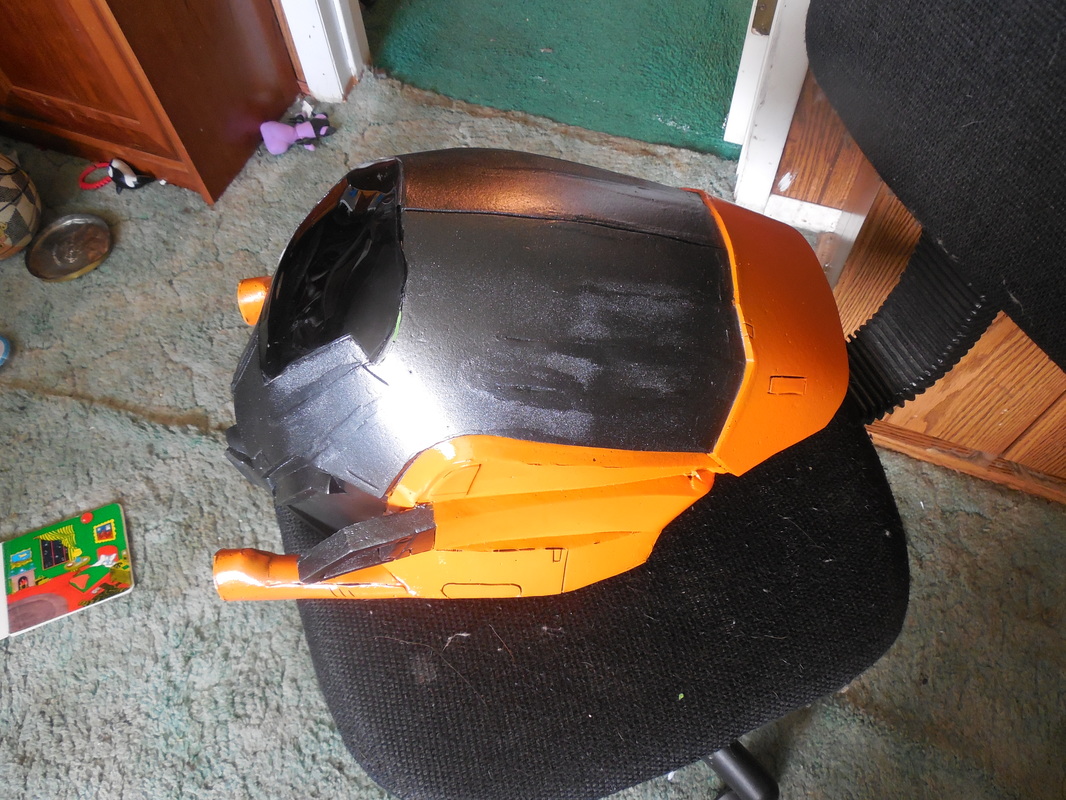
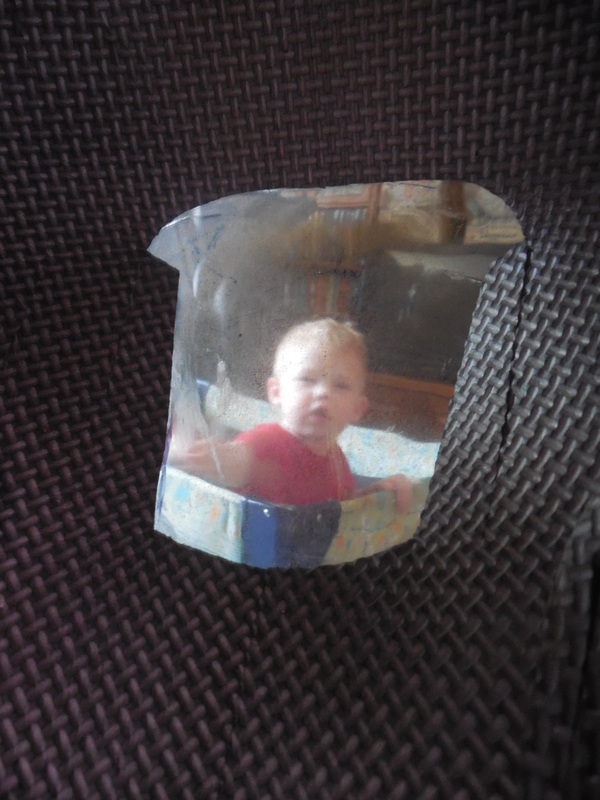
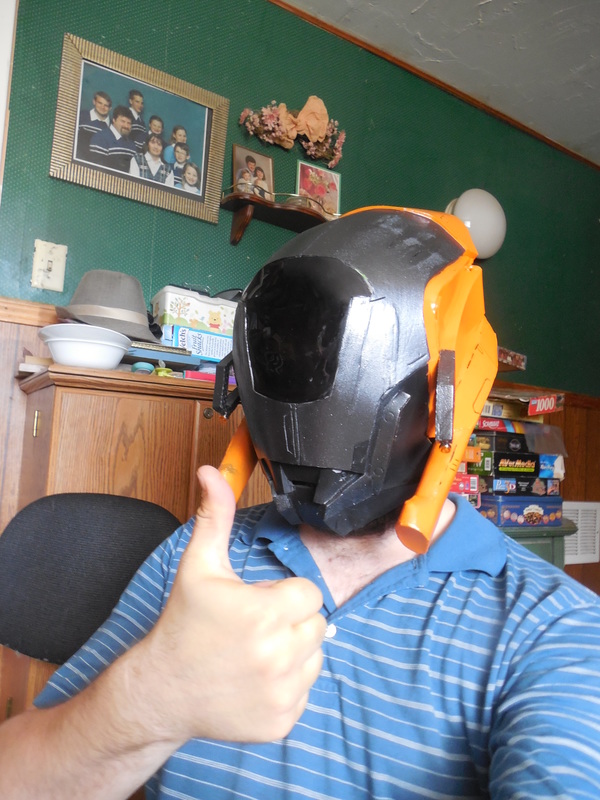
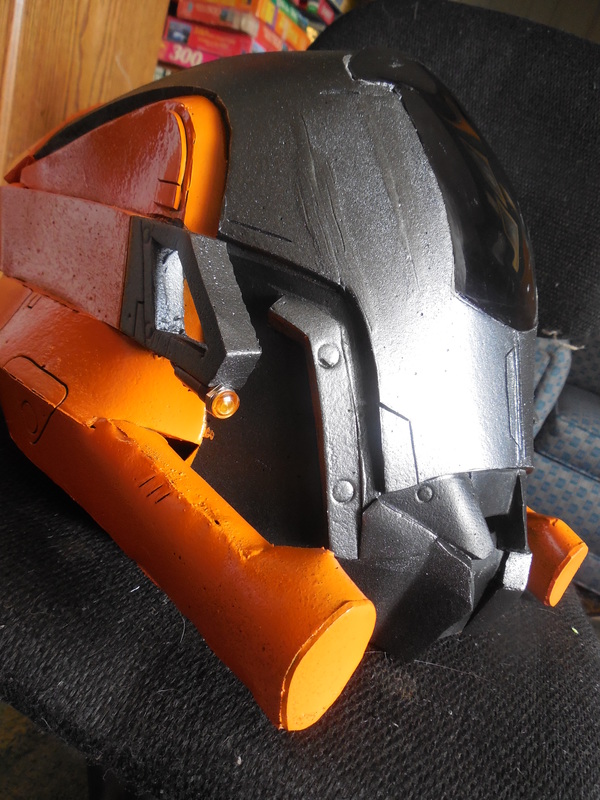
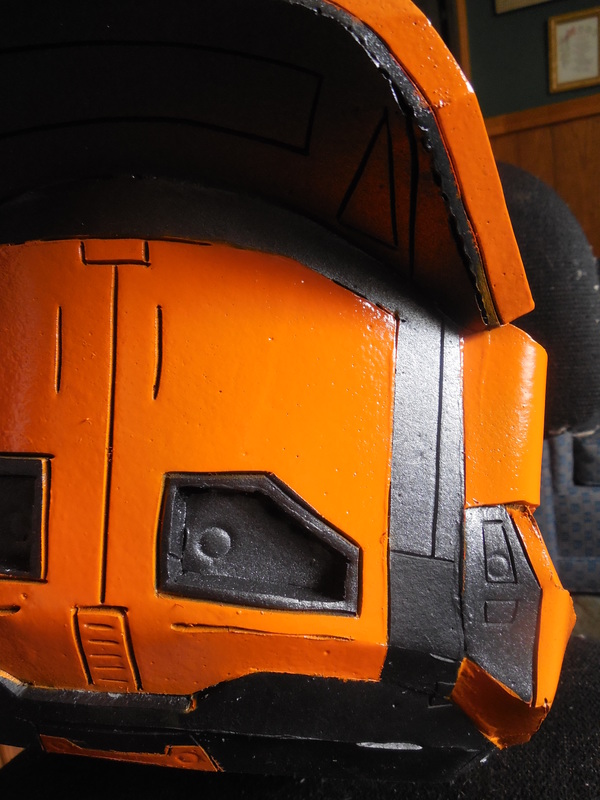
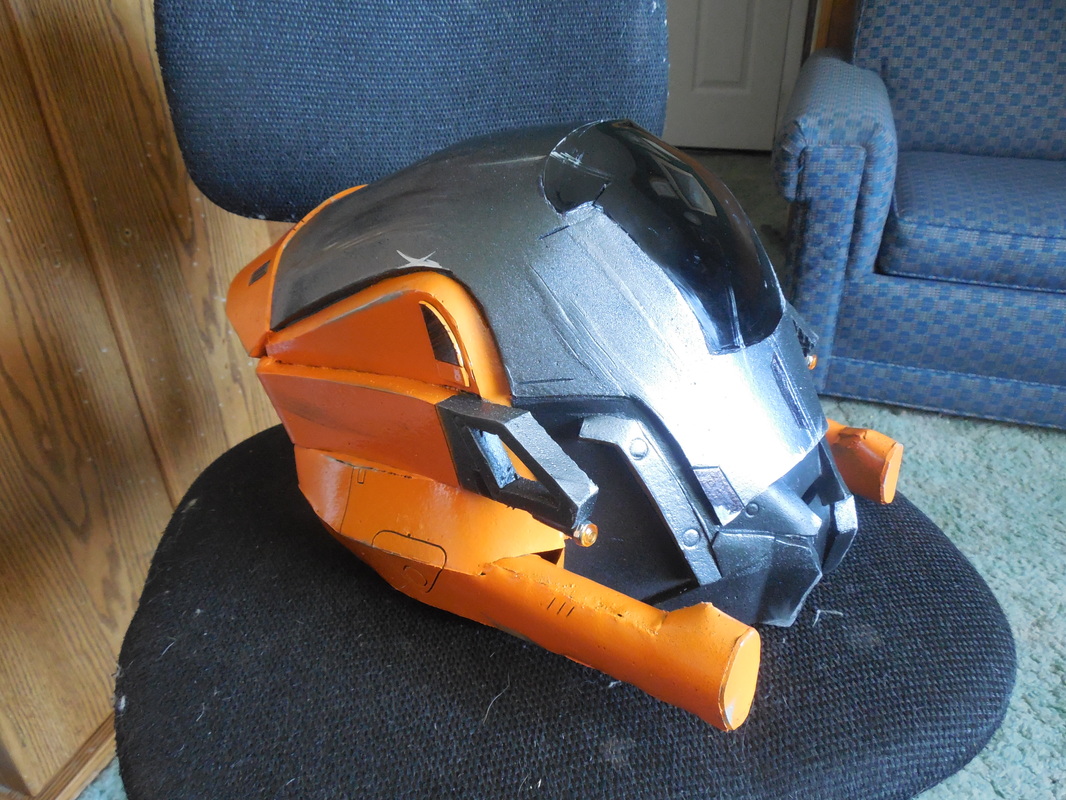
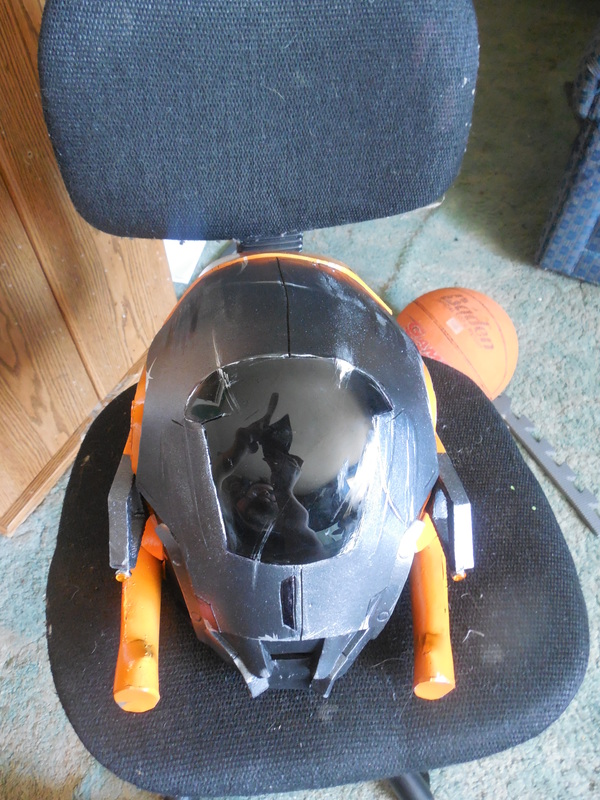
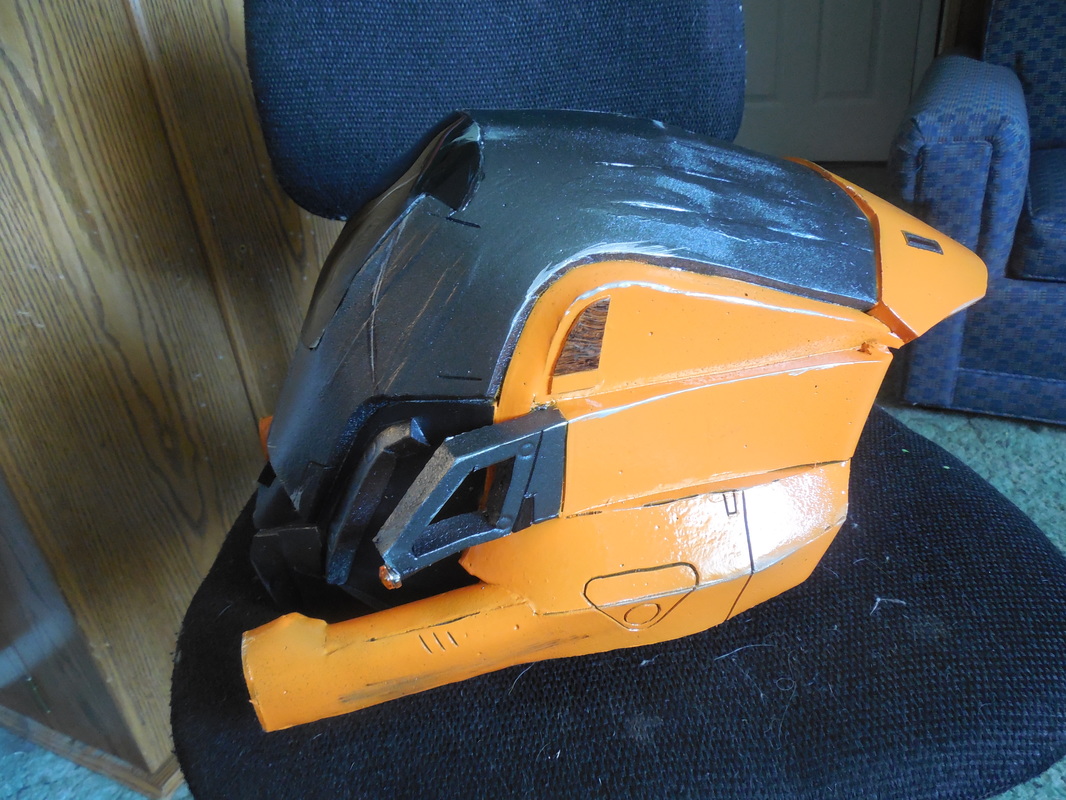
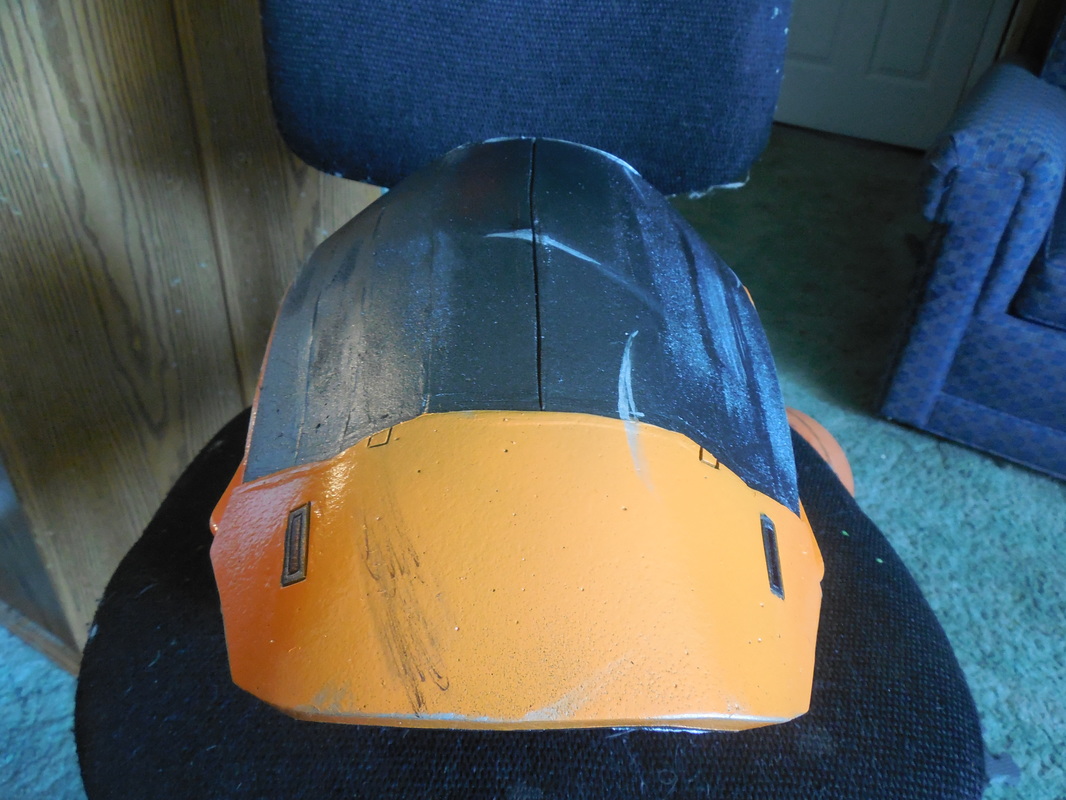
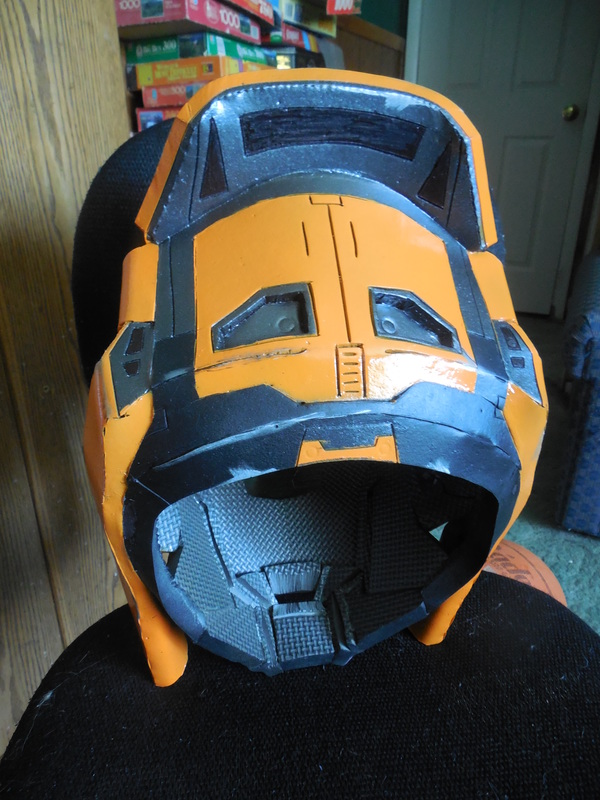
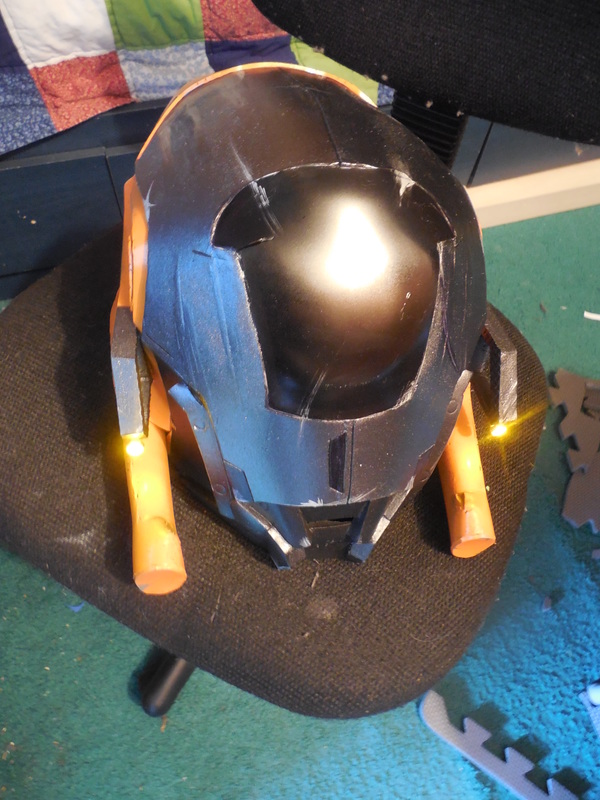
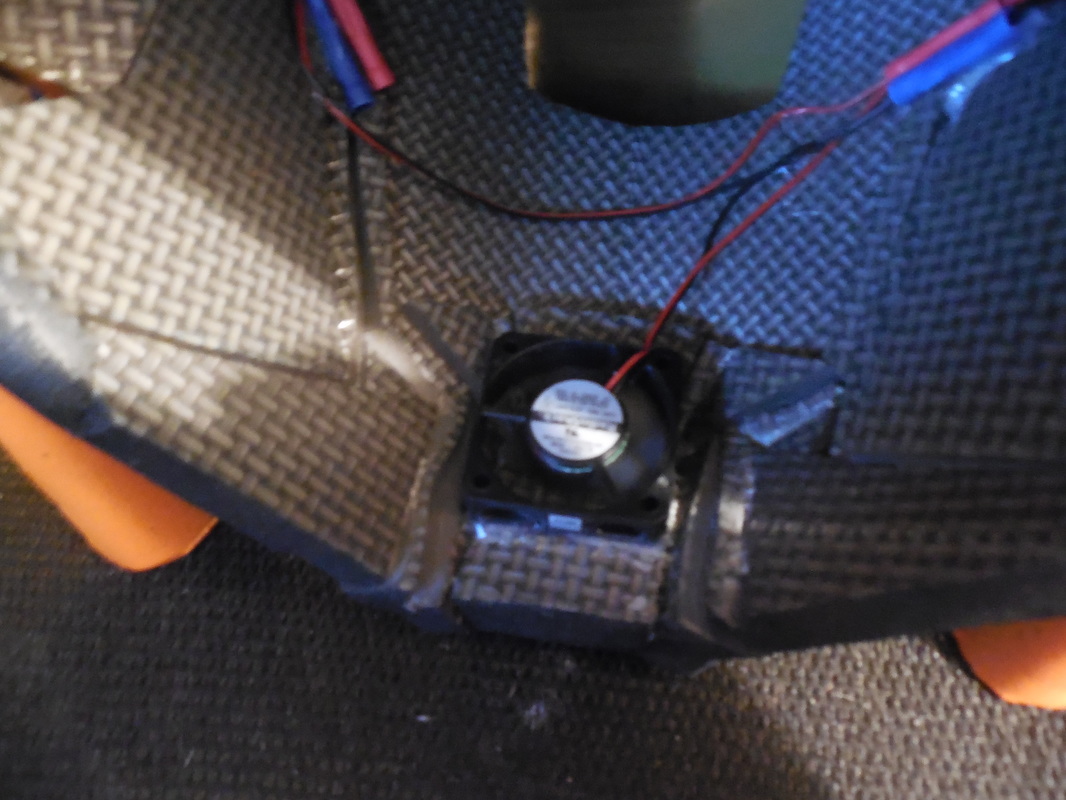
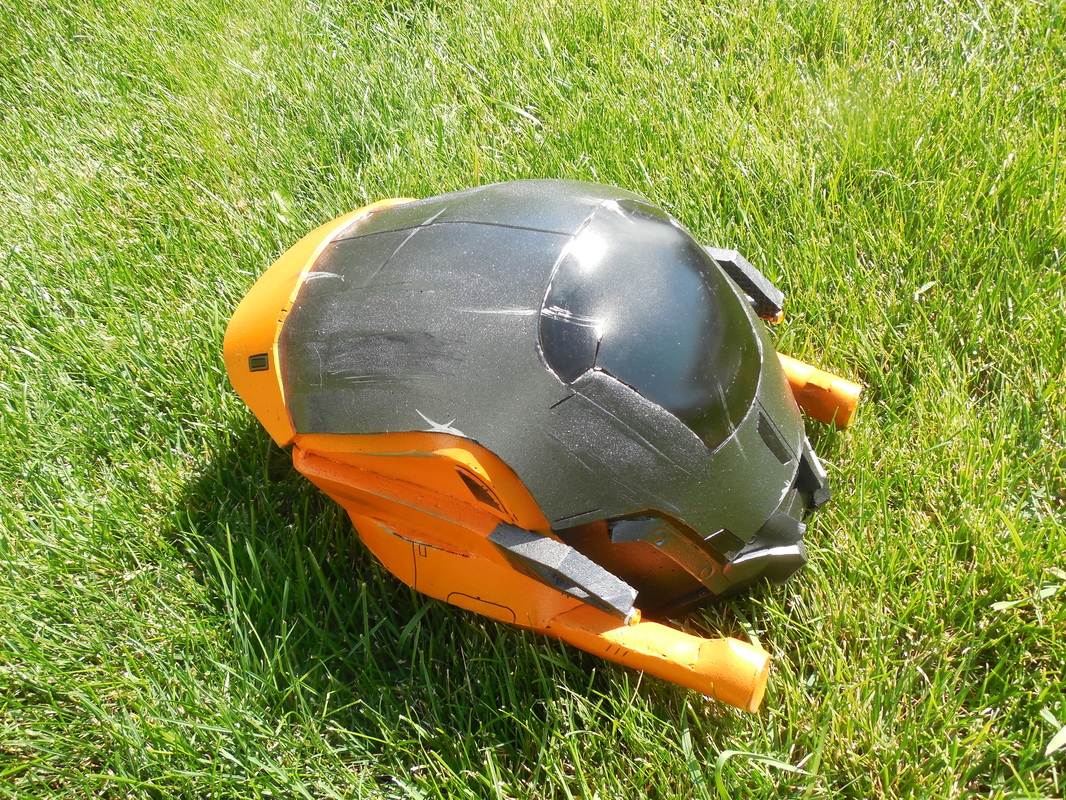
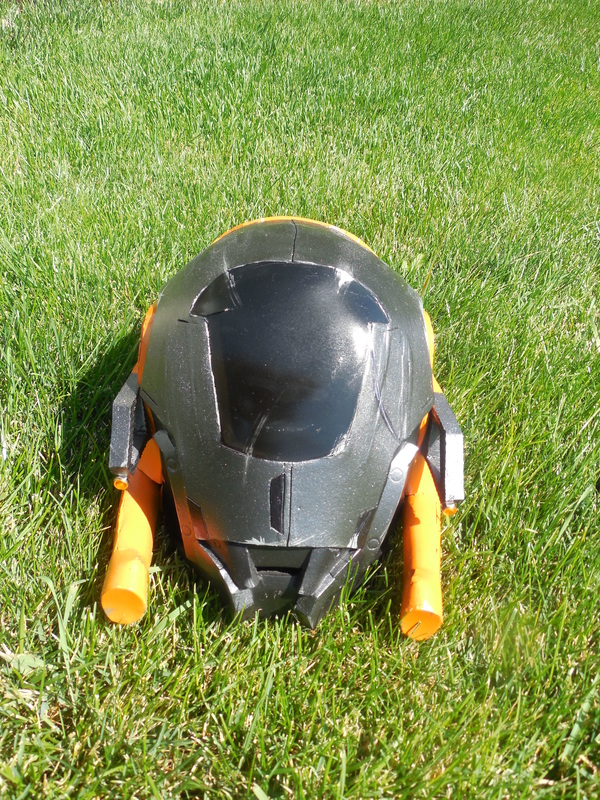
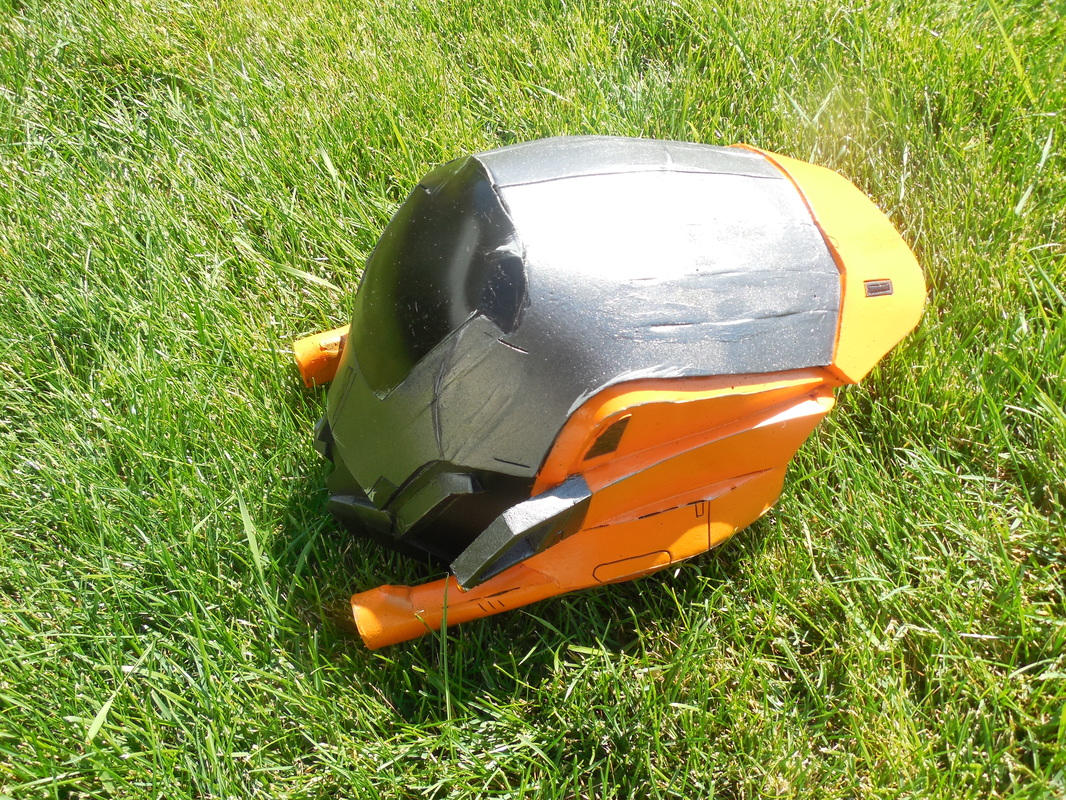
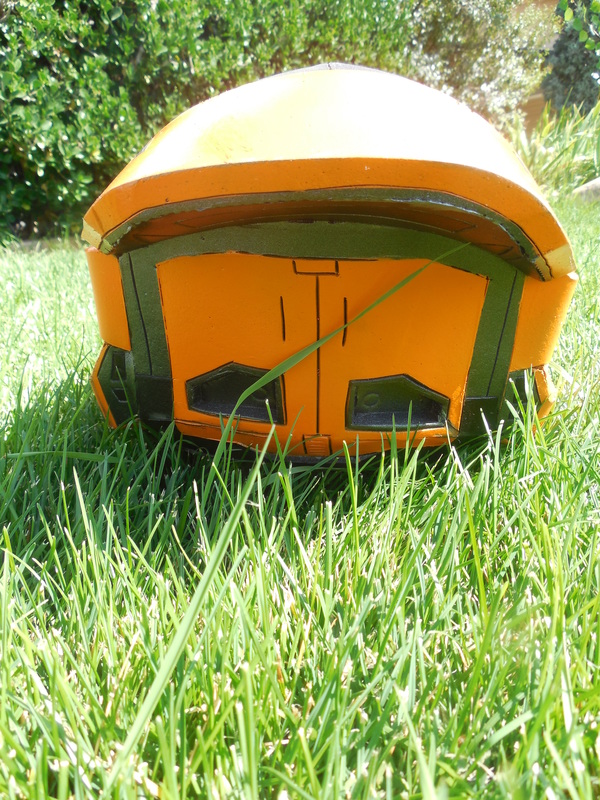
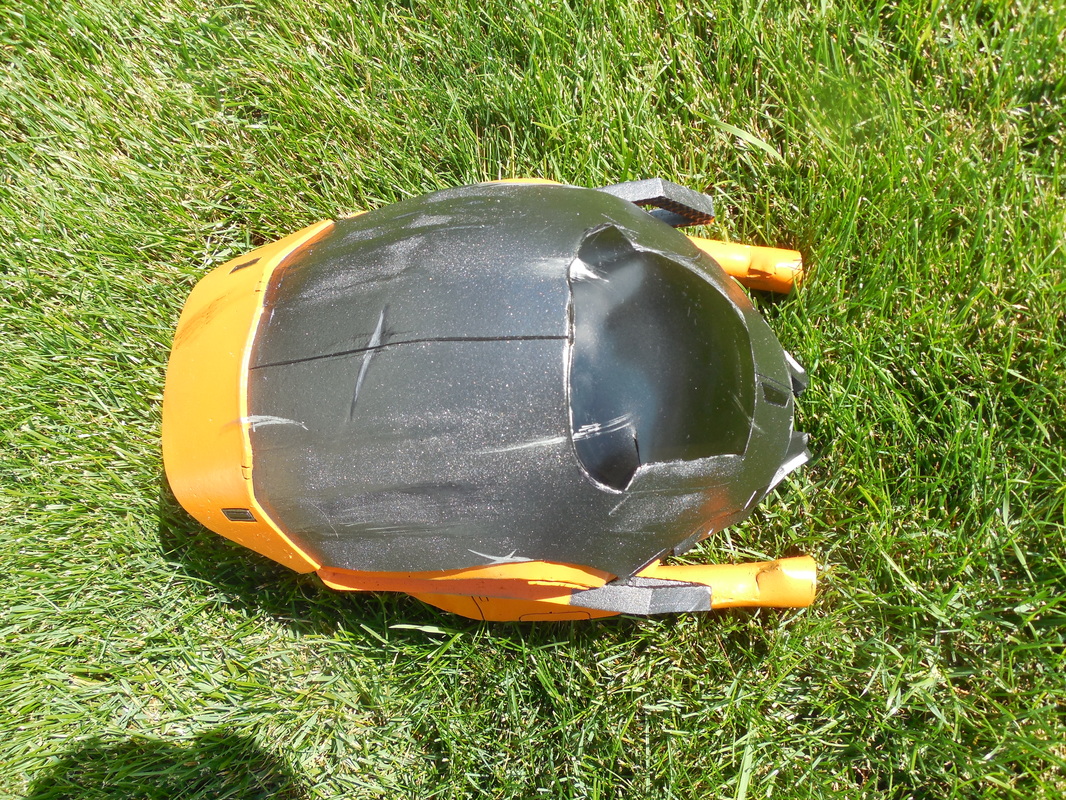
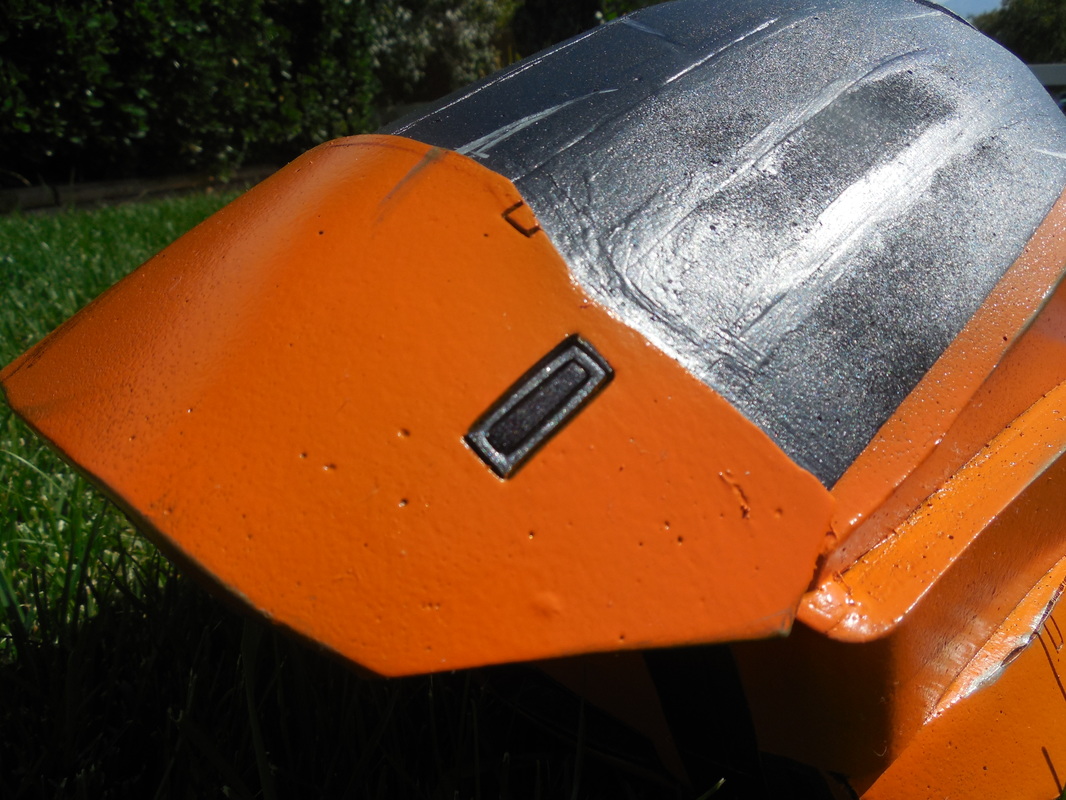
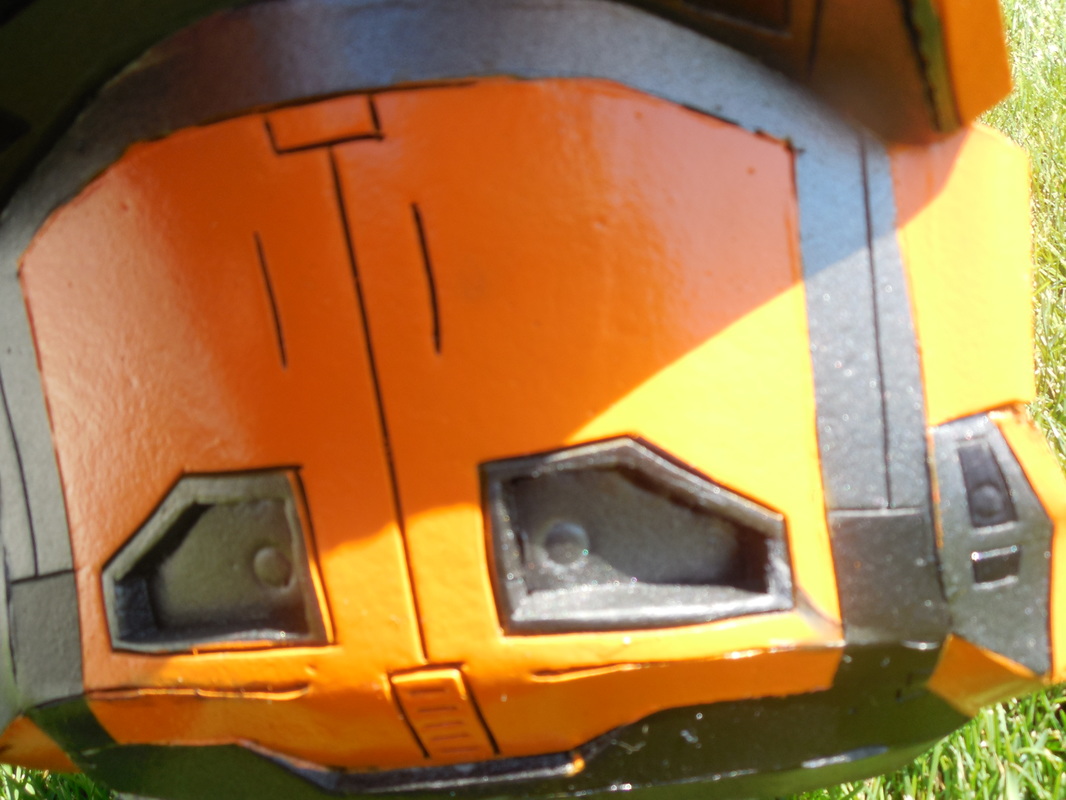
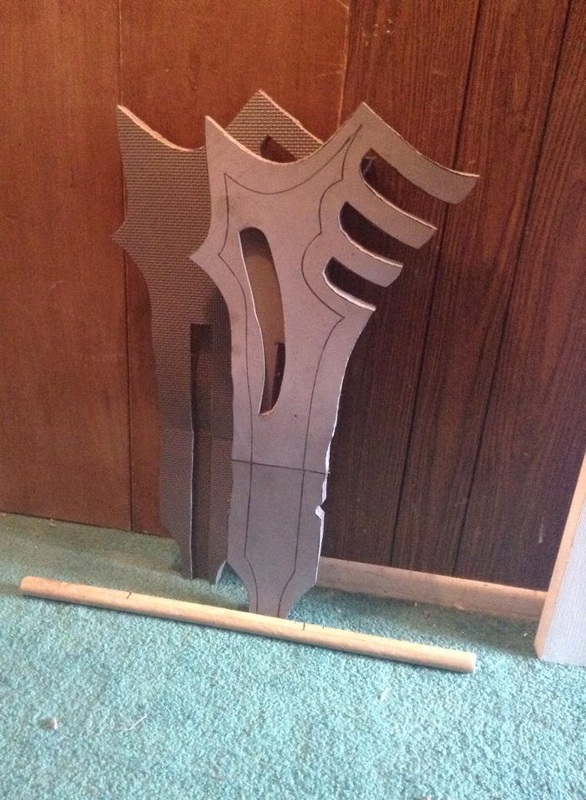
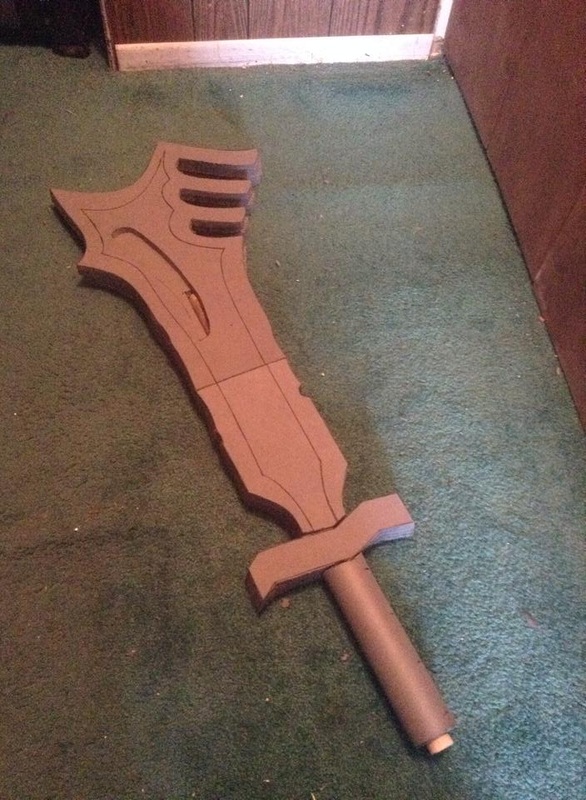
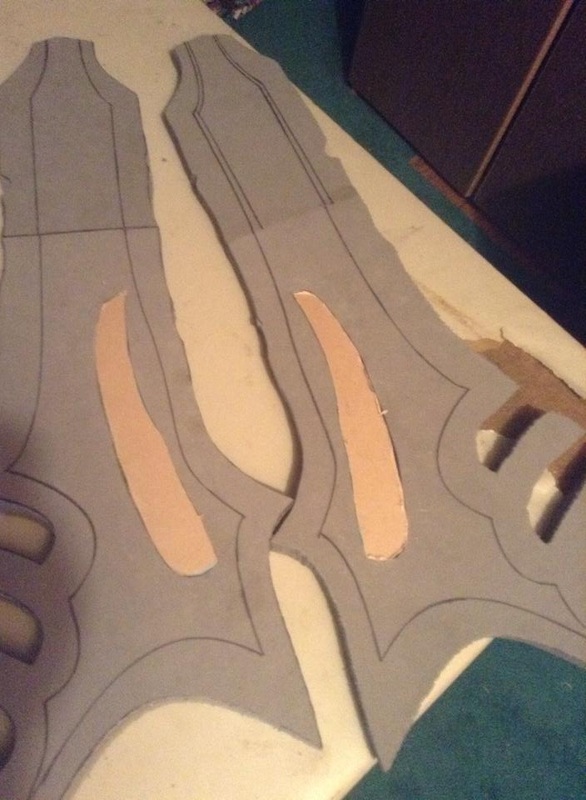
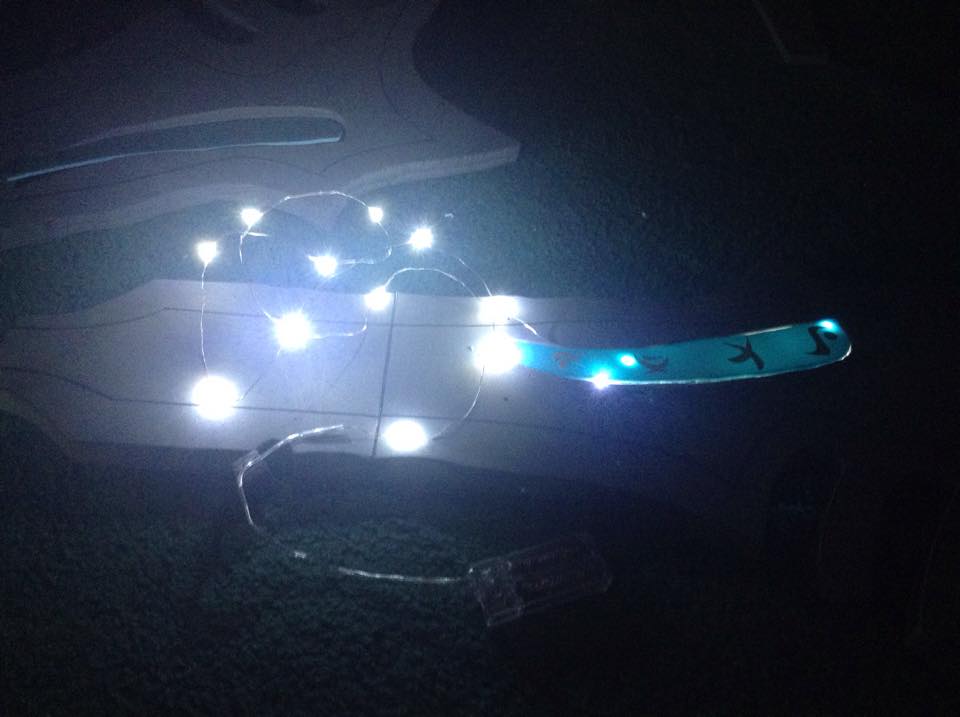
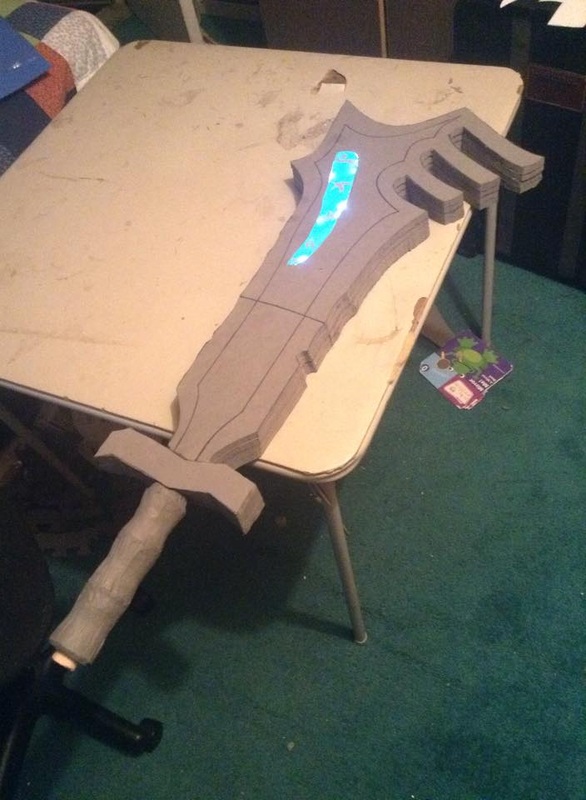
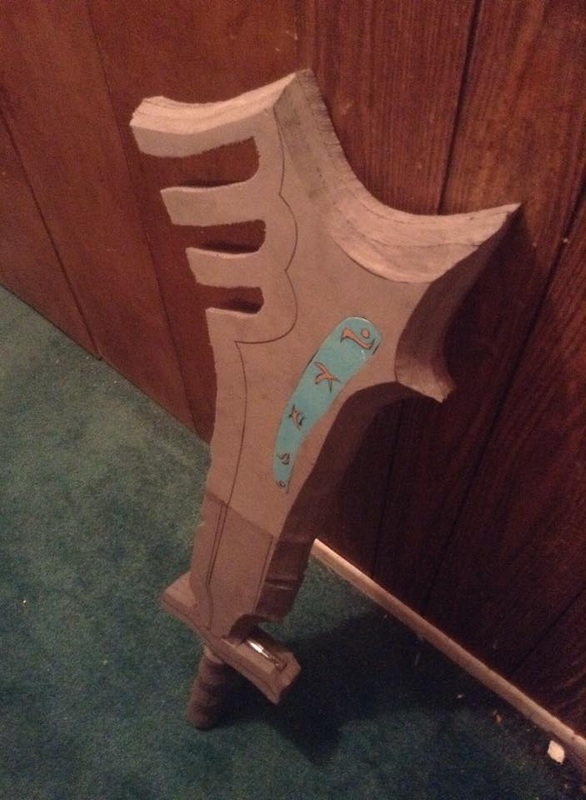
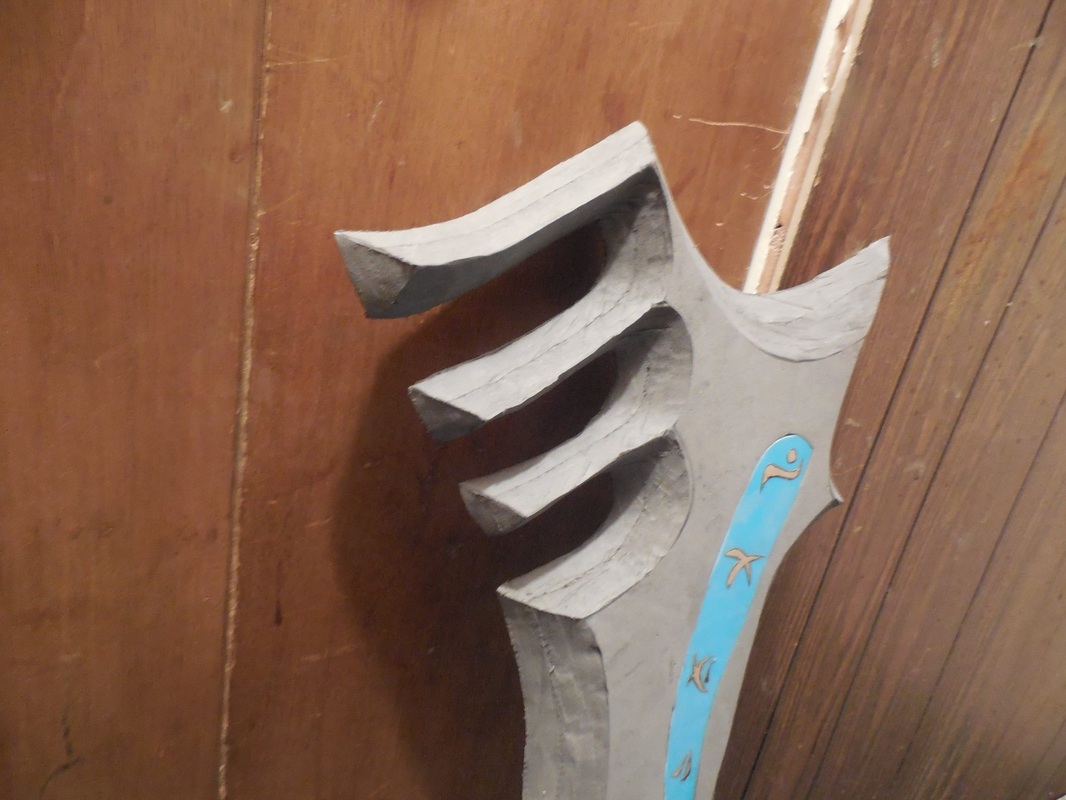
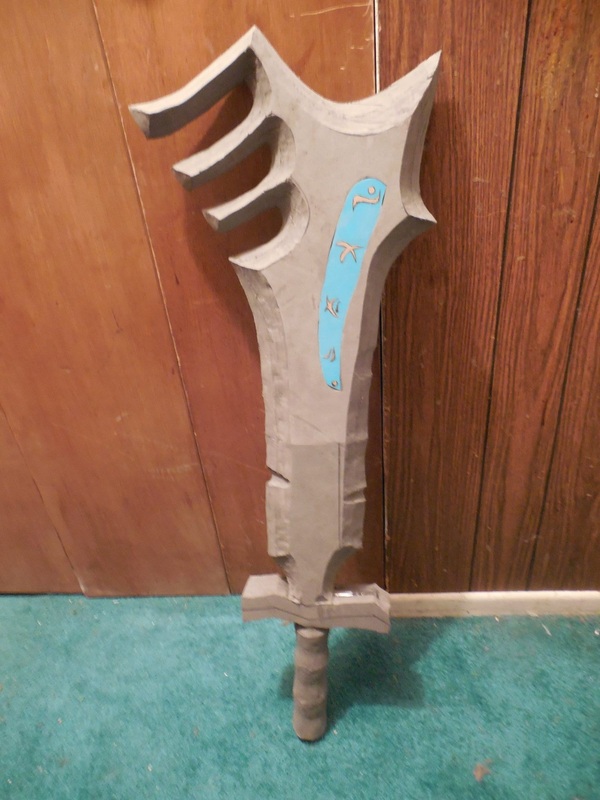
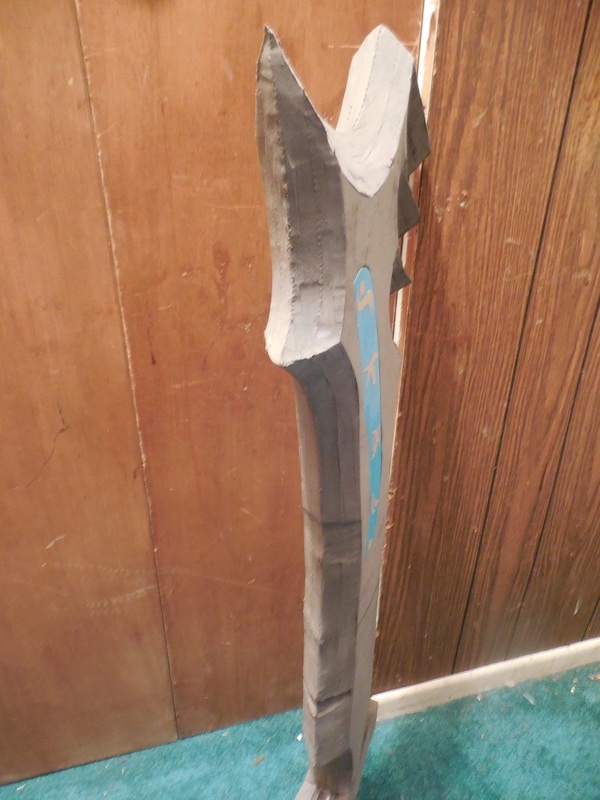
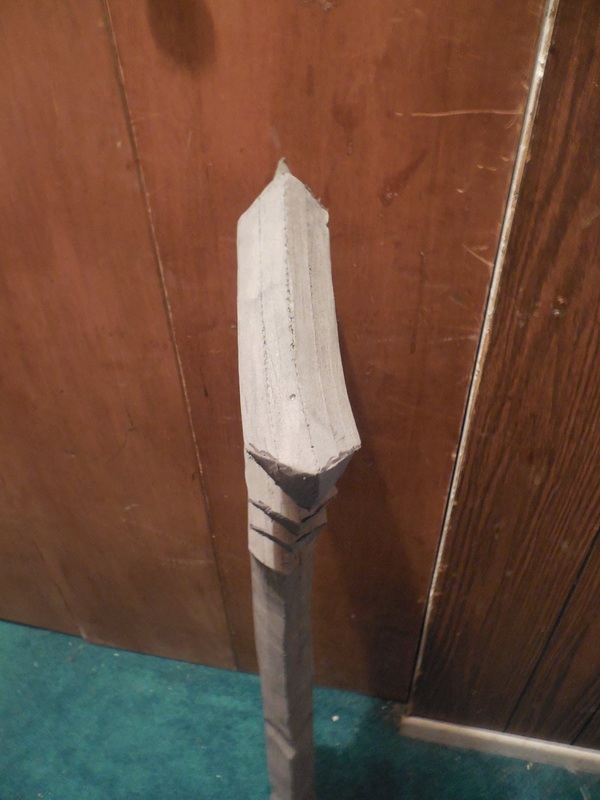
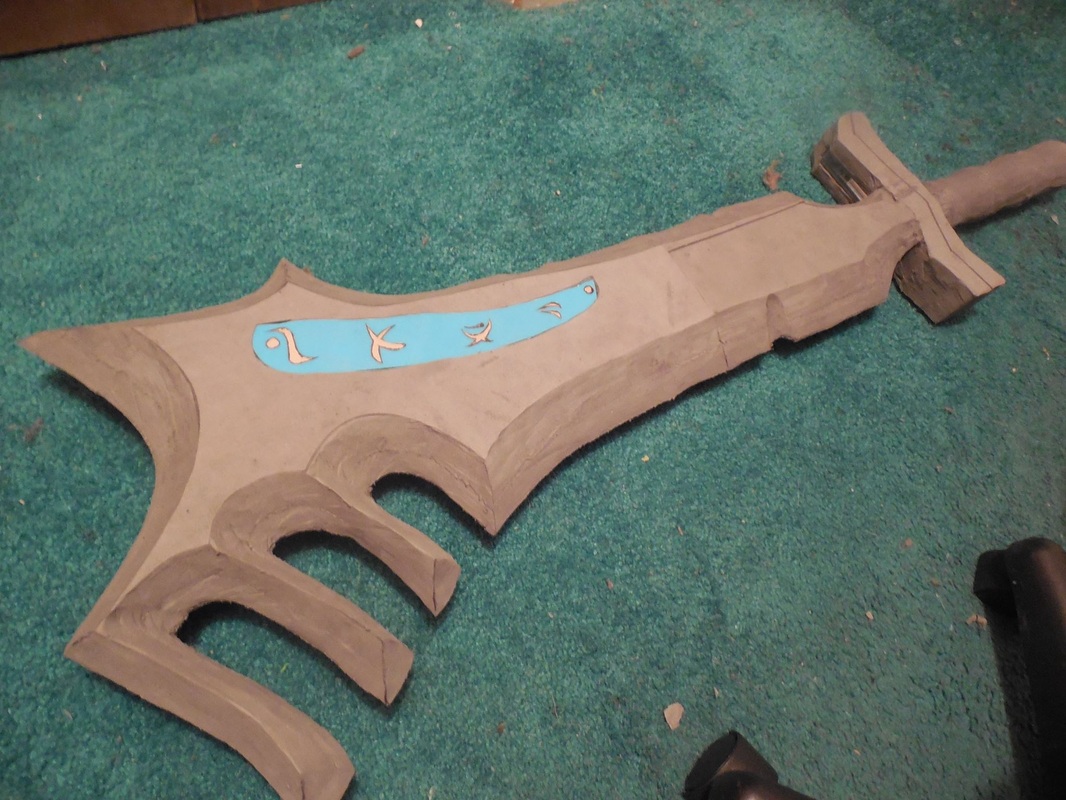
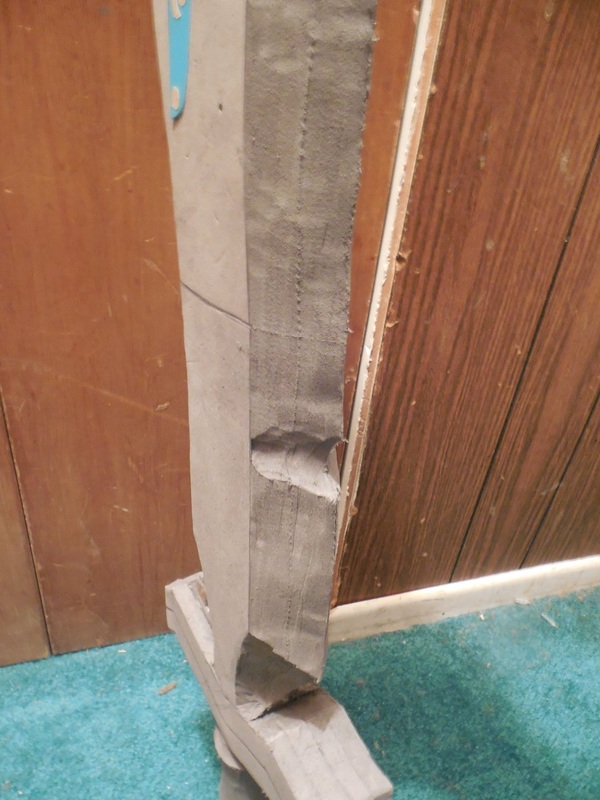
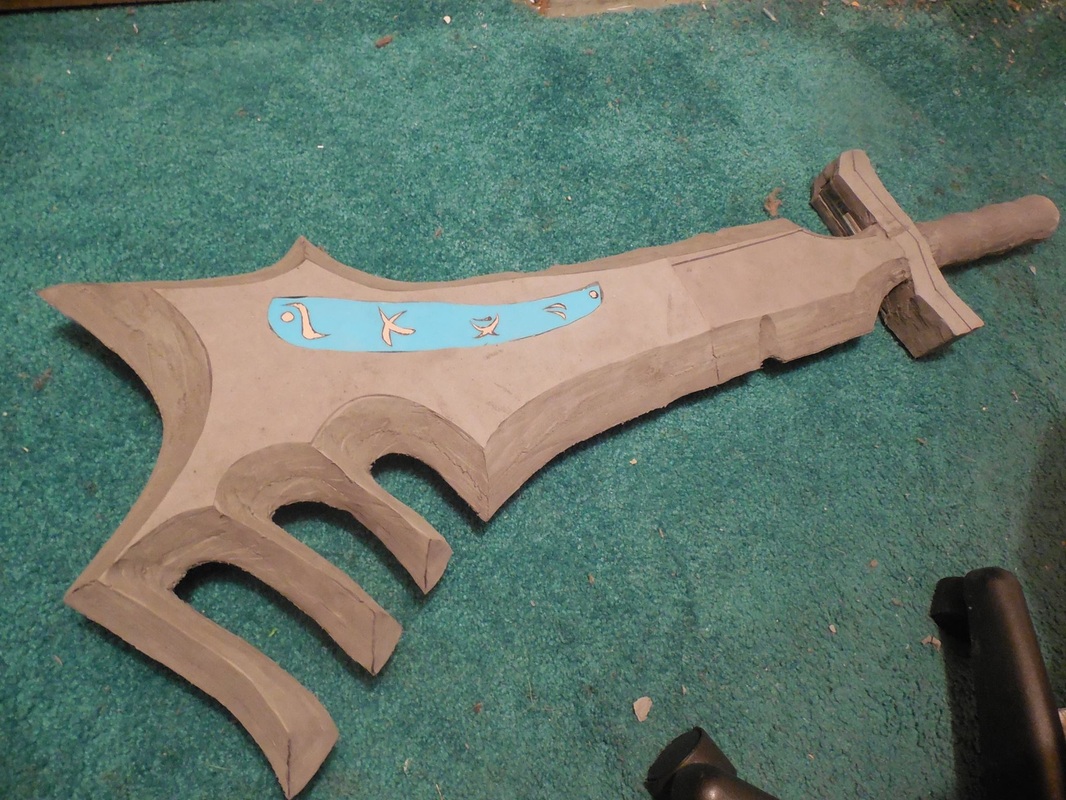
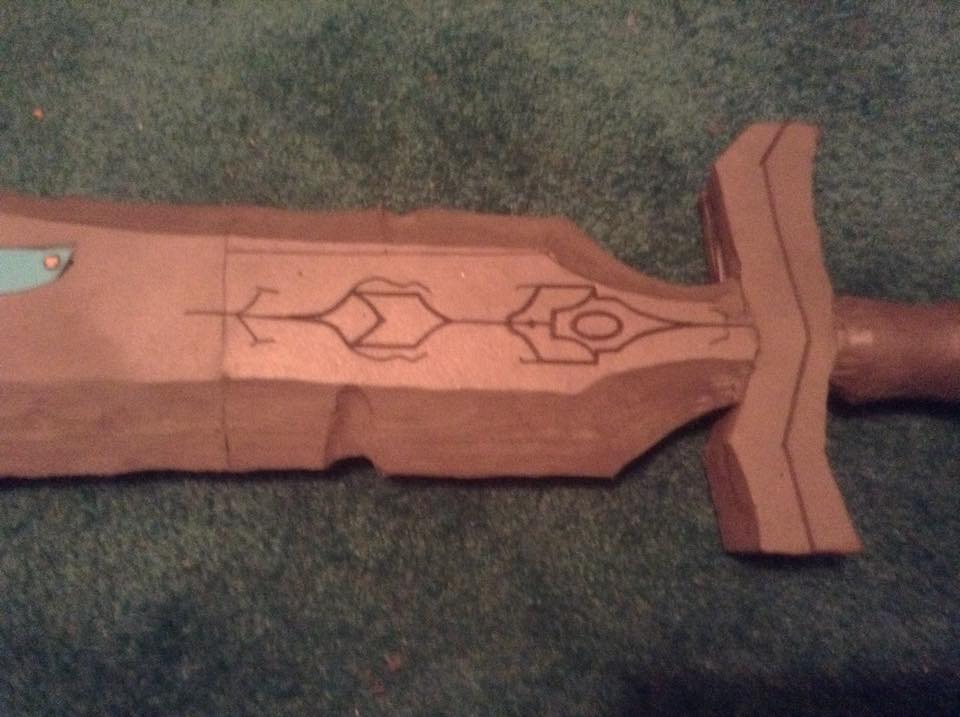
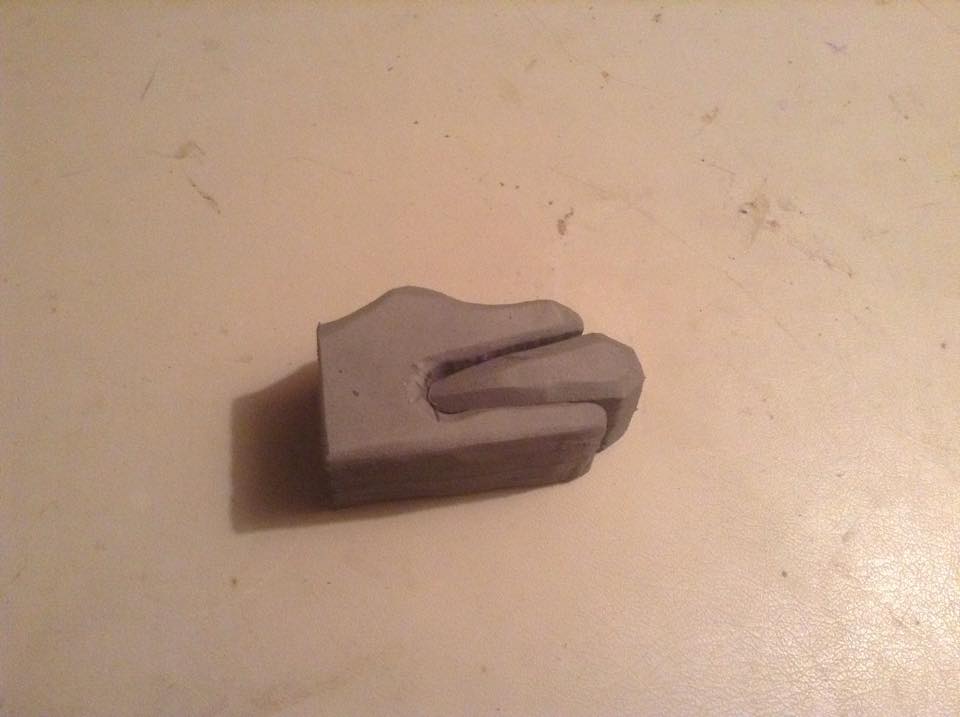
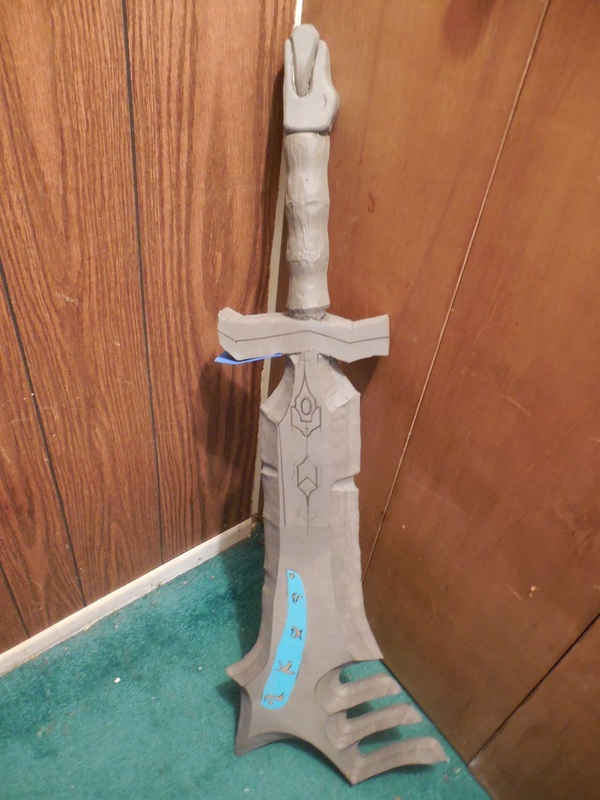
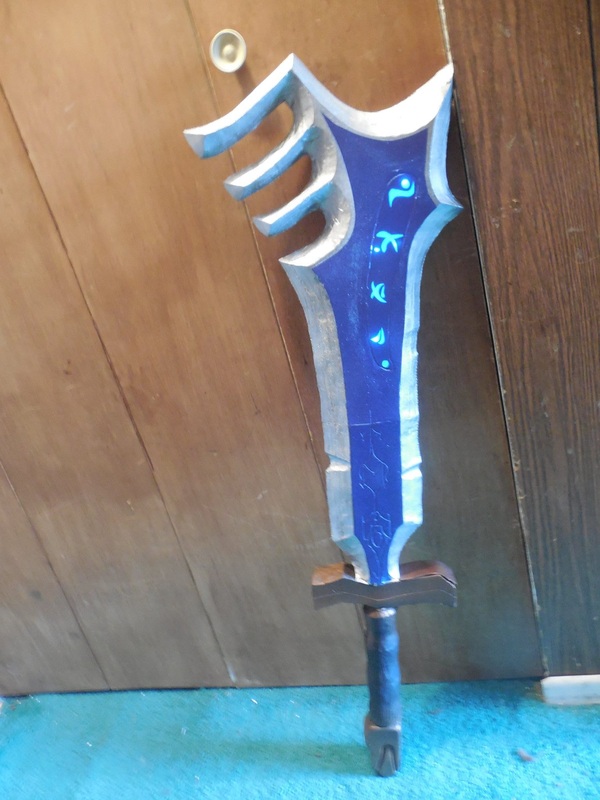
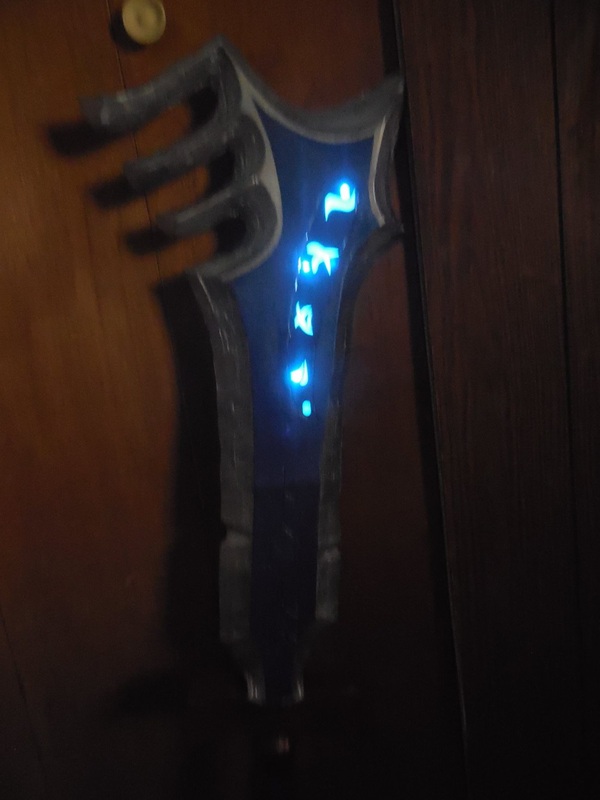
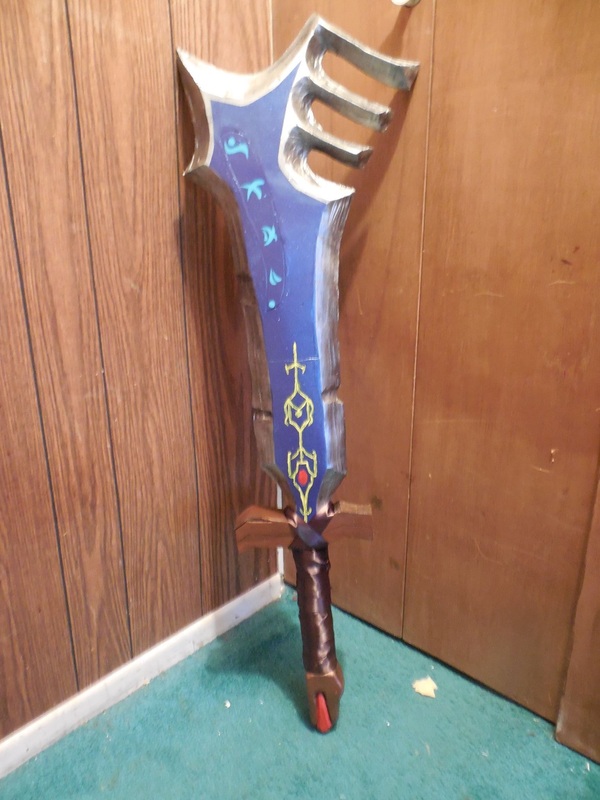
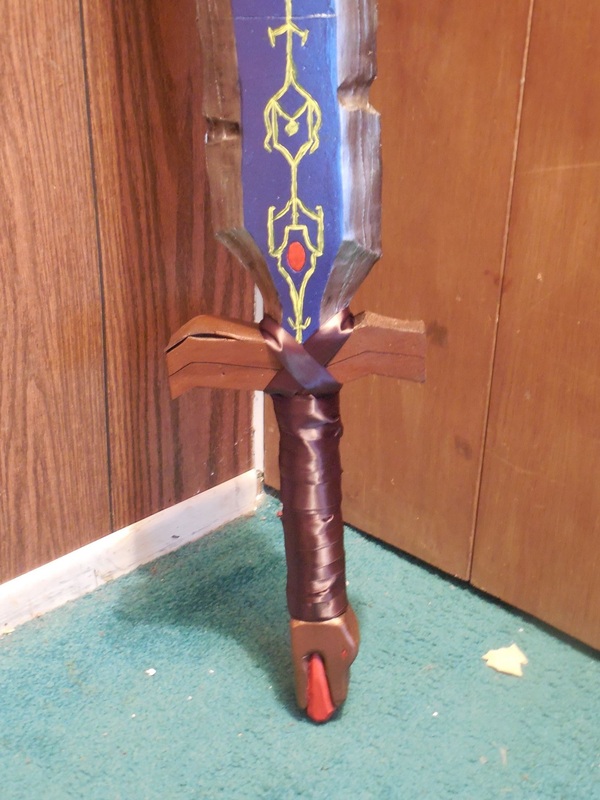
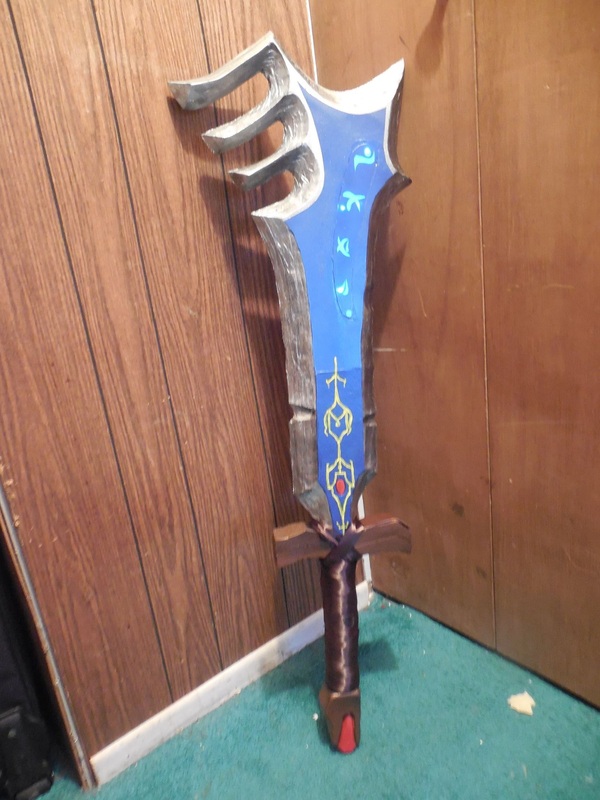
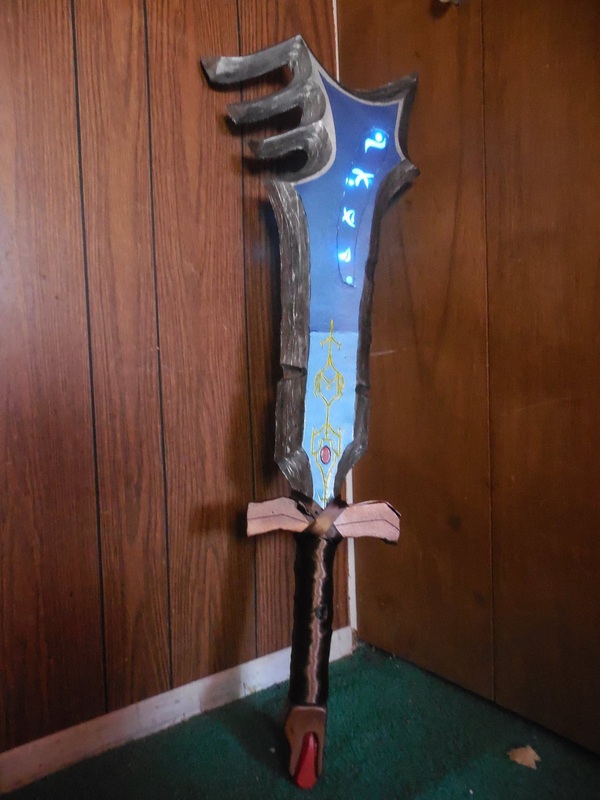
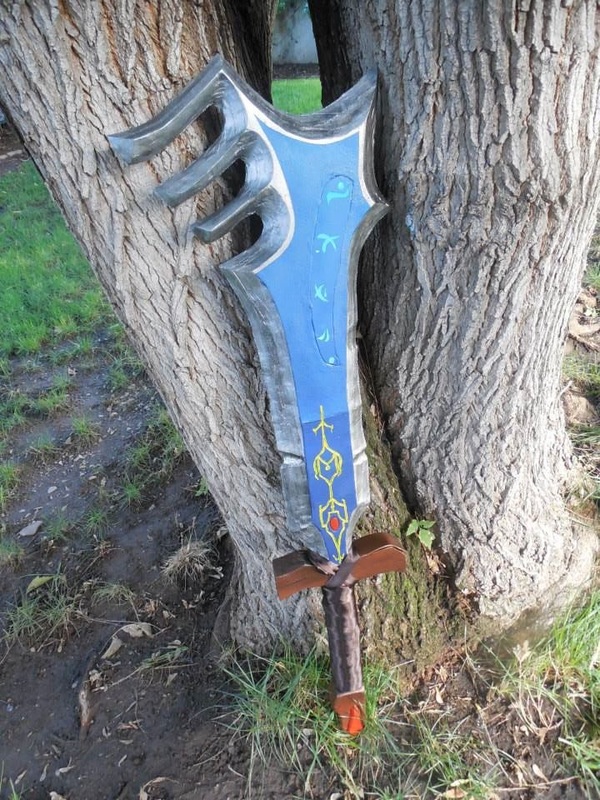
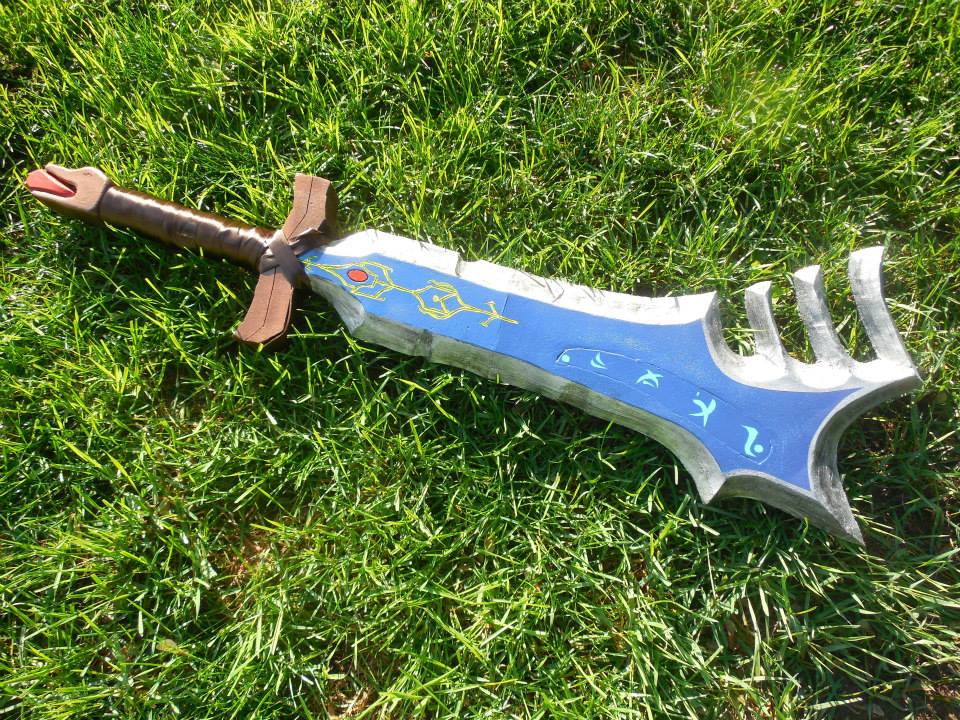
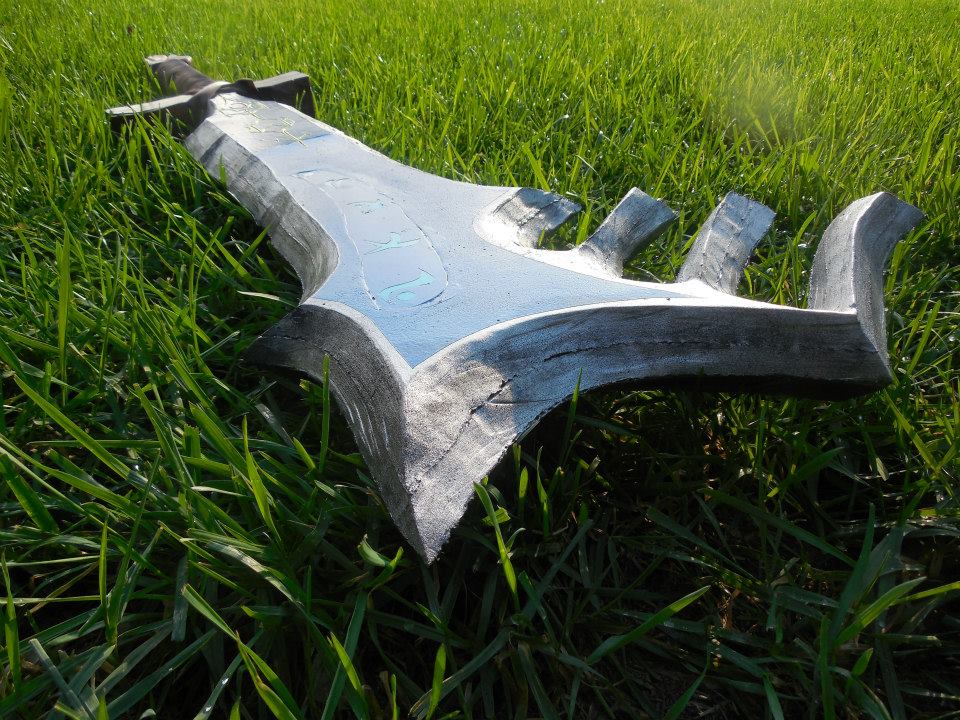
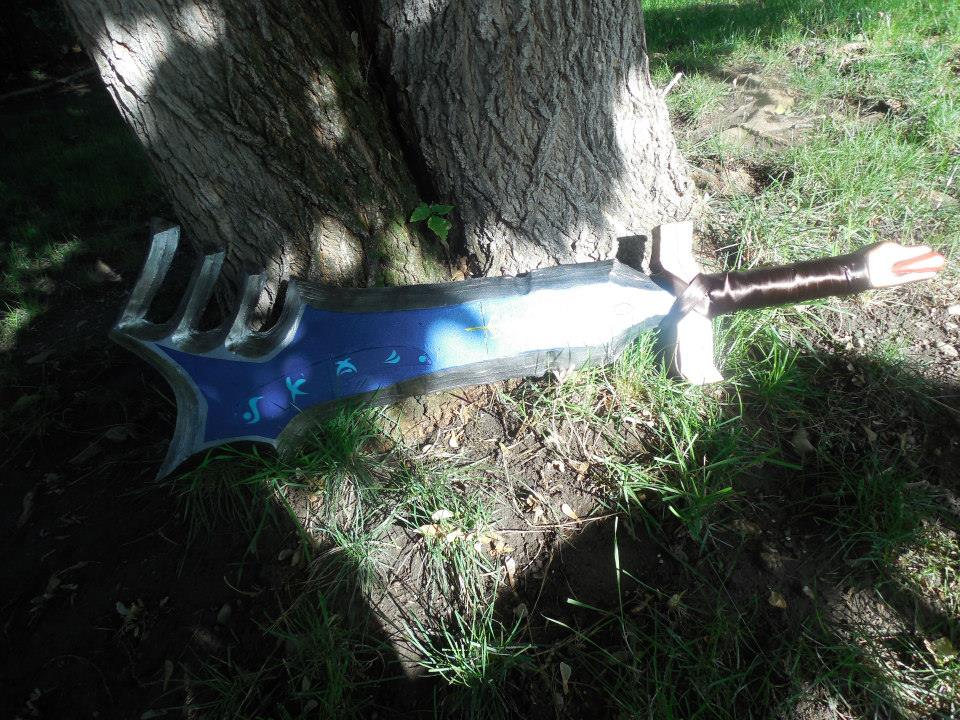
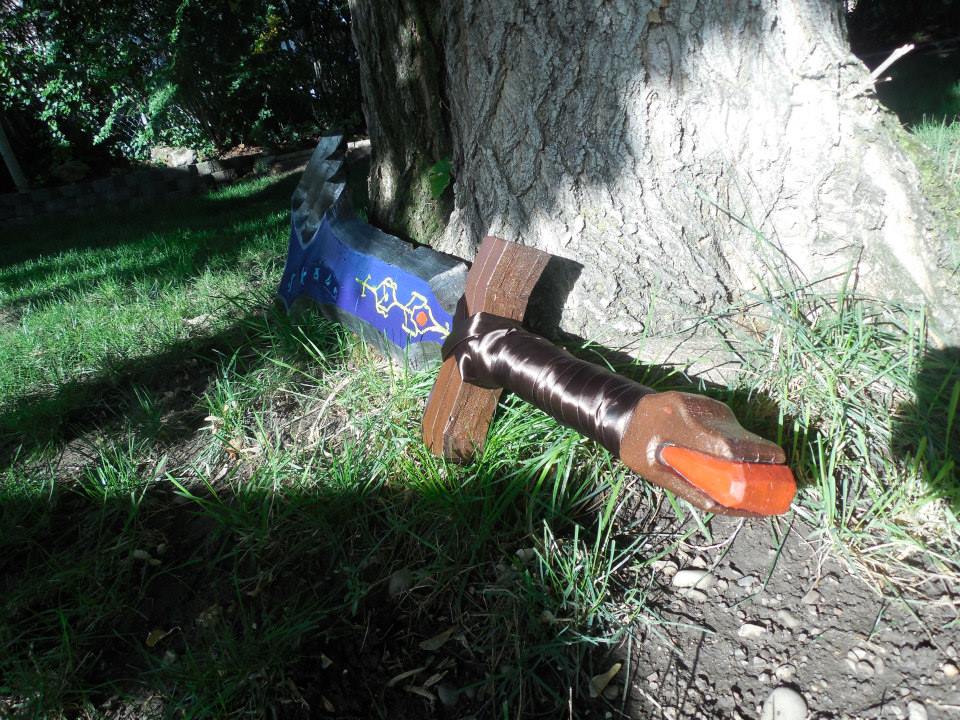
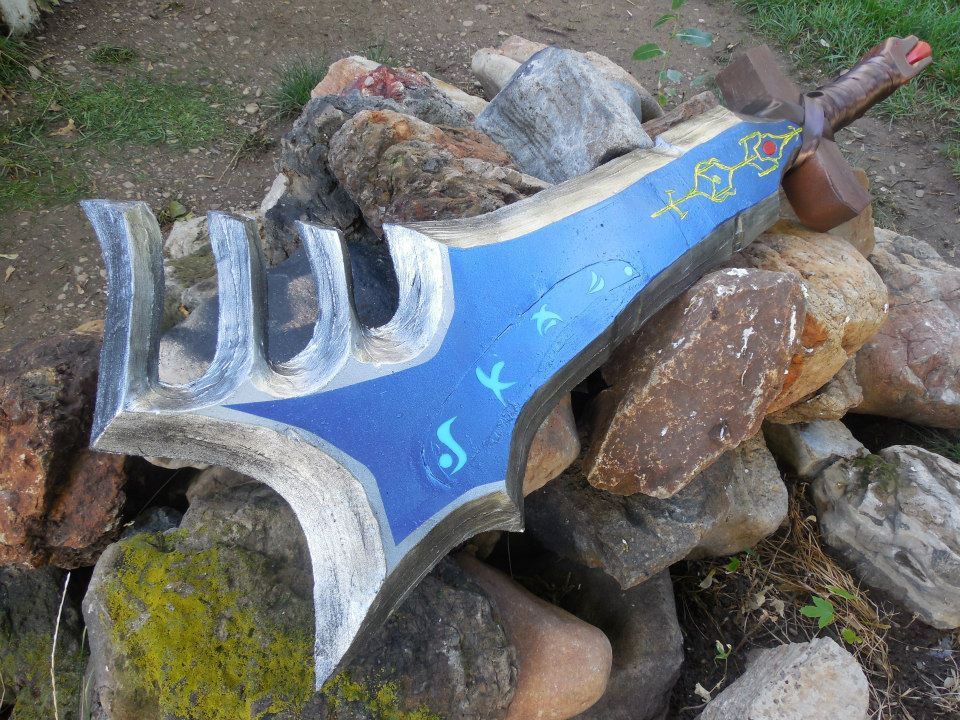
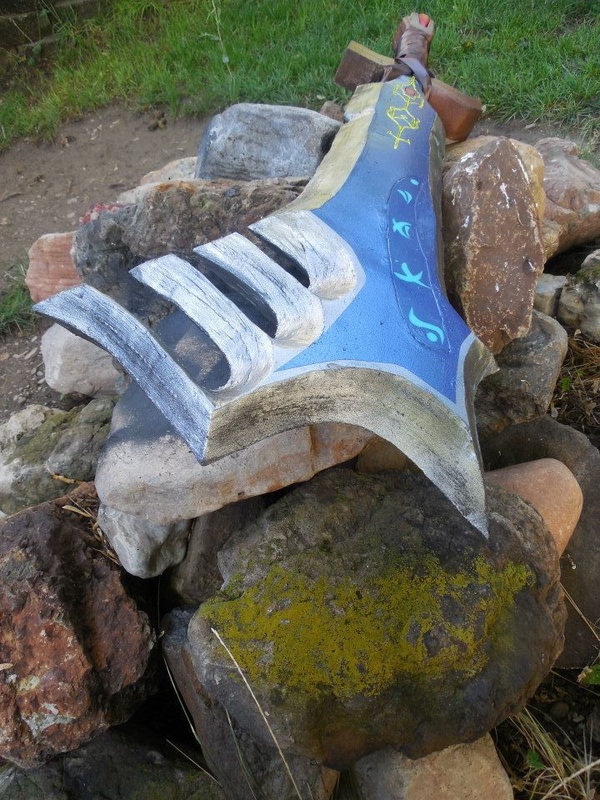
 Around the same time that I was working on the Sword of Ahrah, I was pumping out a bunch of different helmets. The first of these helmets was the Titan helmet from Destiny, for the awesome guys at Extra Life ATX. I opted to make it out of foam, like I do, but mostly because they wanted it light and durable since lots of people would end up wearing it at events and they wanted to cast games in it as well. This turned into a very interesting build, so let's get started! 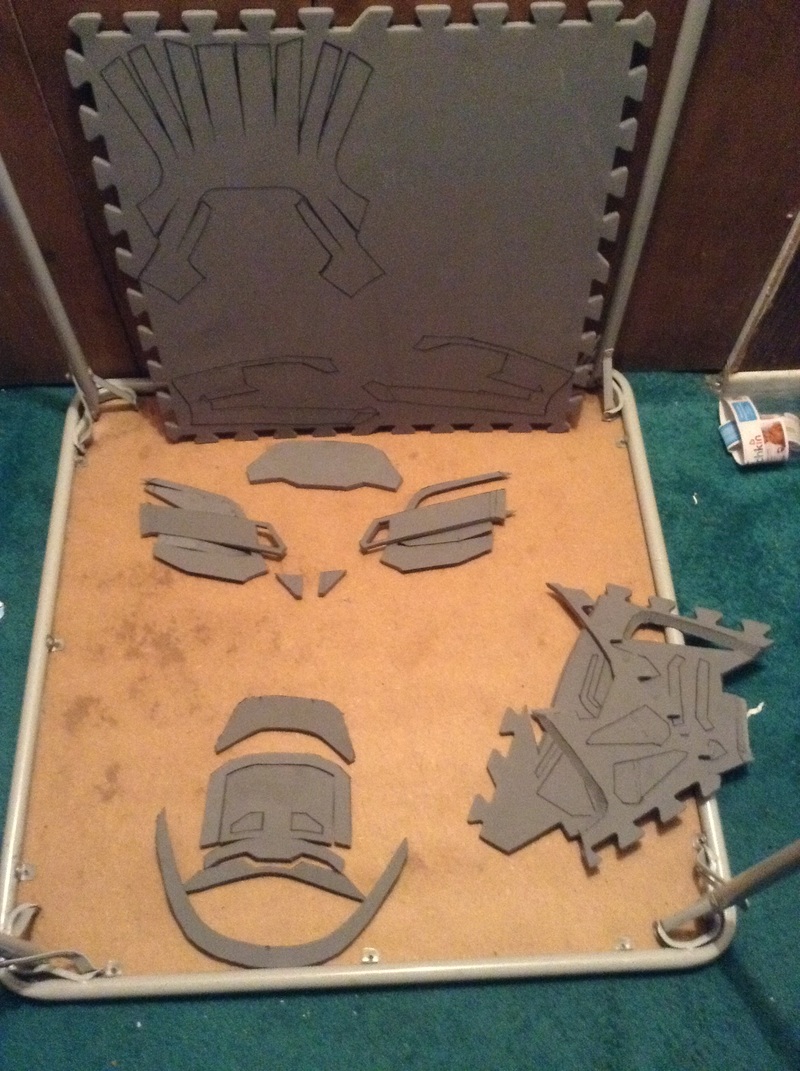 Started off as normal: prep the pieces, trace them to foam, cut them out, the glue them all up with contact cement. I had to do some major work on a few of the pieces, like the crest at the back. The underside piece needed a heavy angle cut, and the turkey legs (as I affectionately call them) needed huge trenches and grinding down to even fit together. Eventually, however, I prevailed! Got it all cleaned up, took it outside, and filled the seams as best I could with some sandable, paintable caulk. 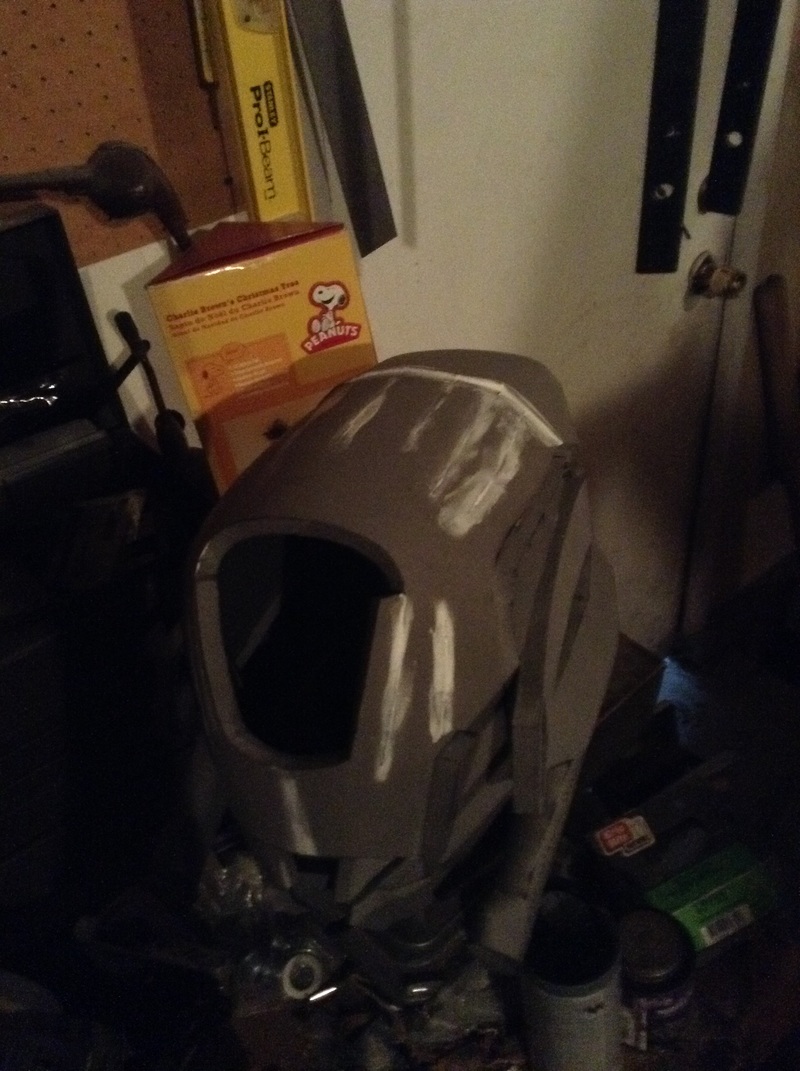 Once that set, I sanded it as smooth as I could, then brought it back in and used some craft foam to fill the front holes in the turkey legs. I also grabbed some smoke grey acrylic from my local supplier, used my heat gun over a ceramic bowl to stretch it to shape, and cut a visor out. I also used the xacto knife/heat gun trick to etch in all the detail lines. A light scoring and some quick passes make excellent and clean etchings! After that I grabbed a couple orange lights from my local Radio Shack (this was long before they closed down), and wired them up, along with a fan for later. Now it was time for paint! Wrapped up the fronts of the lights, leaving the back to be painted over. Also taped up the visor. Then, threw on my favorite foam sealer, Plasti Dip! 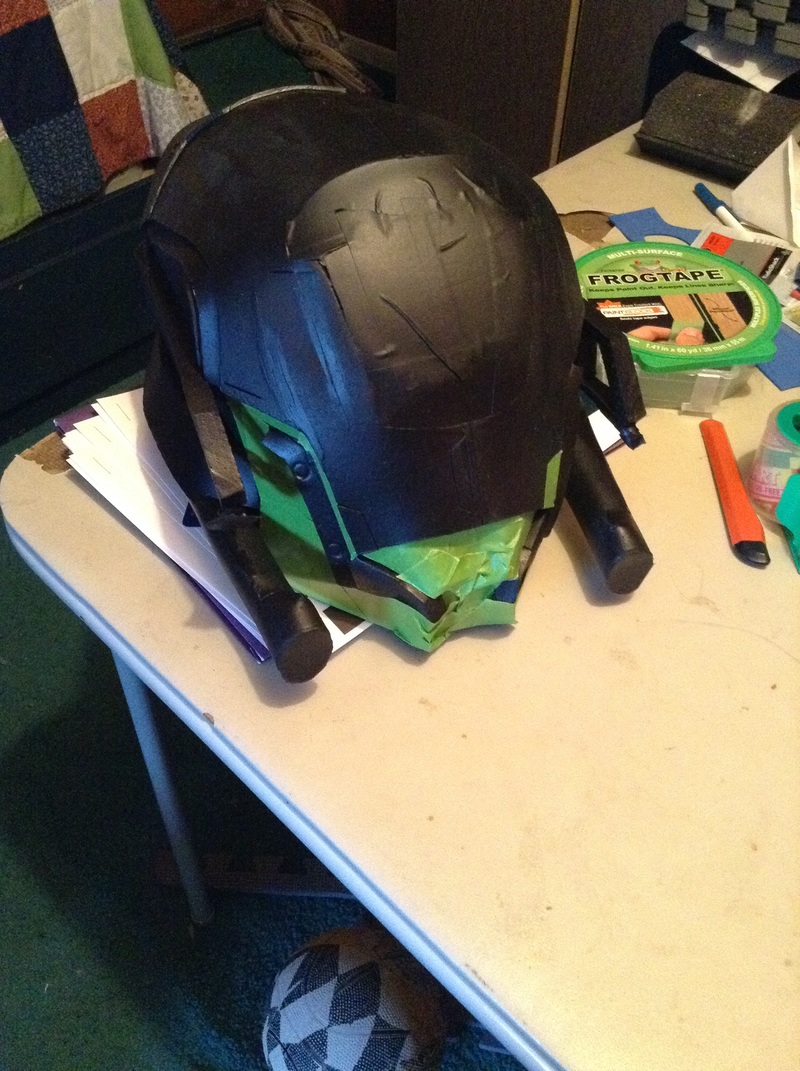 Taped up the areas I wanted to keep black, as you see above, then grabbed an automotive gunmetal grey and went to town. More tape, and then came the primary color: orange! Cameo of my son, as viewed from the inside of the helmet. Looking great so far! Next came everyone's favorite part, weathering! I did a variety of things, from dry brushing to a dark acrylic wash, and added some color to a few of the details to highlight them better. I also finished installing the fan behind the hole in the front, so that the wearer could have some better air circulation and keep the visor from fogging too much. Threw on a final clear coat to seal it all in, which was unfortunately my folly as I forgot to tape up the visor again. It ended up being really hard to see out of, but I was so excited to get it to them I didn't test it before I shipped it. Looks awesome, but I failed on the end result of them being able to stream games wearing it.... Still, they loved it, and I loved making it so much I decided to make another one! But that's a tale for another blog! Here's some final shots of the Titan helmet. Hope you enjoyed!  Time to recap this most interesting of builds I've done thus far: the Sword of Ahrah, from Dust: An Elysian Tail! First things first, I made a blueprint after scouring the interwebs for pictures. I would have taken them myself, since I own the game, but my system was (and still is) packed away in the moving pod. 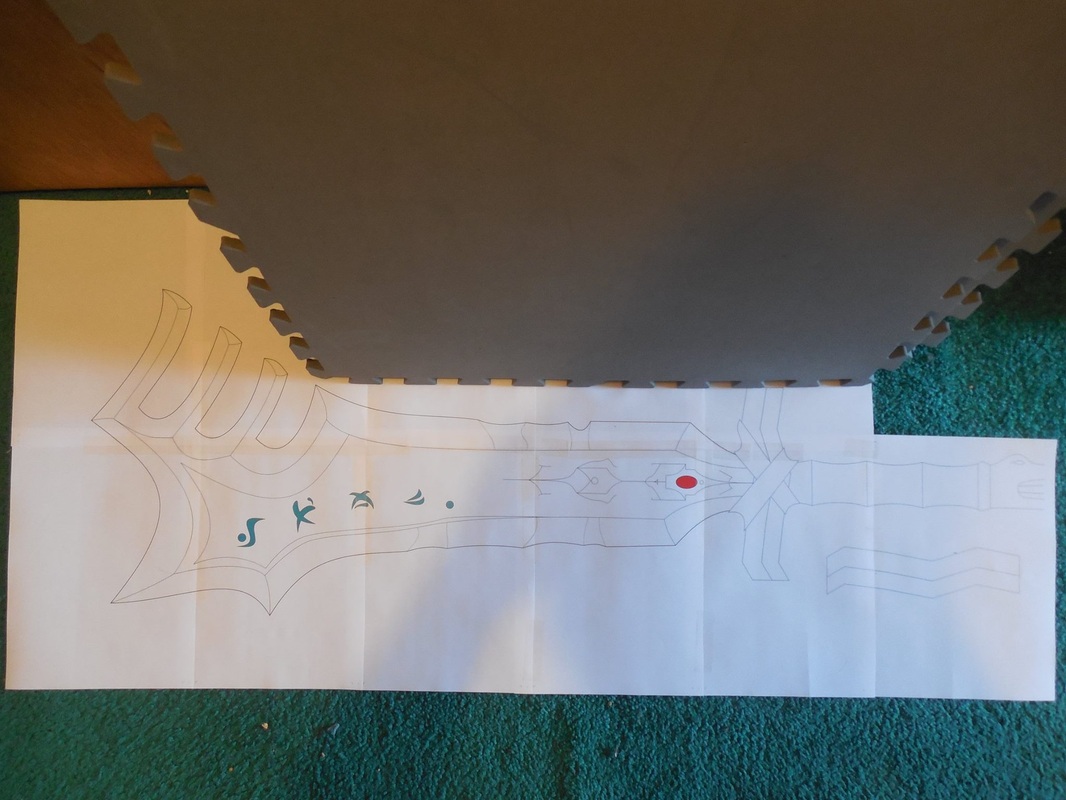 I scaled the sword at three and a half feet long, both for the size of my client and because anything larger than that would have been too unwieldy. Even then, though, the blade section was longer than the foam I have, so I had to make it in two parts. 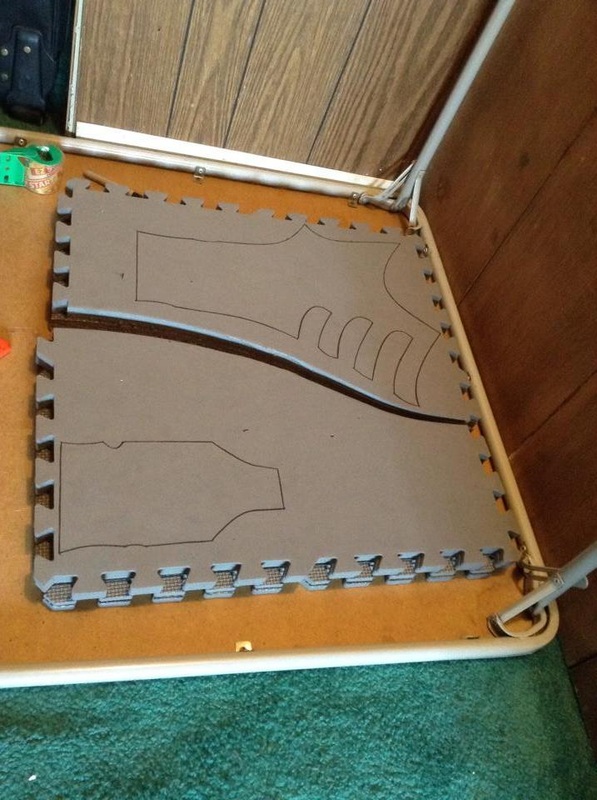 Now we come to the first of many conundrums for this build. Because it's so bulky, I decided on 4 layers of foam. That meant a lot of cutting at once. Since I needed to do work on the inner layers as well, I needed to keep them all separate from each other. Since I am no good cutting by hand exactly straight, and since I would have to do each piece as identically as possible, box cutters and xacto knives were out of the question. Normally I would reach for my band saw at this point, but guess what? Remember how my console is packed away? Yeah. Every single one of my tools/power tools is too. No band saw, no scroll saw, no belt sander, no nothing. So, I went and got a cheap electric knife, something I could use and throw away when it's done because I knew the torture I was about to put it through would kill it utterly. What I didn't anticipate was how quickly it would die. 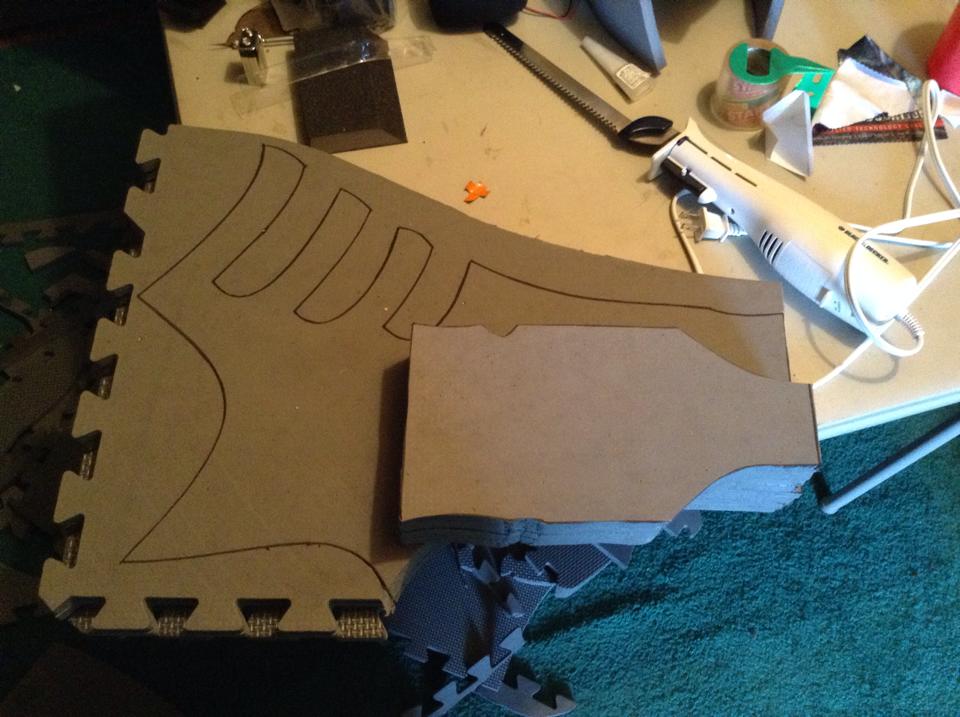 Yep, that's right: cut out the bottom bit of the blade, and a small part of the upper bit, and gave out on me. Thing still turned on, but the blades wouldn't move. After trying to figure out what else I could do, I splurged a little and grabbed a coping saw, along with the cheapest dremel I could get since I knew I needed it soon. Not pretty, but the saw got the job done finally. 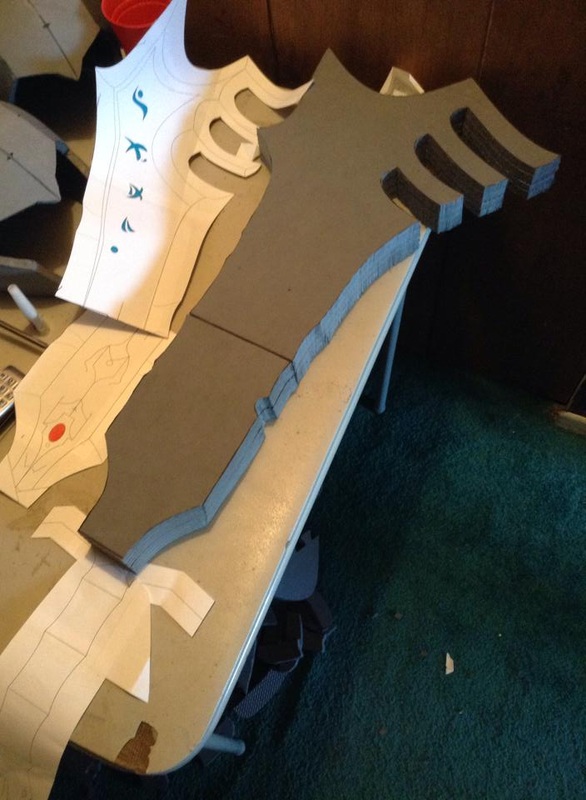 Now I could start on the inner workings. I grabbed a dowel that was lying around, cut it down, marked out where it would slide in and support as the blade's tang, and cut the trench out with a box cutter. 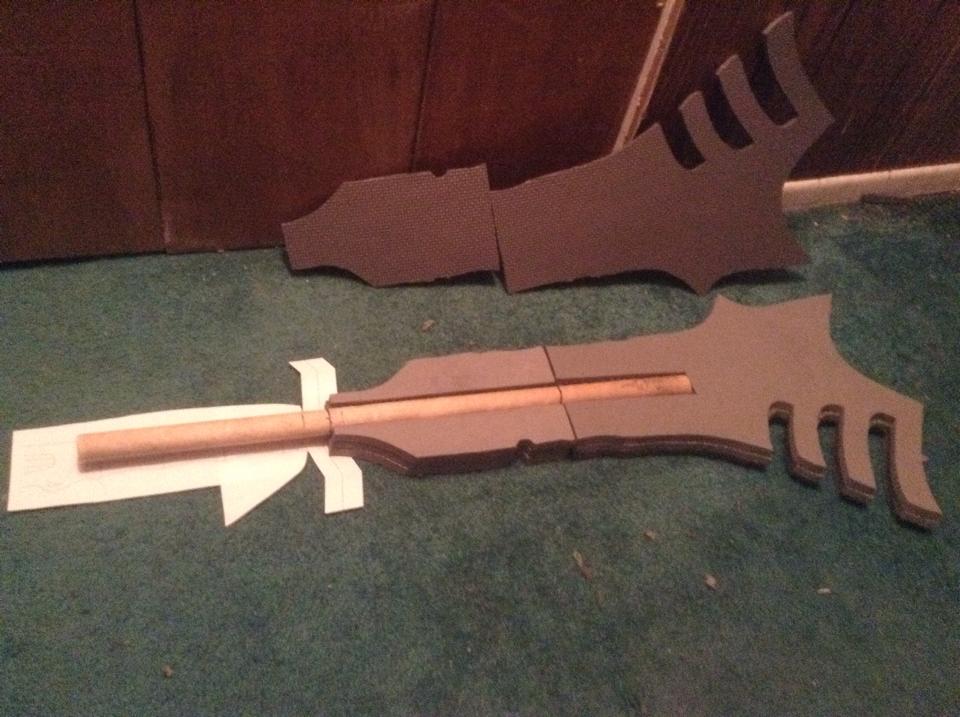 I then glued two layers of each side together, keeping the halves separate since there was still a little more work to do inside. Since the client wanted it to light up, I went out and got some turquoise acrylic, then traced a small section out for where the runes would go. 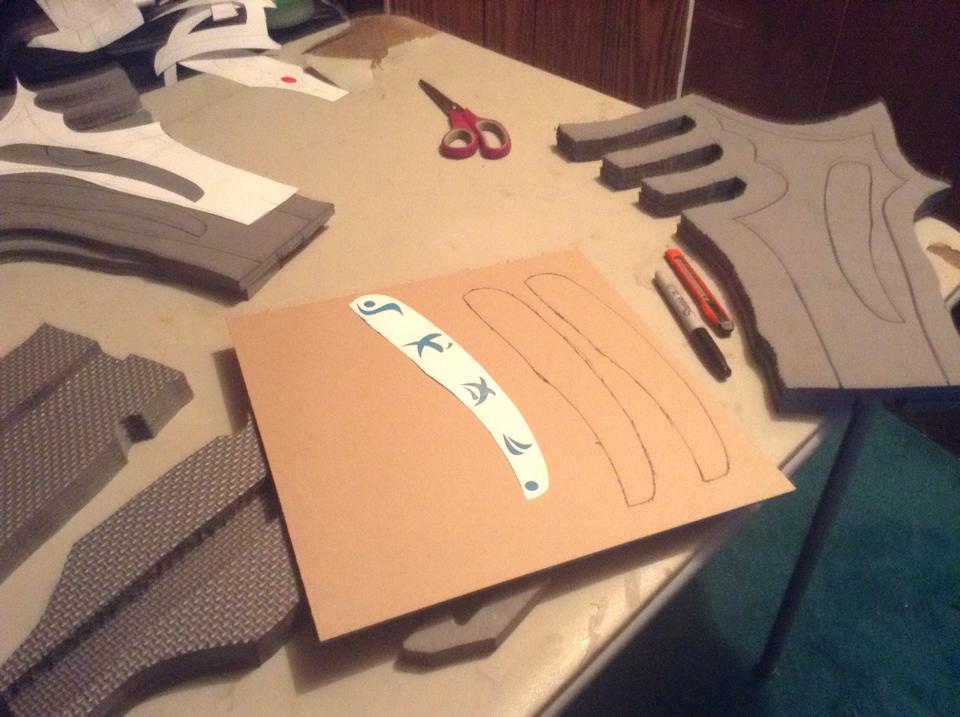 I would have preferred to cut out each rune and install them that way, but I don't have access to a laser cutter, and there was no way I could hand cut such intricate details out of two layers of foam - twice - to install them. Not only that, but the foam is malleable, whereas the acrylic is not, and given that this was a big sword going to an anime convention I didn't want to risk them popping out. So, I opted to cut a larger section out with the coping saw, to give it more surface area to glue. I traced that larger piece onto each half, and cut them out. Part of the dowel stuck out into these sections, which would make things easier for the lights. I also cut out the cross-guard, and wrapped the end of the dowel in foam for the grip. Once the fit was right, I made a stencil for the runes and cut them into the protective sheet on the acrylic. Once I removed the larger area, this left behind the rune shapes, which saved me from having to re-tape them later just to do the same thing. 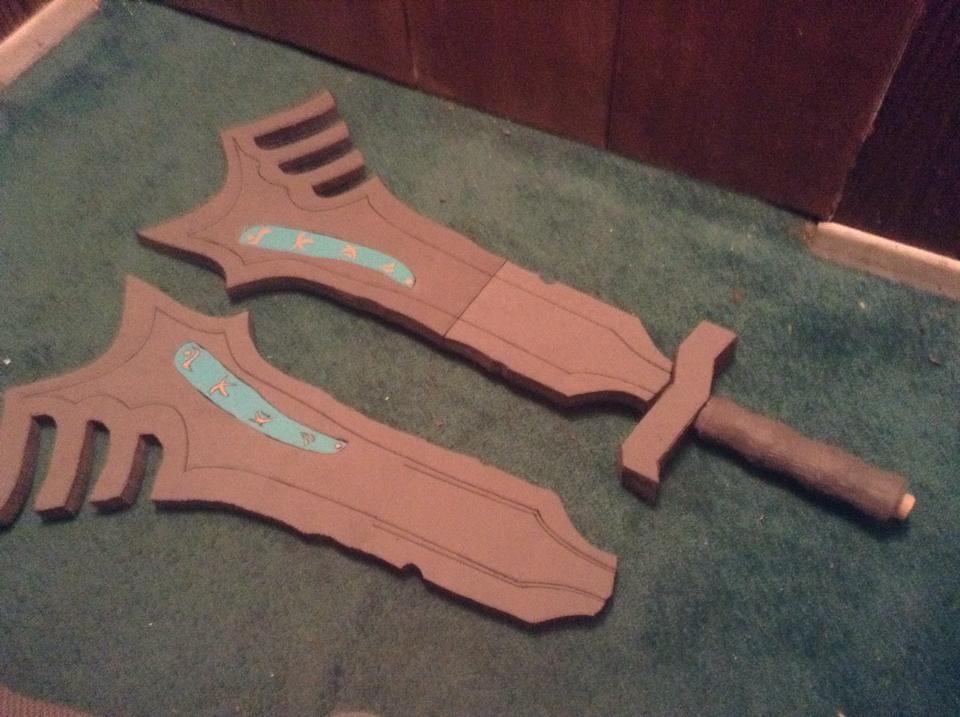 Since I didn't want to replace all my soldering stuff, I decided to get a string of prewired LEDs attached to a battery pack, which had an on/off switch. Made things simpler, and man those lights were bright! Glad of it though, since I needed as much light as possible to make it through the opaque acrylic to be seen. Secured the lights and acrylic panels in with hot glue, then glued the blade together along with the hilt/dowel. In hindsight, I should have waited to install the hilt, but there it is. Now the real fun begins! Remember those lines on the blade? I marked those out so I knew exactly how far I had to bevel it down. This took ages with the dremel, and literally covered me head to toe in foam dust. Thank goodness for goggles and a respirator! Now it's reeeeeally starting to look like a proper sword! You can see that I also took the dremel to the grip, to give it the wavy look of the game model. From here, I took my xacto knife and scored in the pattern at the base of the blade, then took a heat gun to it to separate the cuts and make a nice etching. I also made the snake-head pommel, did the same trick to etch the eyes, and attached it. Finally, I took a bit of craft foam and used it to cover the battery pack in the hilt, accessible via a small bit of velcro. Home stretch! Time for one of my favorite parts: painting. Threw on several layers of black Plasti Dip, as a base. 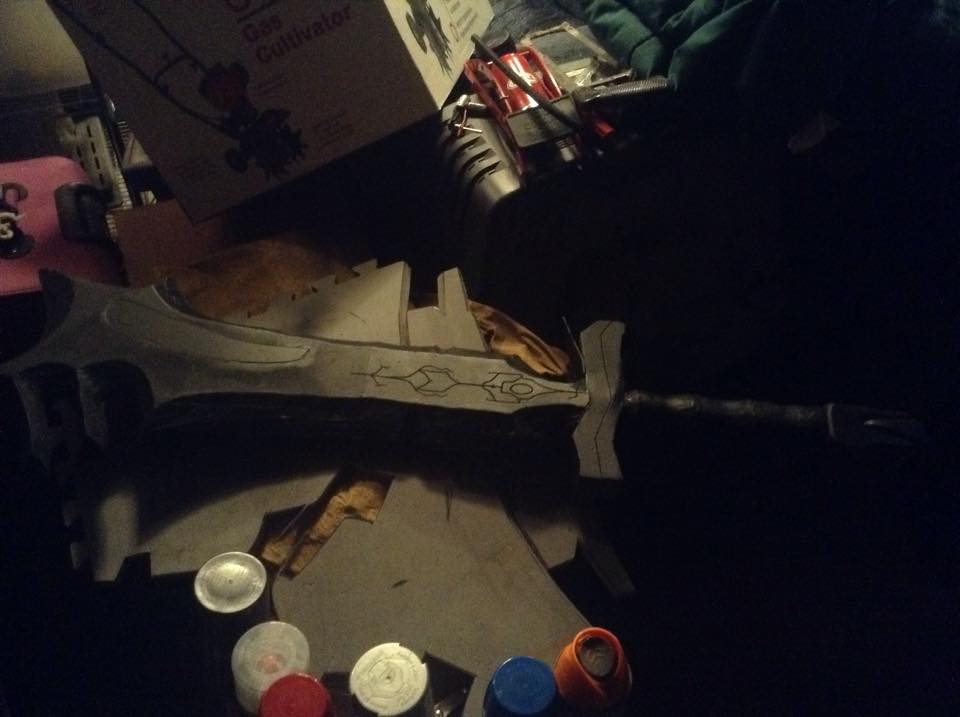 Then painted the cross guard and pommel a goldish bronze, let it set, and taped it up. Once that was ready, I covered the blade with an automotive silver paint, which gave it a nice shine. 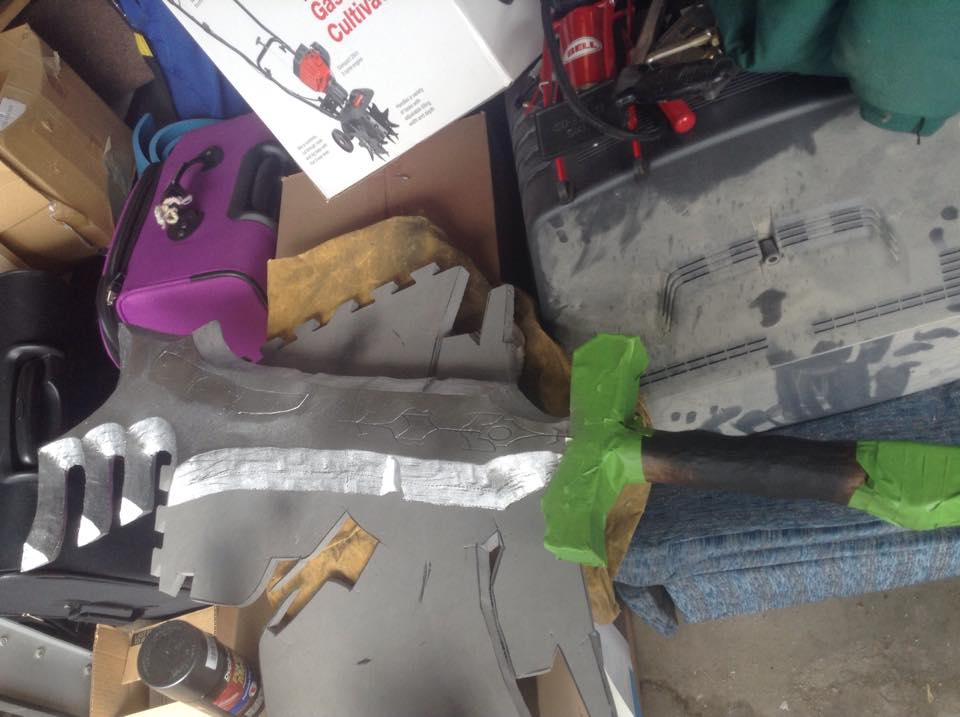 Taped it up some more, then covered the central part of the blade with a nice, deep blue metallic paint. Once that all set, all the tape came off, plus the rest of the protective paper from the acrylic! You can still see the seam where the acrylic meets the foam, which I tried to hide as best as I could but still never fully worked. The biggest issue was going from a solid piece of acrylic to the softer foam, but I also should have waited to put the two layers together until I had evenly glued in the acrylic piece. Oh well.... Hand painted in the yellow filigree on the blade, using the etched lines as a guide. Also did the red gems in the blade and pommel, and threw a basic black wash over the silver of the blade to give it a little bit of weathering. 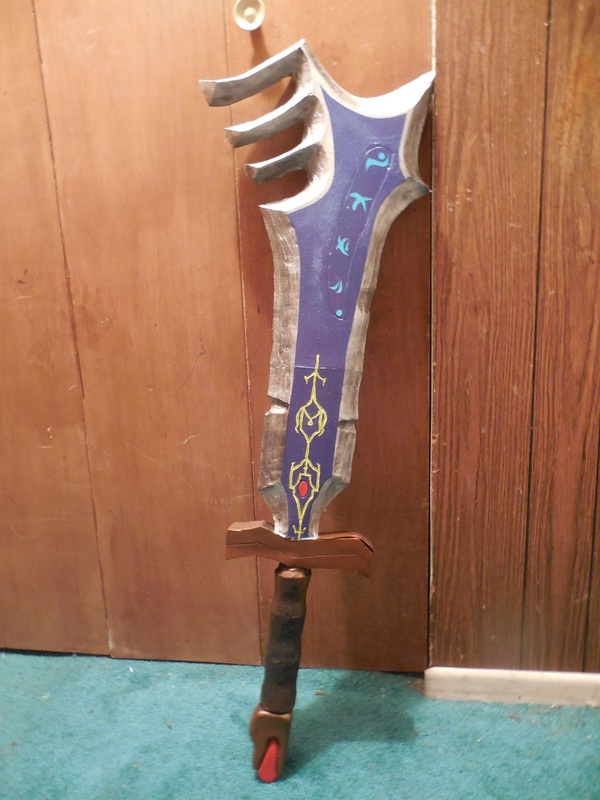 Once that was all done, I could add the finishing touches: the wrap. Got a simple brown lace from Walmart, glued one end down, wrapped the grip up to the top and wrapped the hilt, then went back down with the excess and glued it down too. Worked perfectly! Really happy with how this turned out, even with the visible acrylic edge and the craft foam cover that refused to stay down, and a seam on the top opening after everything was done. Given how I had to use tools I wasn't used to, having to go without the tools I would have liked to use, and still turning out how it did makes me feel really good about how my skills are improving. Hope you guys liked this build! Here's a send-off of some outdoor pics I took to show off the details a bit better. 
Okay, okay, so I couldn't just stop at the pistol. Everybody who was anybody was building this helmet for the upcoming Guardians of the Galaxy release, and when I found a great foam pep unfold on the RPF, I decided to join in. Why? 'Cause I can. ;) So, naturally, I printed all the parts after sizing it to me, cut out all the paper templates, then cut out all the foam. 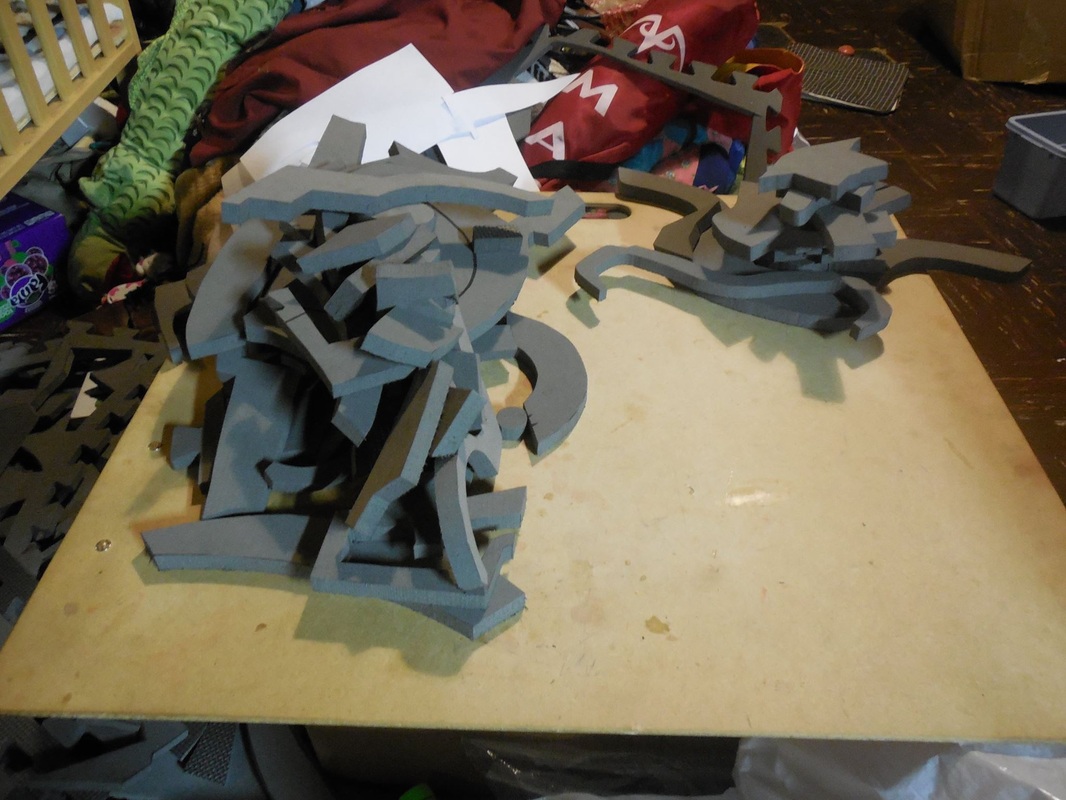
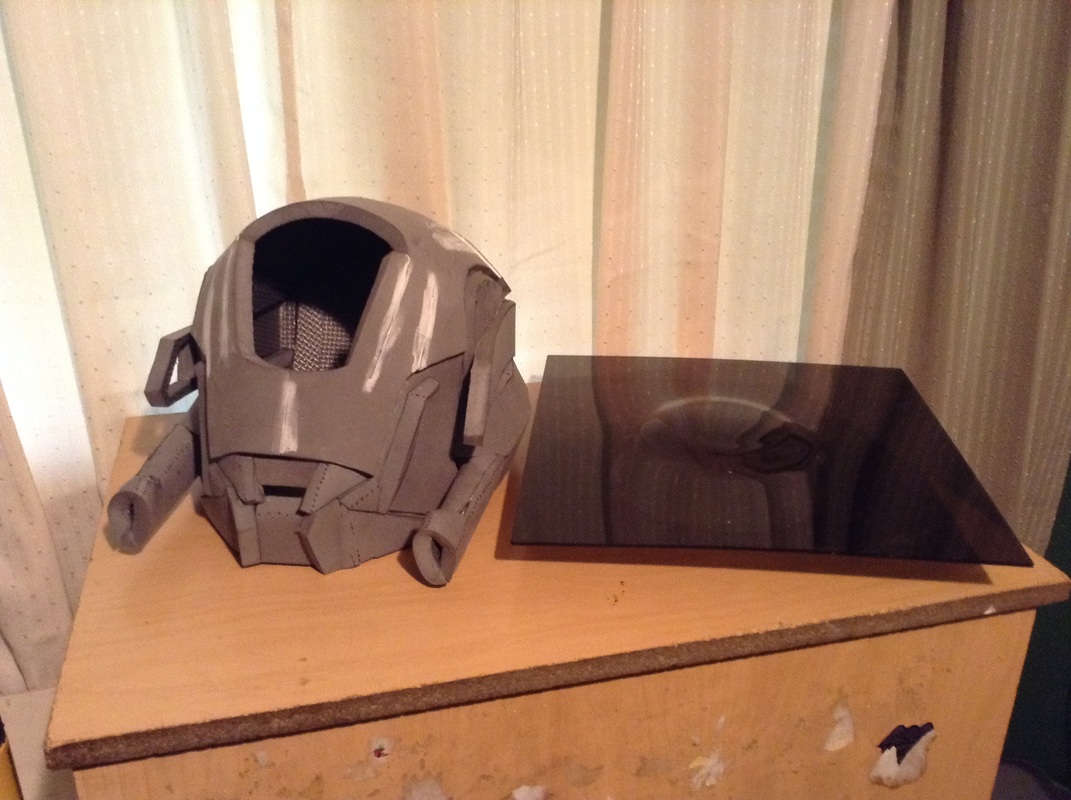
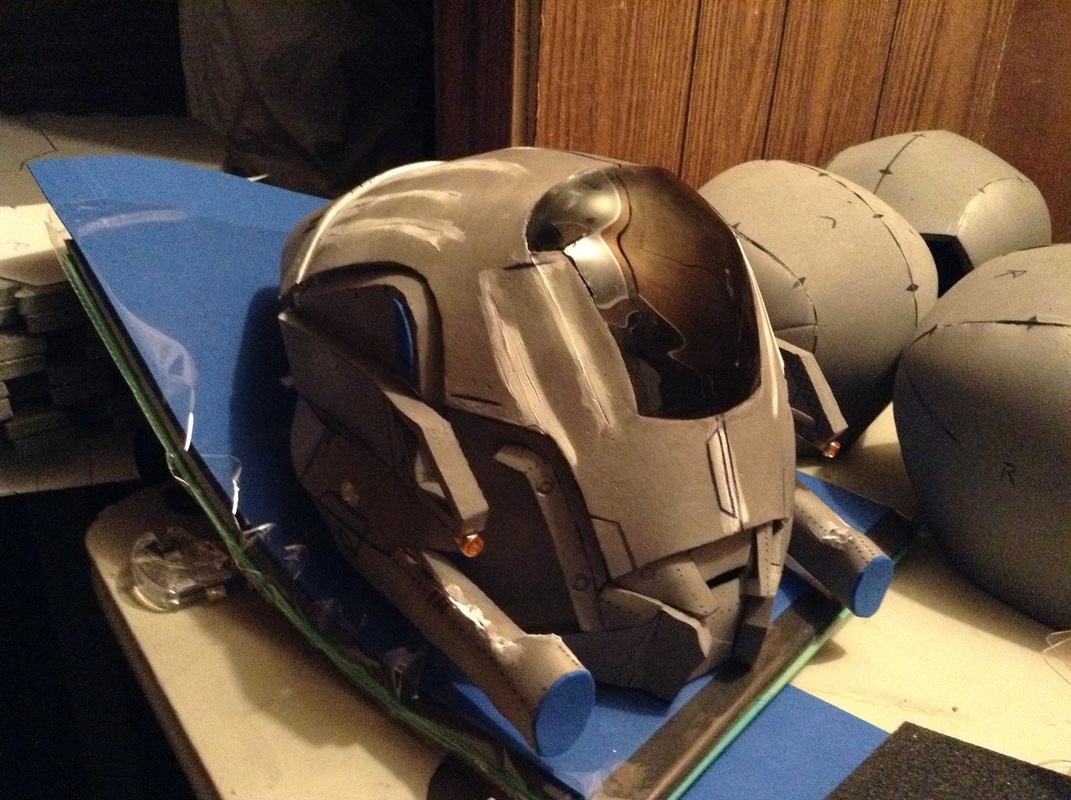
Just for a bit of perspective, on the left are all the pieces for an N7 breather helmet, and on the right are all the pieces for this one. Muuuuuch simpler overall, though obviously with its own difficulties. Organized all the cut out pieces, then started the assembly! 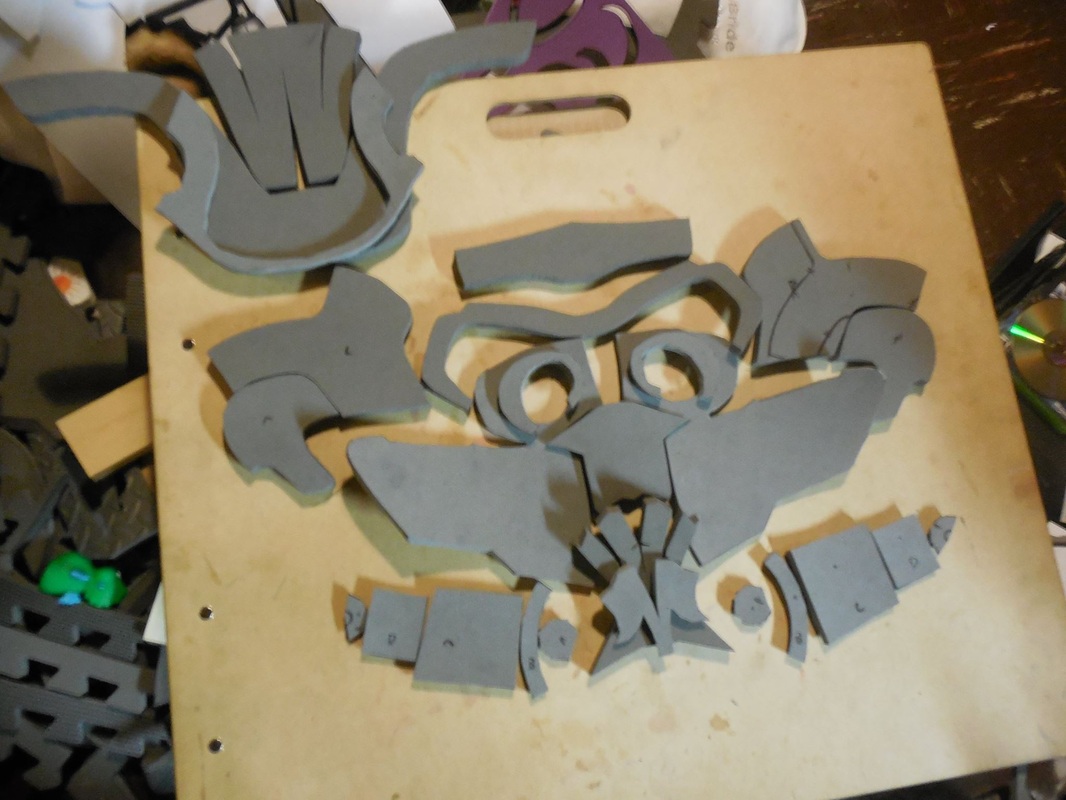
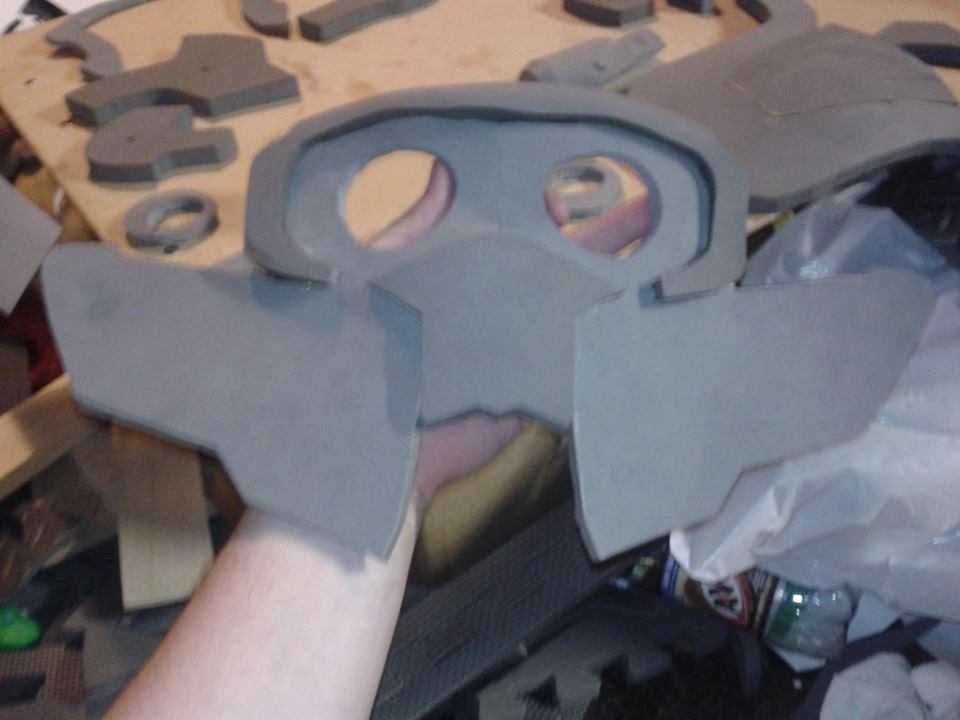
Totally laughed at this part, because it looked to me like an aviator platypus or penguin or something. XD 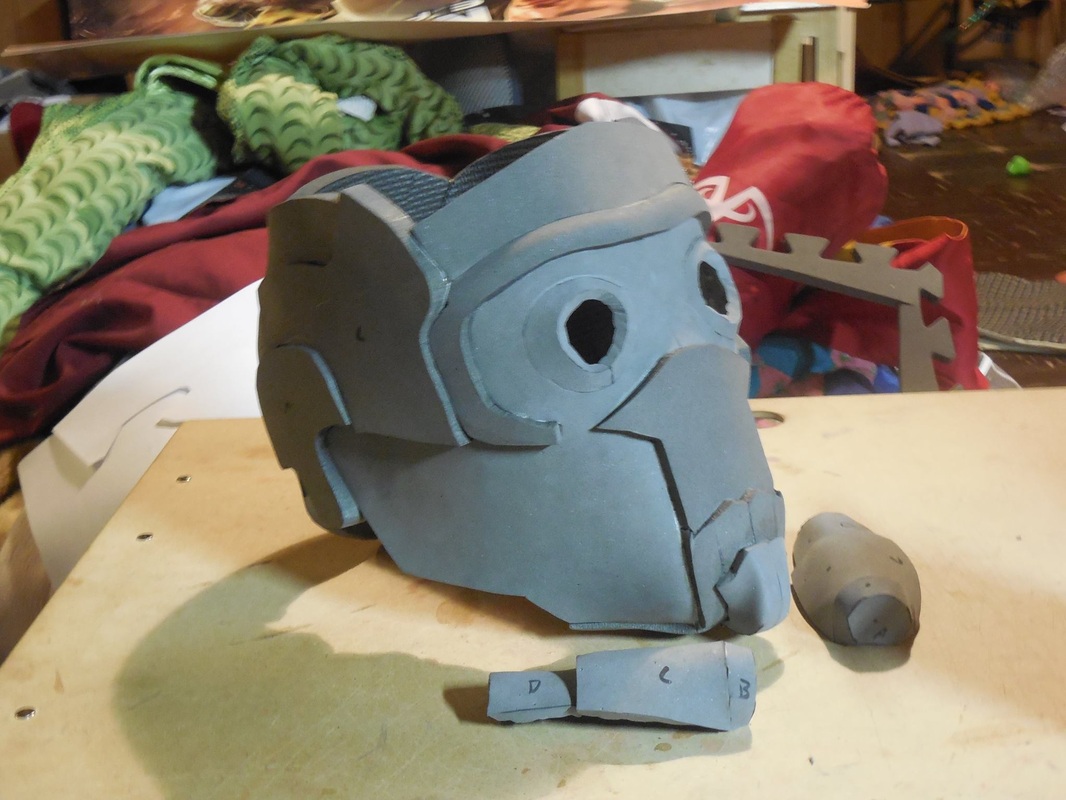
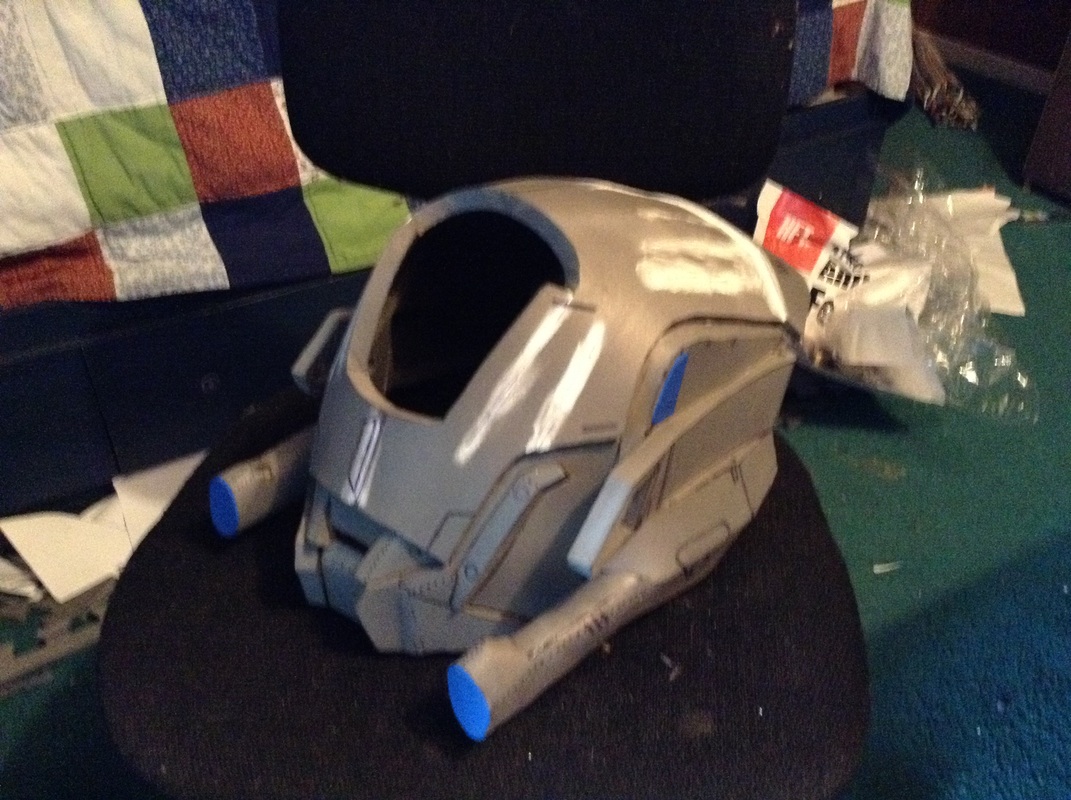
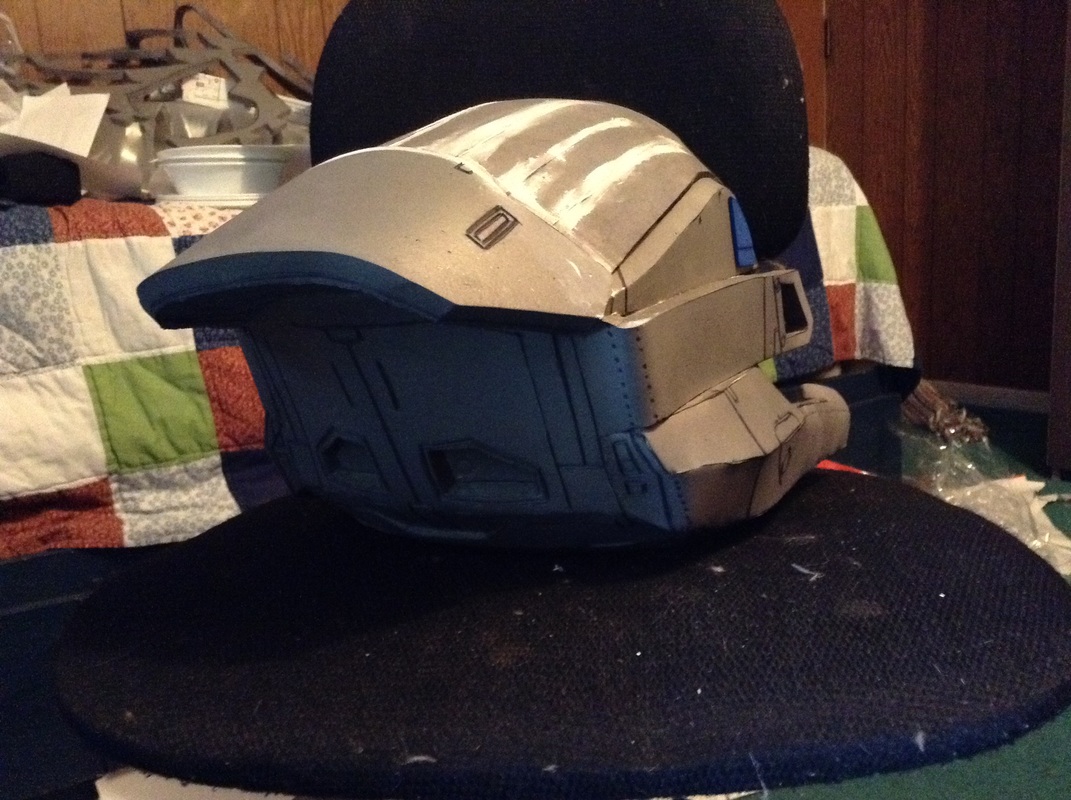
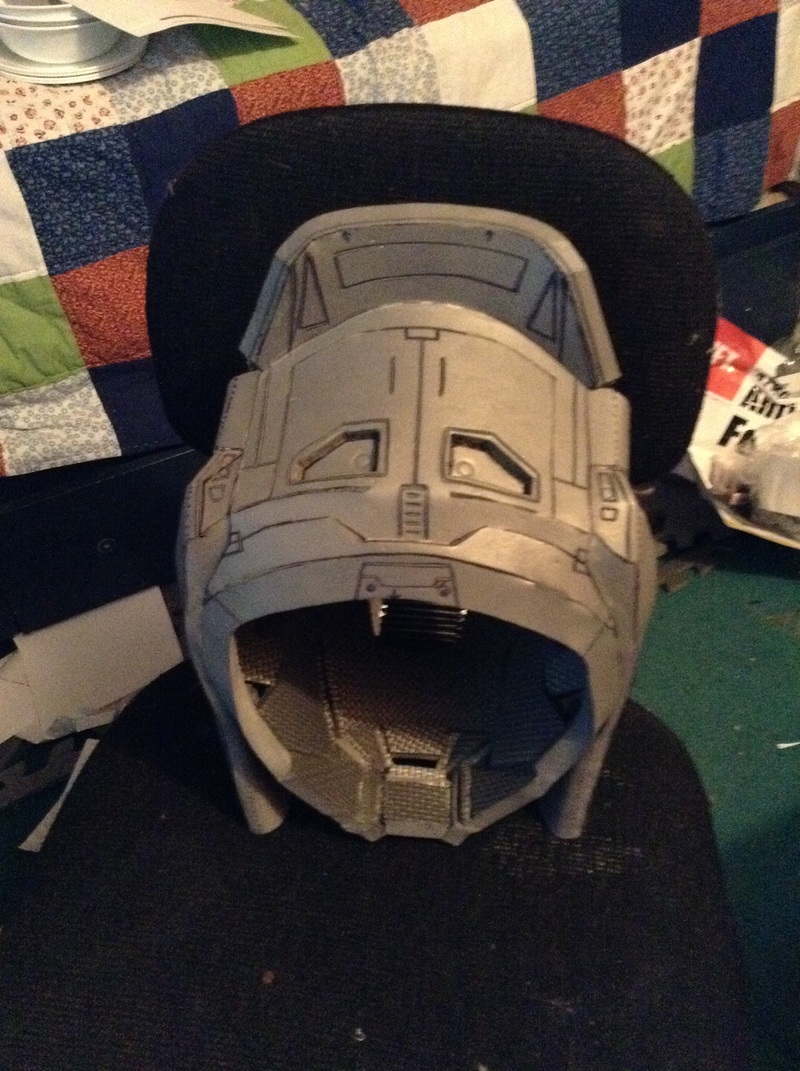
Got it all pretty much assembled, then put it aside for a bit while I finished off a couple other projects. This was for me, so other stuff came first! Once I was able to get back to it though, I etched in the lines with the xacto/heat gun combo. 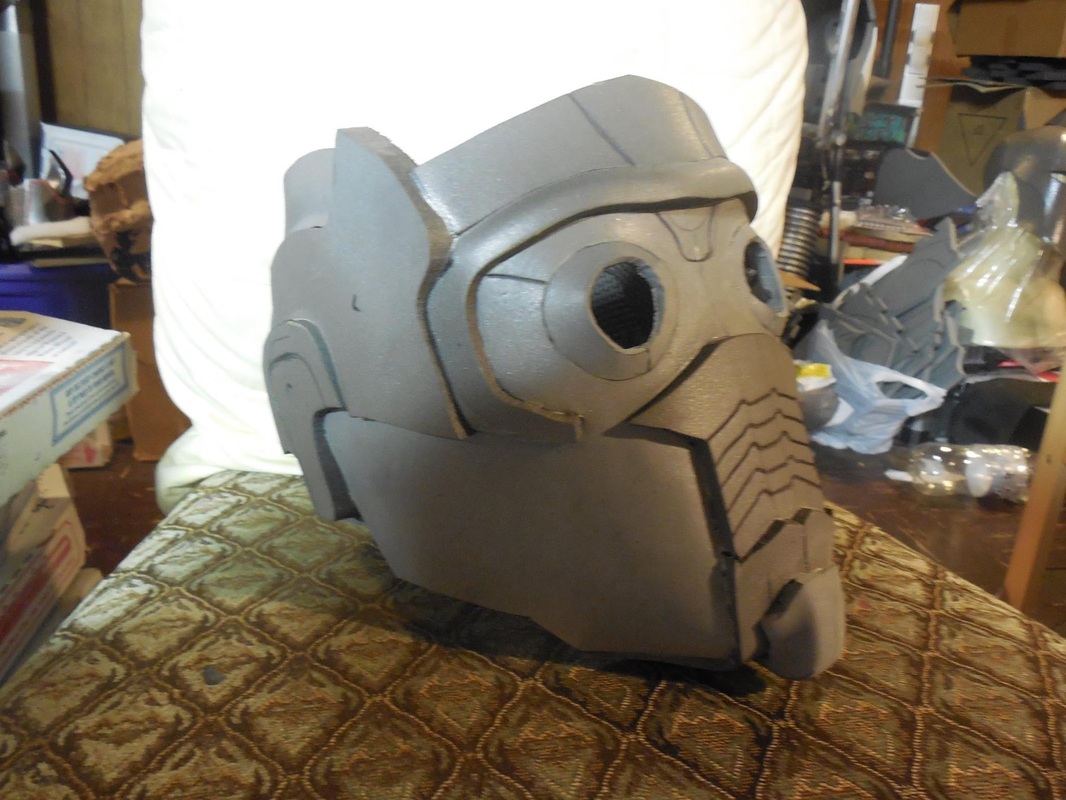
Starting to look more like it! Attached the breathing tube things on the sides, as well as simple craft foam bits on the cheeks. Nothing fancy or crazy about the build, just getting what I can done with little time to spare. 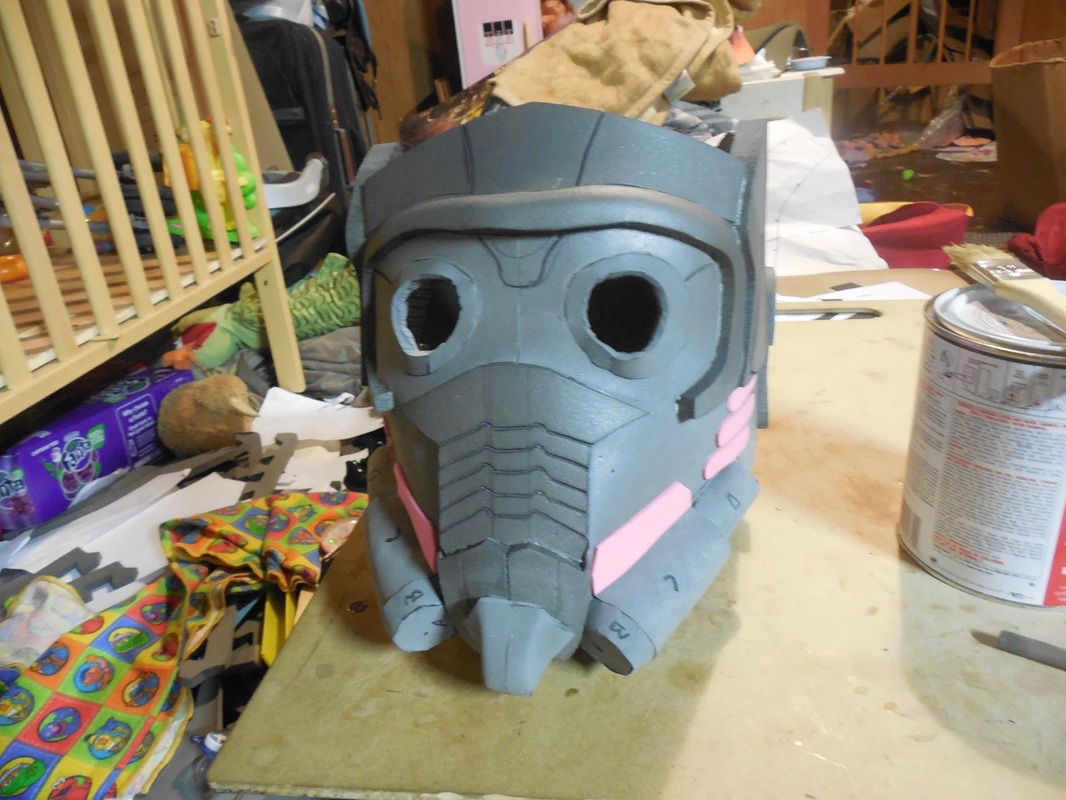
Tried to find some bendy straws, a trick I saw someone on the RPF do for the tubing, but I didn't have any. Instead I grabbed some old ethernet cable I had lying around and glued all that on. 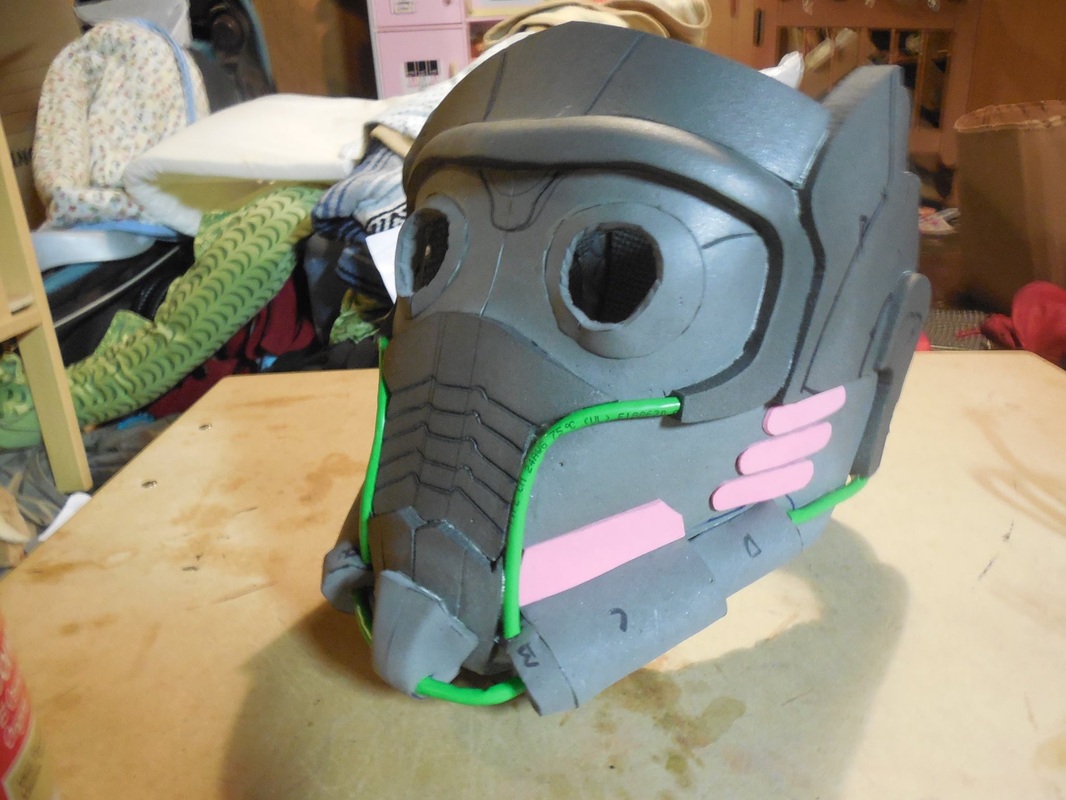
Sent that out for paint so quick (and rushing to get it done the day of the release) that I forgot to take pictures. Sorry! I did take a quick shot of the acrylic discs for the eyes, done with the same red acrylic I used on the Terminus helmet. 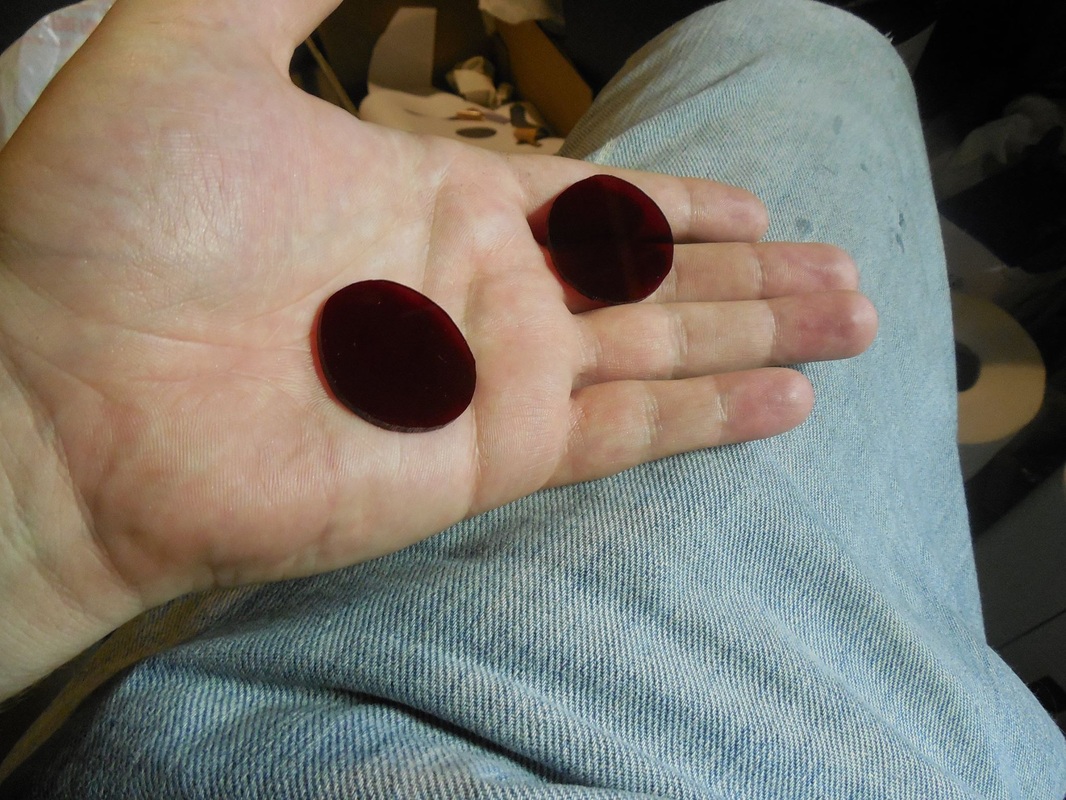
For the paint I used Plasti Dip (naturally), metallic gold, and a satin aluminum I had lying around. No weathering, no clear coat, and no gunmetal, since I didn't have any and we were out the door soon as the tape was off and the acrylic eyes installed. 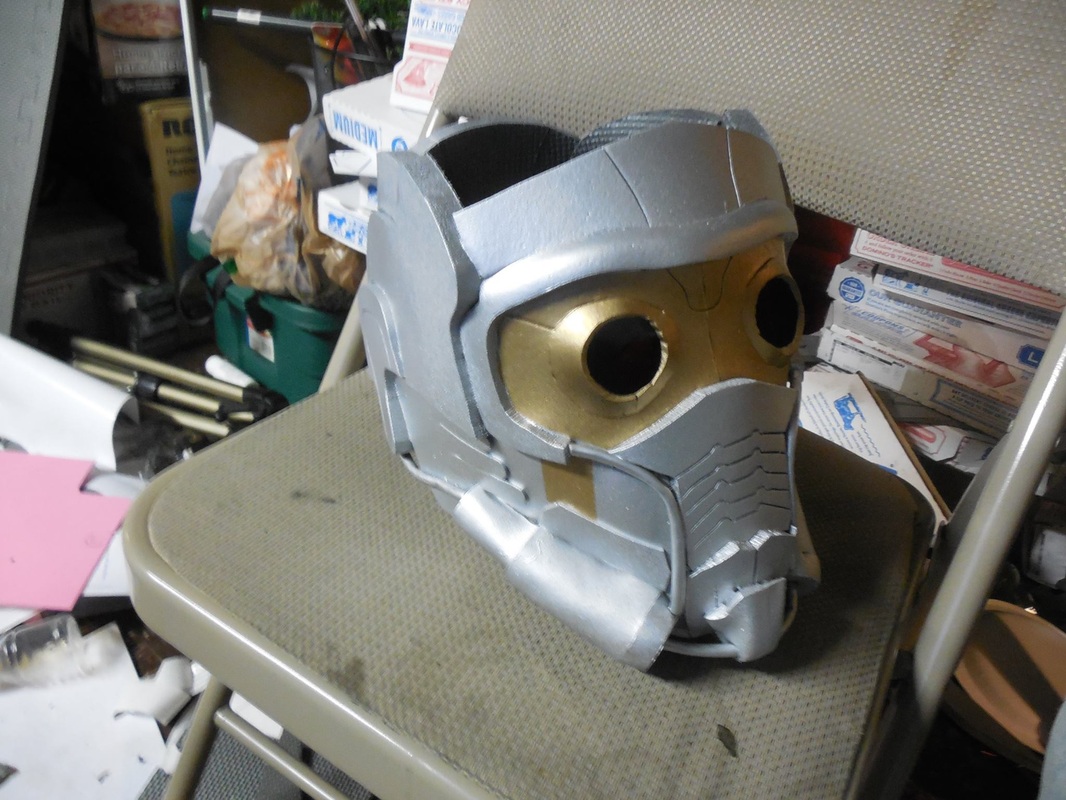
There's still a bunch of work I'd like to do on it, and some shots of me wearing it I'd like to get, but it currently sits in the state you see here, in a giant pod with all my tools and belongings, in Pennsylvania. While I sit here in Utah.
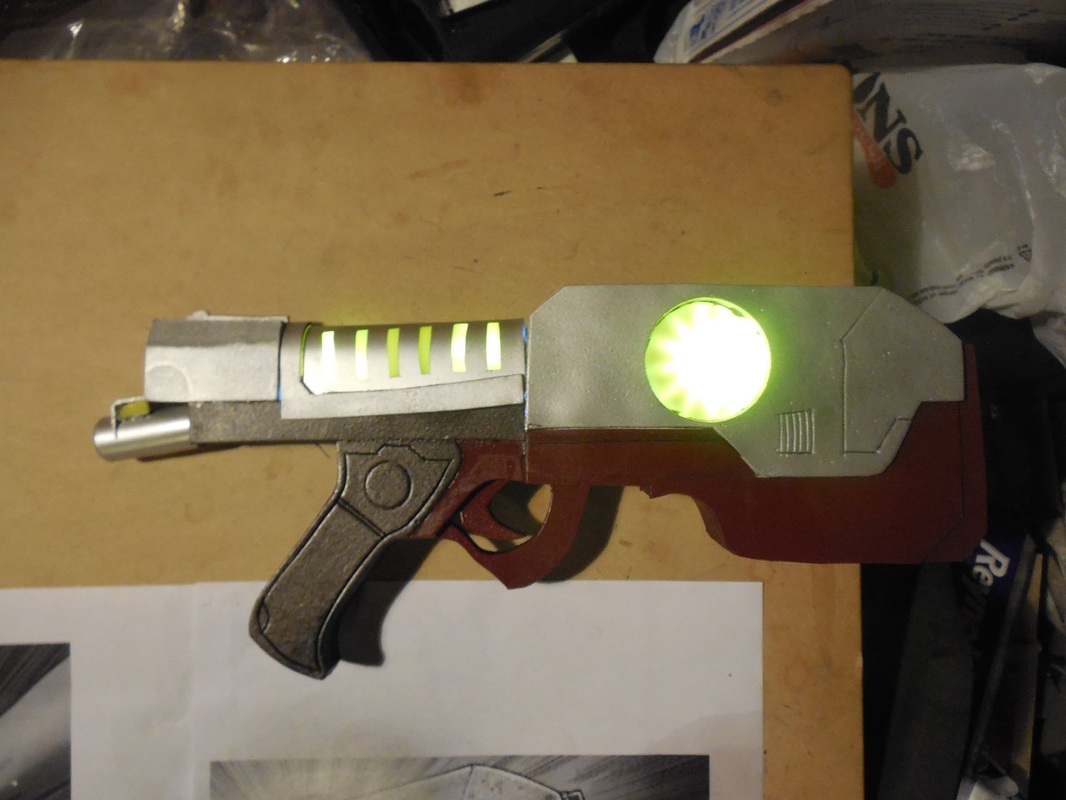
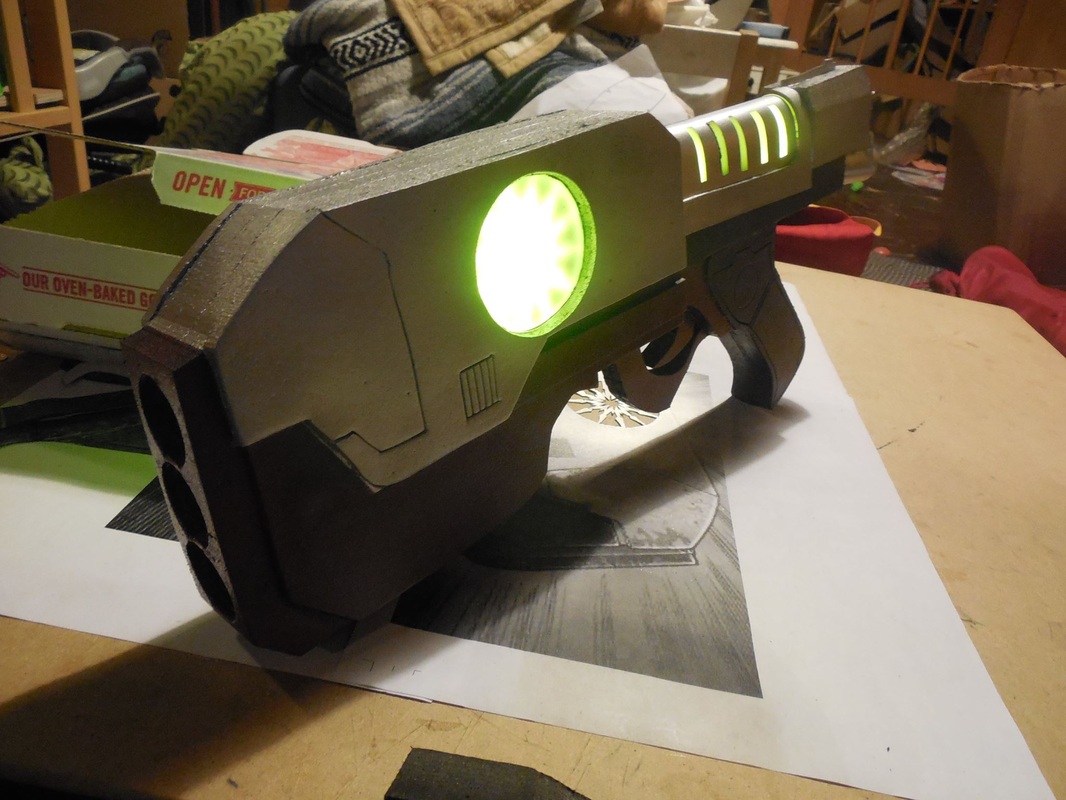
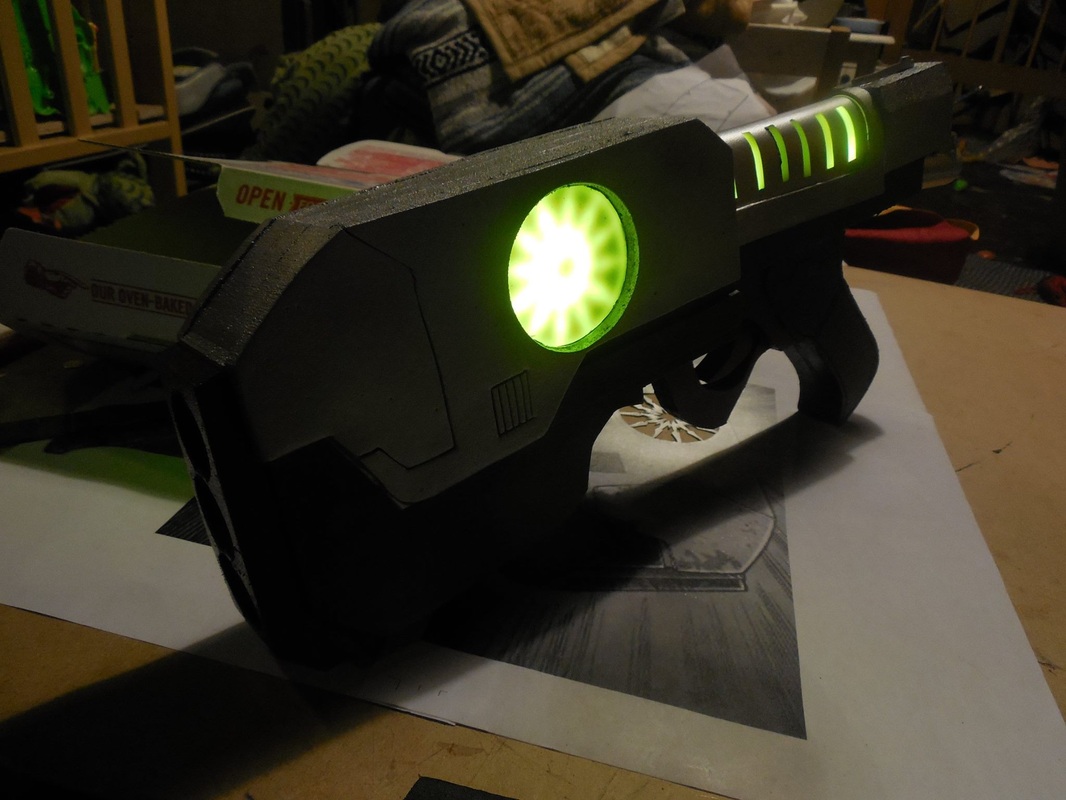
Once I get it back though, it's a nice casual cosplay that I can wear, carry, see out of, all that. I'll be putting the final touches on it just for that. It also needs some beveling and edge work, so expect a possible repaint when that happens. Either way, I think it turned out pretty great! 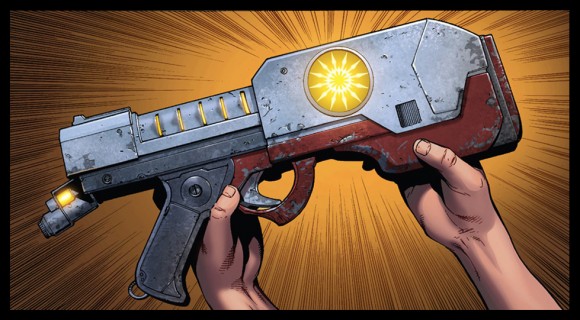 Was commissioned to make the comic book version of Star Lord's pistol, by a previous client of mine. Not only did it look really cool, but with the upcoming release (which has now passed) I thought it'd be fun to do and a bit of a challenge. First up, printing out the proper sized thing, and cutting pieces out of the foam. 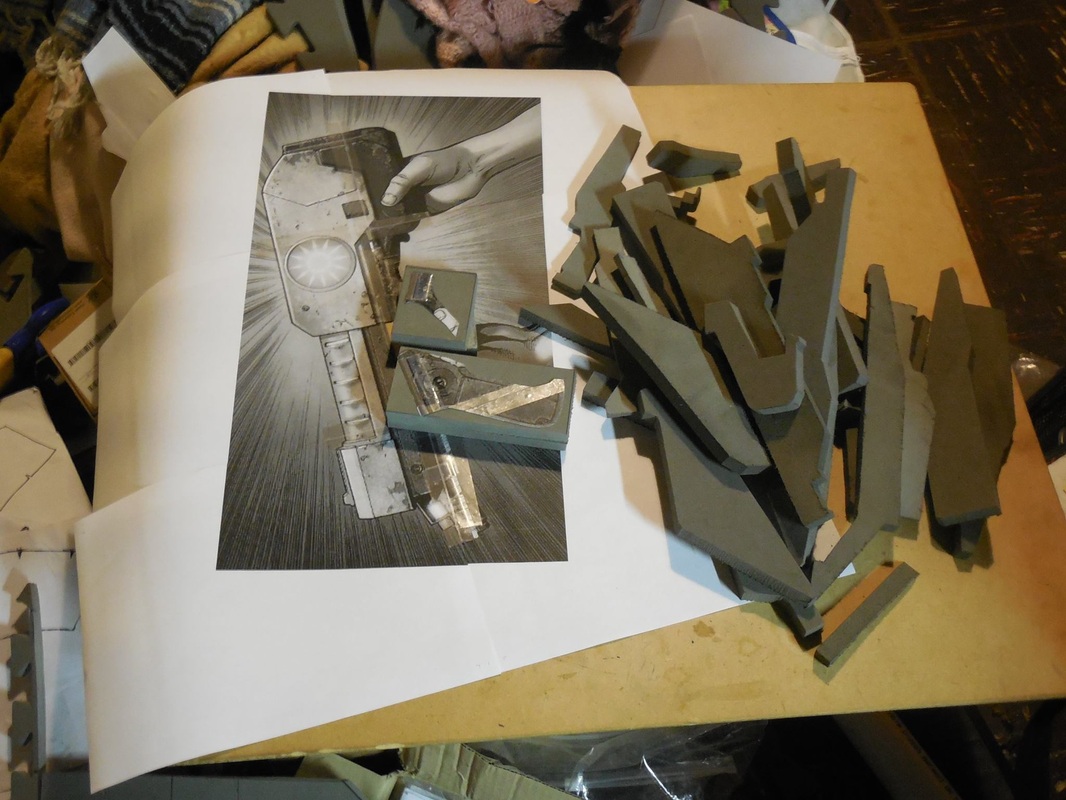 If you read the previous write-up on the Turian Phaeston (which you should if you haven't) you know that these two builds happened basically at the same time, so you'll see both in a lot of the pics. Don't worry though - I'll try to keep things on track. ;) Once all the layers were glued and each puzzle piece cut out, I got to work on the acrylic pieces. I was still debating a few different ways to do the glowy parts, as well as hide the battery, but after a wonderful chat with Beer Money Props, we came up with a couple simple, and useful, solutions. 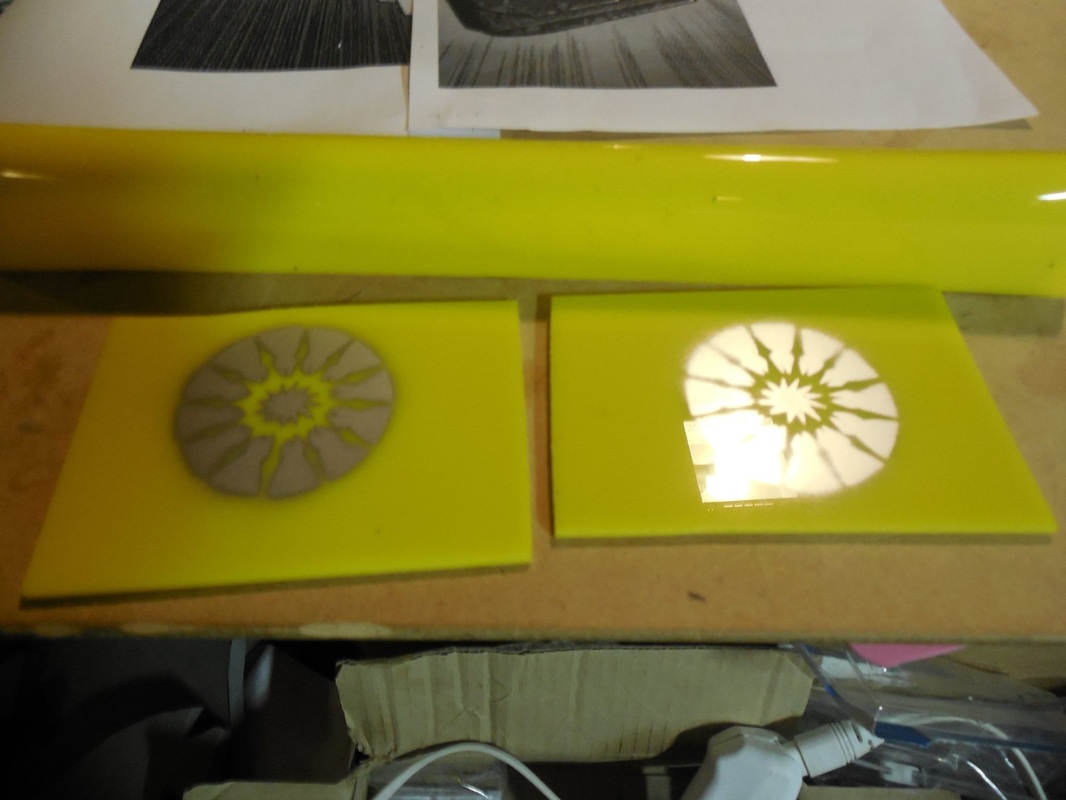 First, I cut a quick and dirty mask with painter's tape and sprayed some paint on what would be the inside of the acrylic. This would help make the cool pattern in the discs when the light shines through, without blocking out the light entirely. Next, I heated up a section of the acrylic and bent it over a small pipe, curving a section and leaving two flat walls, to make the middle section. Originally I was just going to make that out of foam, and insert a panel of the acrylic on either side, but this was his suggestion which was not only easier, but worked perfectly. 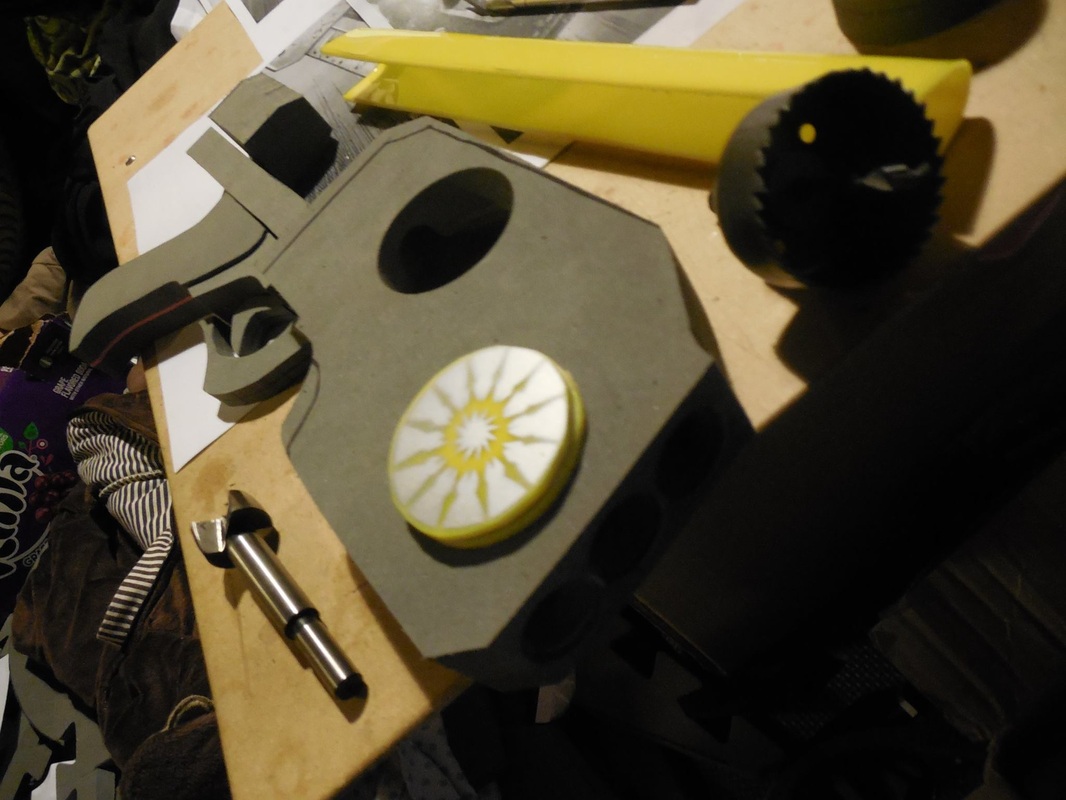 Here you can see the cutting bit I used to cut out the large hole in the side, where the discs would go. You can also see how the other acrylic bit bent to go in between it all. Finally, I used a forstner bit to drill a hole in the back for the wires, as well as in the front for the barrels. For that I used a slightly larger bit, followed by a smaller bit, to give them a bit more detail. 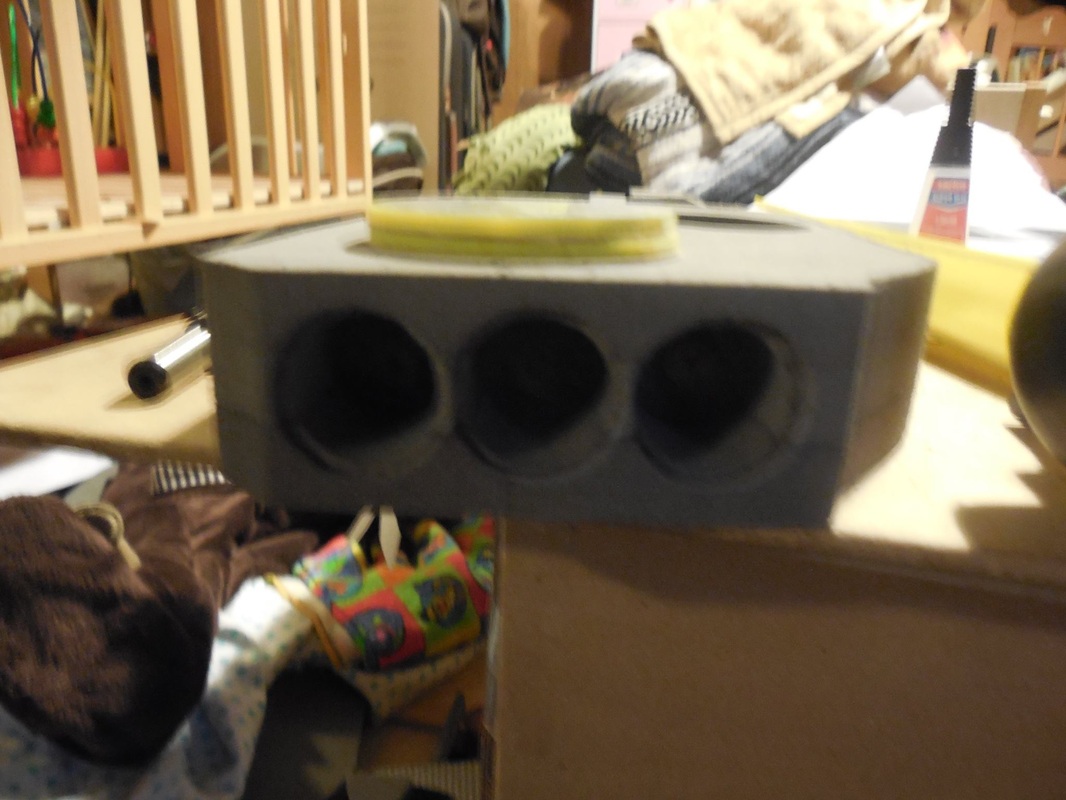 Finally, I had originally planned to have the very back section be removable, attached via magnets, to hide the battery and give easy access to change it. However, Beer Money Props suggested sticking it in the middle, above the grip, which would give it a more even balance. So I did. :) 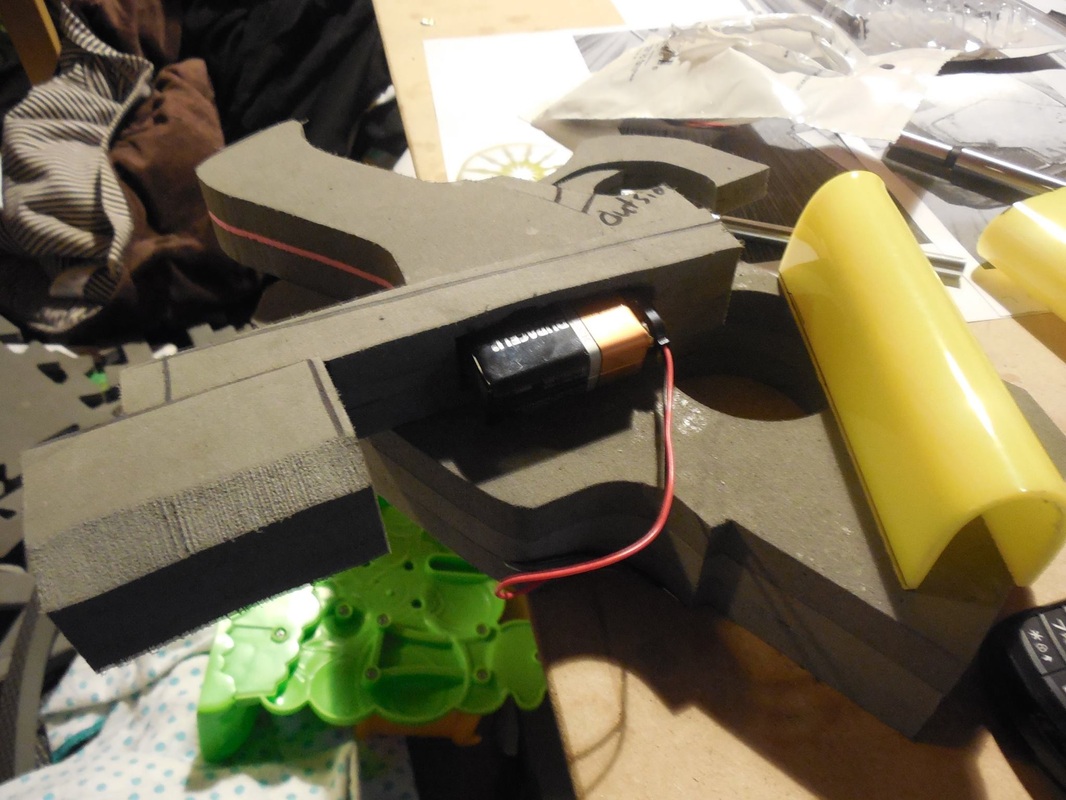 I still had to cut out a small chunk of foam for it to recess into, but it worked a lot better. Now that that was done, it was time to wire everything! 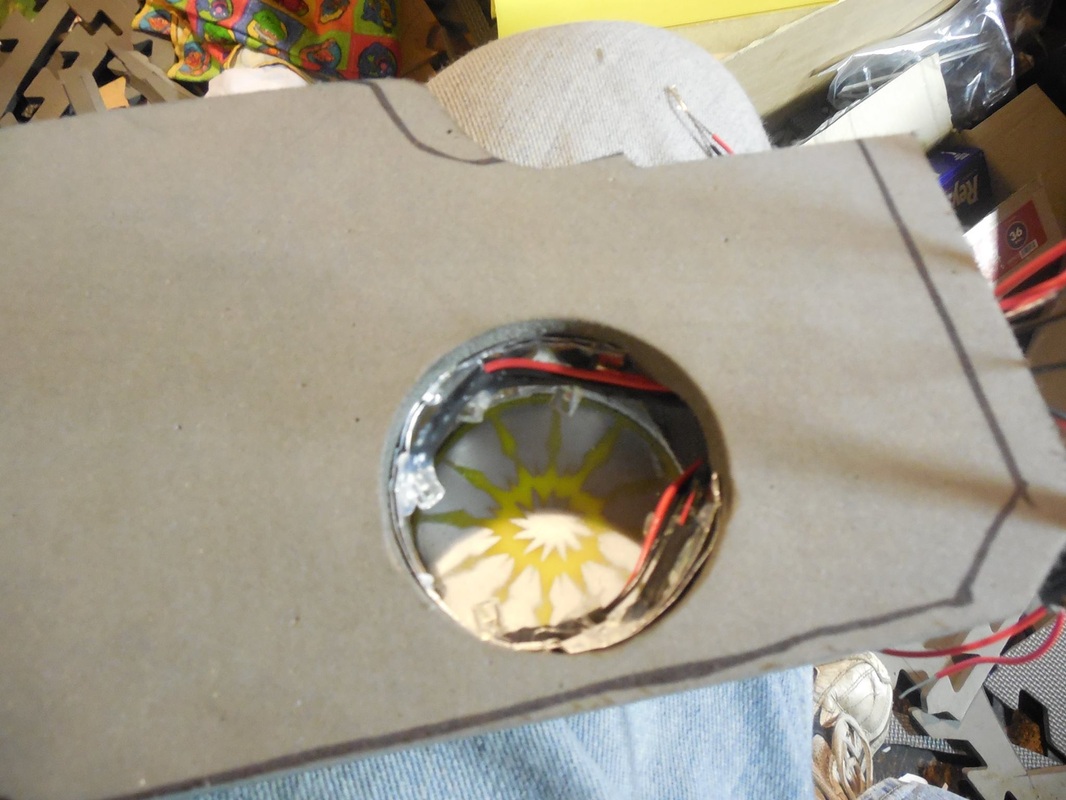 I put six wide angled LEDs inside the front bit, with some aluminum foil to help diffuse the light more so it didn't look spotty from the outside. You can also see that I installed one of the two discs so that I knew exactly how much room I would have. When that was done, I installed the other disc. 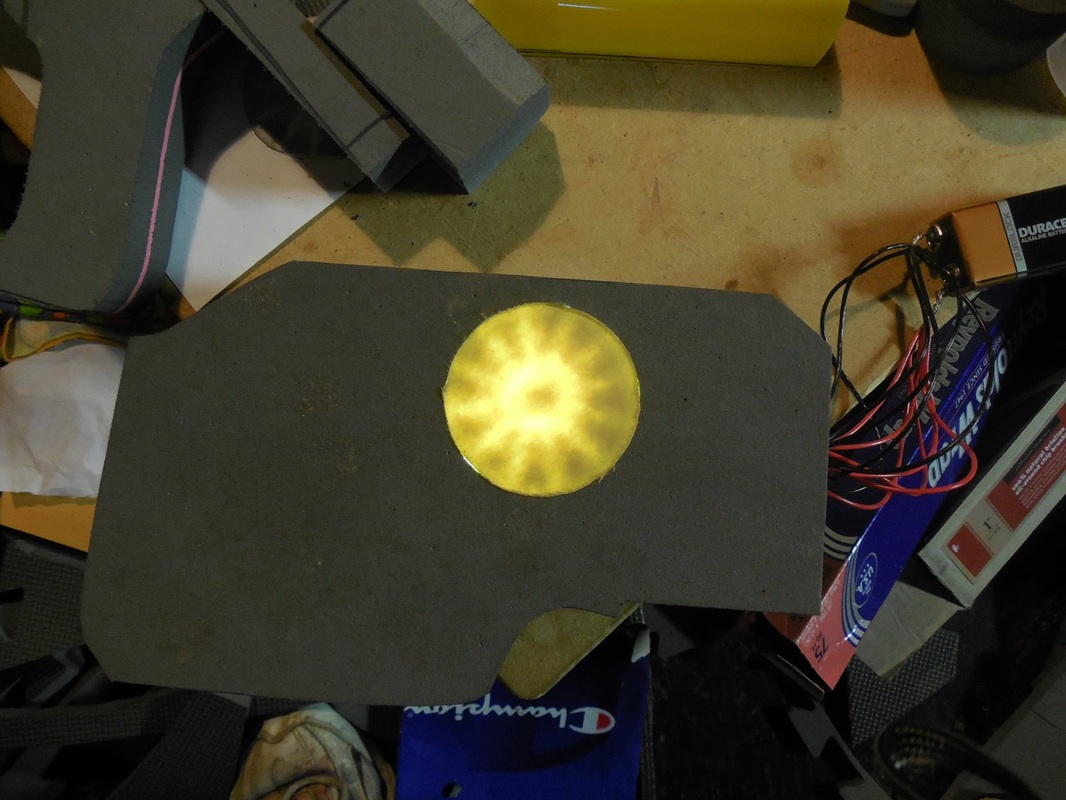 And it works! You'll probably notice here that I left the protective paper on the outside of the acrylic discs. This was to save me from having to tape it all back up again after painting it, which would have been a pain. I left it on both discs, though I took it off entirely from the cover piece. Once I had that all set, I glued all the pieces together, added a couple more LEDs to the other acrylic section, and tested the lighting again.  In hindsight, I probably should have put a third light in the middle there, but I was worried the battery would block that light anyway. Still turned out great though, so now it was time for all the details. 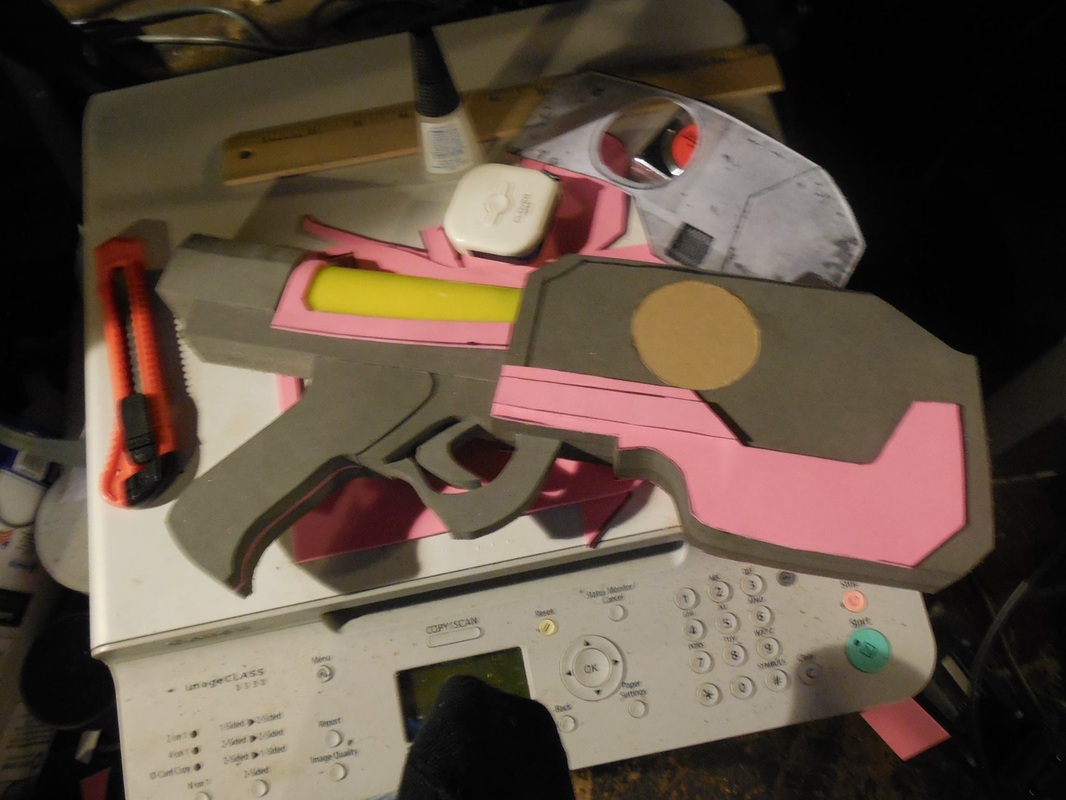 Started out with some craft foam layers, to get the thinner spots. Also added the central details onto the acrylic with the craft foam. This helped hide the edge of light and wires underneath. 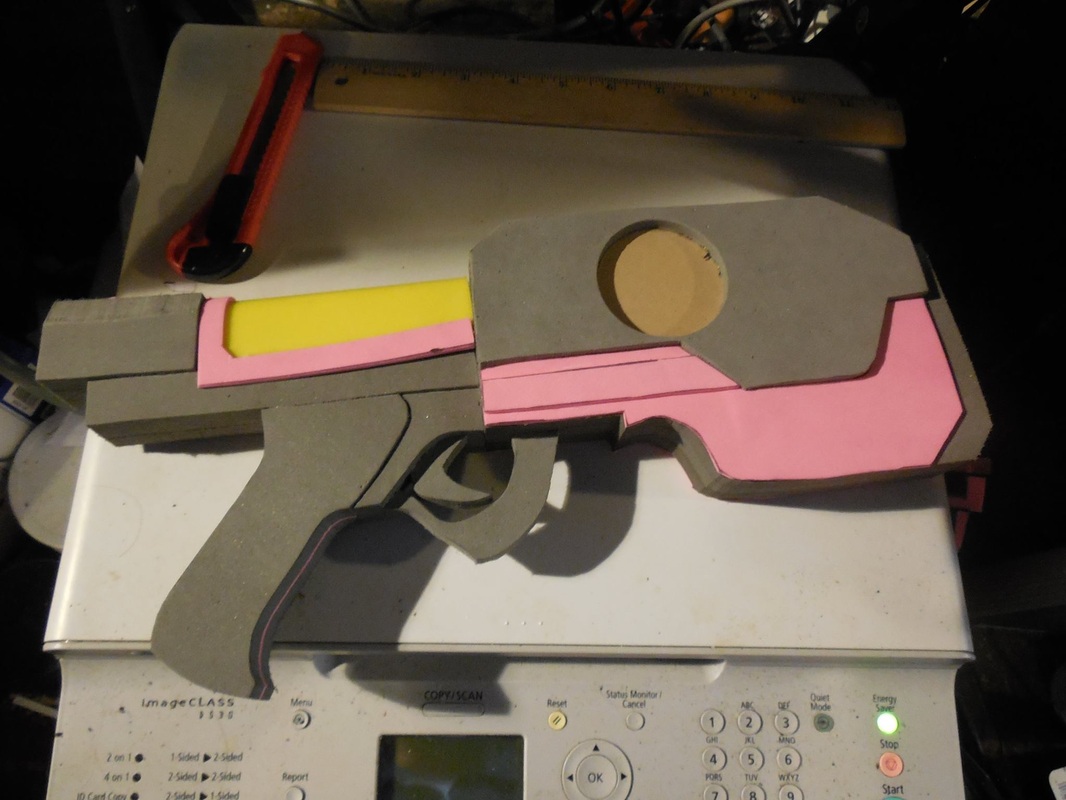 Then came the 1/4" foam, again with the hole cut out, for the slightly thicker area (which the 1/2" would have been too thick for). Once both sides were done, it was time for the details! 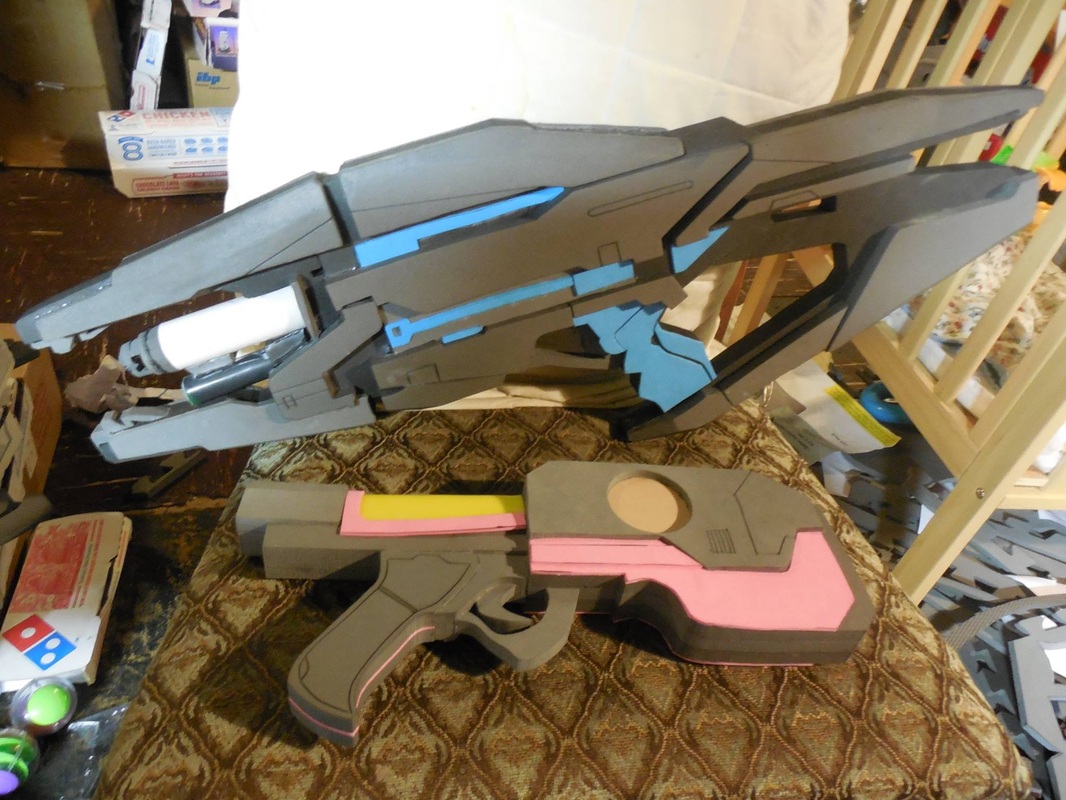 These were done, as always now, with the xacto knife and heat gun. Super fast, super easy, super clean! 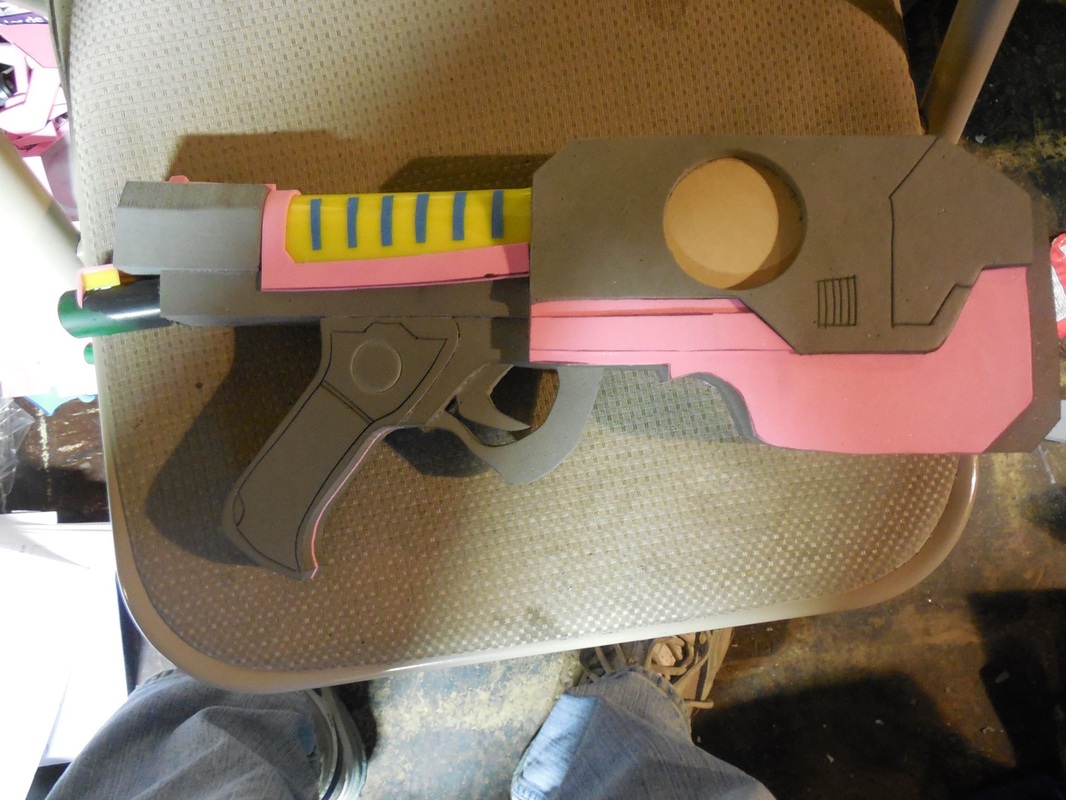 Lastly, I cut a small PVC pipe to size, used a dremel, file, and some sandpaper to sharpen the inside edge of the pipe, and scored a light ring on each side of the grip. Then I attached it to the back of the pistol, and used more craft foam and scrap acrylic to form the doohickey on the back. Those strips of blue are bits of painter's tape, to mask off the acrylic. That will make more sense later. I also taped off the inside of the half-tube bit, to make sure no paint got inside, as well as the battery connector. Then it was off to the Plasti Dip!  I didn't want to risk pulling out the wires of the lights attached to the half-tube section, so I opted to cover one side at a time. Once that was set, I propped the pistol on its top, painted the grip and back section a metallic black, let it set, then taped it up some more. 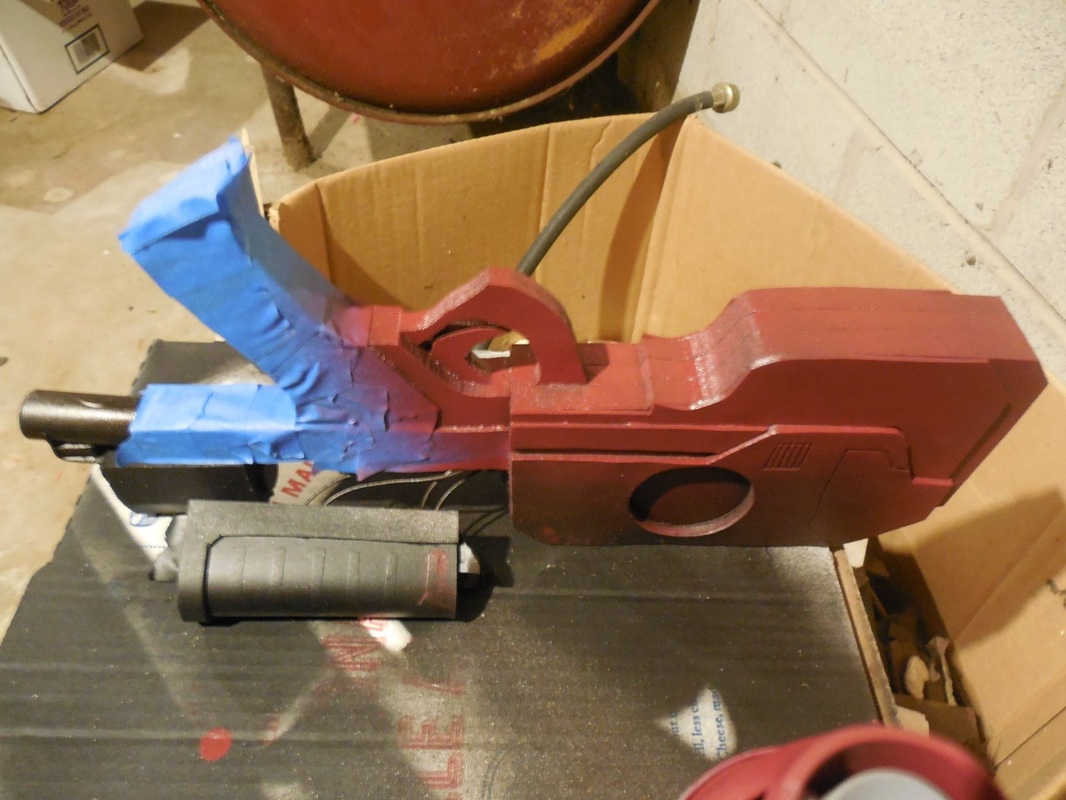 Then I grabbed the darker red I used in the Original Helmet 1 build, and painted more of the bottom area as well as the front. Naturally, I let that set too, then taped it up to paint the rest of it silver. Once that set, I took all the tape off, including the strips on the half-tube section and the paper protecting the acrylic. The result? Perfection. *drool* Ahem. Sorry. :D The paint masking on the inside of the discs worked exactly as planned: there, but not holding back the whole light. The strips shone through wonderfully. You can see it best when I turned down the light levels on the camera in the third shot. Finally, time to tie it all together with the weathering! 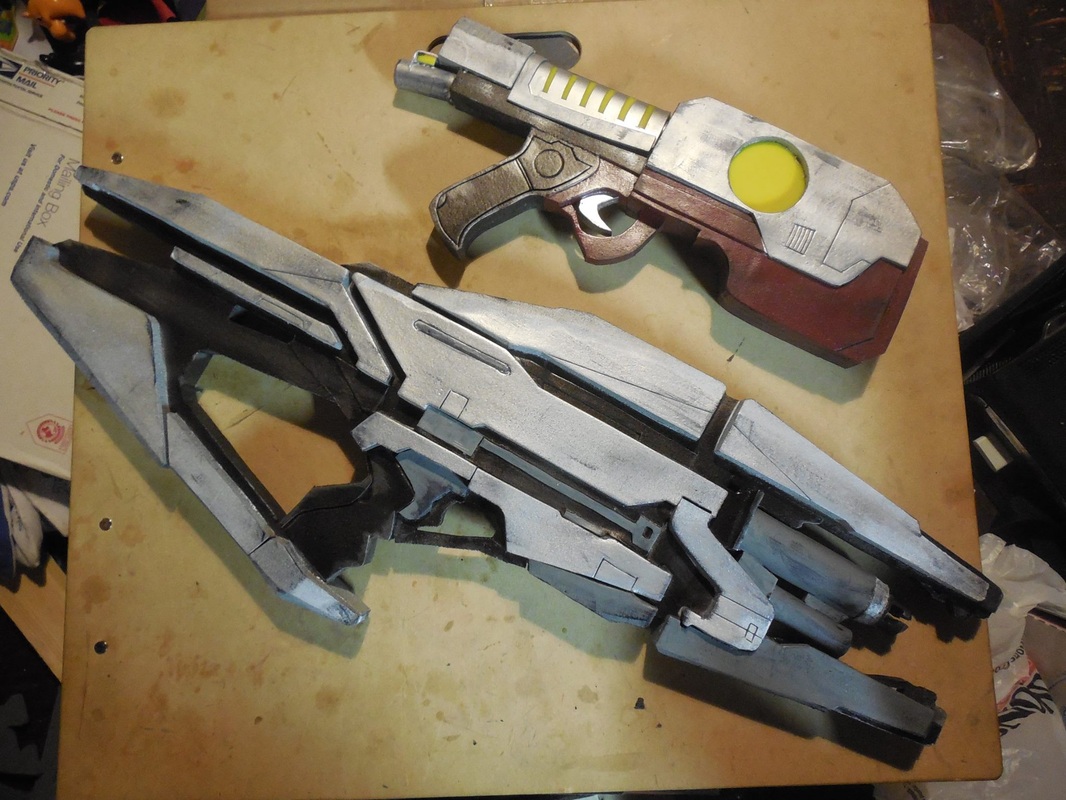 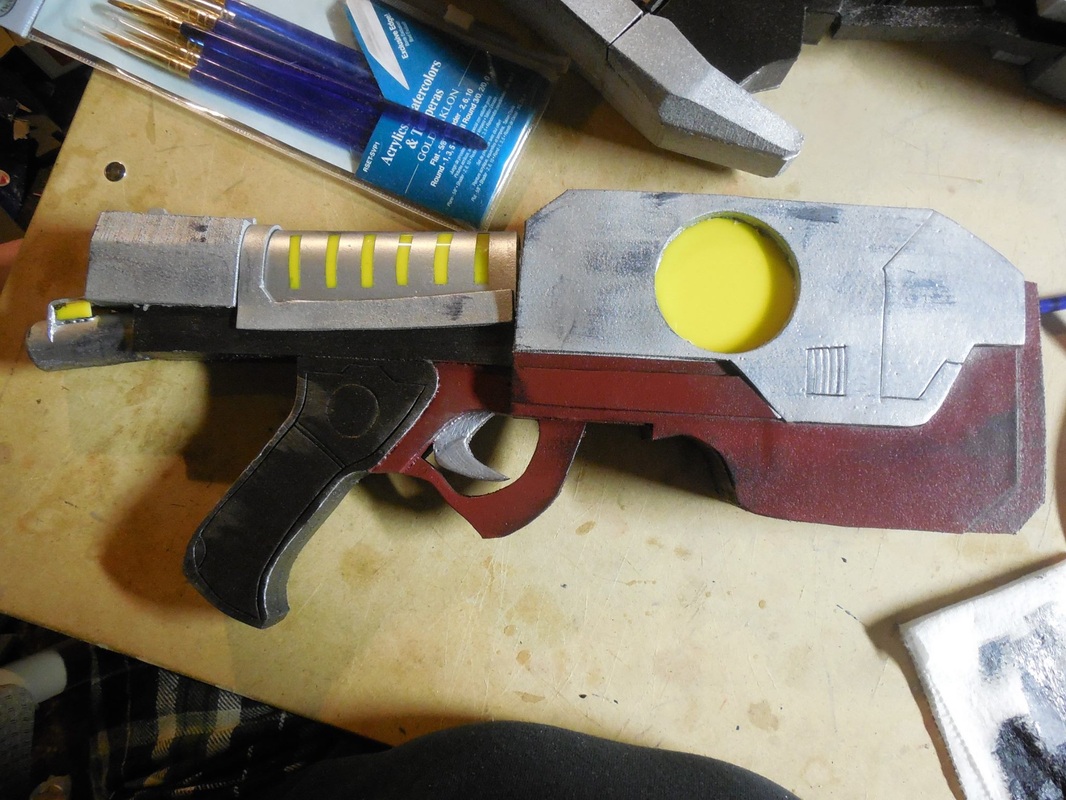 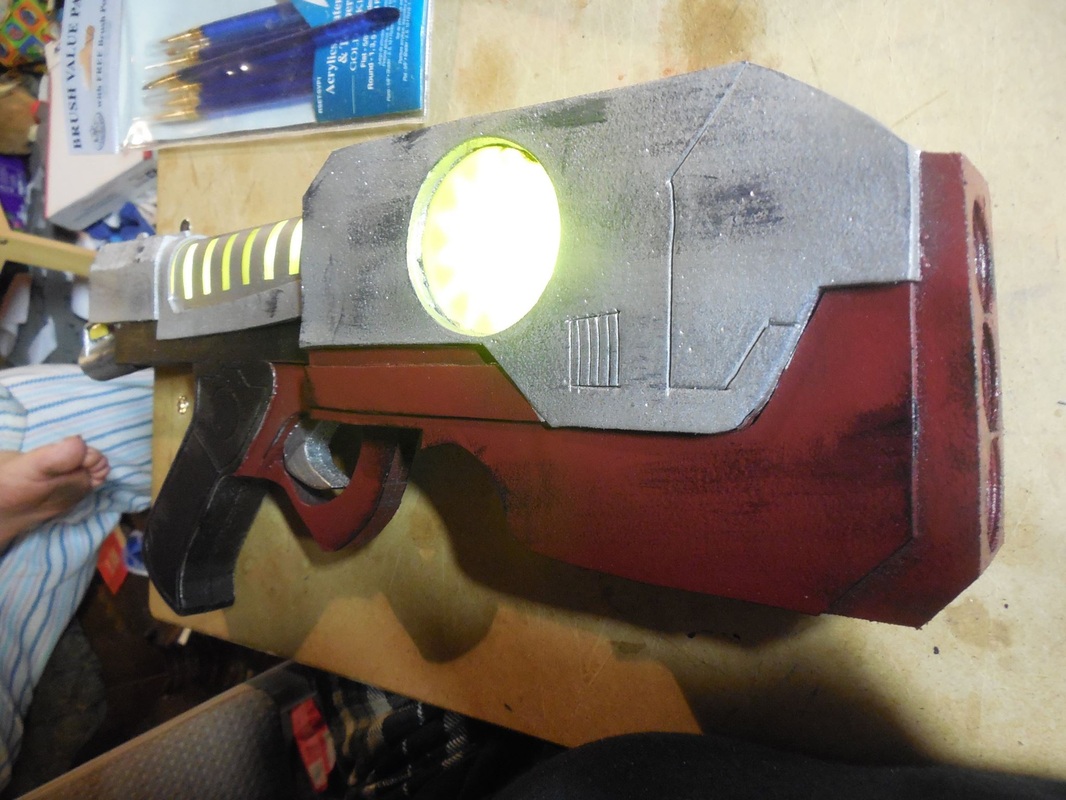 Acrylic wash and dry brushing, then a clear coat to seal it all in. Super stoked at how crazy cool this turned out, and it looks amazing even without the lights on. Big thanks to Beer Money Props for his suggestions which helped a ton, and to Viverra Cosplay who will share some amazing pictures of it once she's finished the costume (crossing fingers)!
|
|


 RSS Feed
